Owner's Manual
Page 19
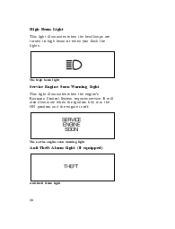
The high beam light Service Engine Soon Warning Light This light illuminates when the engine's Emission Control System requires service. It will also illuminate when the ignition key is in the ON position and the engine is off. The service engine soon warning light Anti-Theft Alarm Light (If equipped) Anti-theft alarm light 16 High Beam Light This light illuminates when the headlamps are turned to high beam or when you flash the lights.
The high beam light Service Engine Soon Warning Light This light illuminates when the engine's Emission Control System requires service. It will also illuminate when the ignition key is in the ON position and the engine is off. The service engine soon warning light Anti-Theft Alarm Light (If equipped) Anti-theft alarm light 16 High Beam Light This light illuminates when the headlamps are turned to high beam or when you flash the lights.
Owner's Manual
Page 69
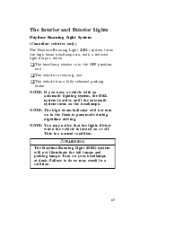
Turn on your headlamps at dusk. Failure to -pass mode during nighttime driving. NOTE: The high beam indicator will not illuminate the tail lamps and parking lamps. This is ... on or off. The Interior and Exterior Lights Daytime Running Light System (Canadian vehicles only) The Daytime Running Light (DRL) system turns the high beam headlamps on, with an automatic lighting system, the DRL system is active until the automatic system turns on the...
Turn on your headlamps at dusk. Failure to -pass mode during nighttime driving. NOTE: The high beam indicator will not illuminate the tail lamps and parking lamps. This is ... on or off. The Interior and Exterior Lights Daytime Running Light System (Canadian vehicles only) The Daytime Running Light (DRL) system turns the high beam headlamps on, with an automatic lighting system, the DRL system is active until the automatic system turns on the...

Owner's Manual
Page 70
... steering wheel. For more information about how the high beams work, see the high beam section later in this chapter. 68 To turn on the headlamps, parking lamps, side markers, license plate lamps and tail lamps, use the rotary control that controls the... headlamps and parking lamps (shown with autolamp feature - other models similar) To turn on the headlamps, parking lamps, license plate lamps, tail lamps and marker lamps, move the knob to the first position. Turning On the...
... steering wheel. For more information about how the high beams work, see the high beam section later in this chapter. 68 To turn on the headlamps, parking lamps, side markers, license plate lamps and tail lamps, use the rotary control that controls the... headlamps and parking lamps (shown with autolamp feature - other models similar) To turn on the headlamps, parking lamps, license plate lamps, tail lamps and marker lamps, move the knob to the first position. Turning On the...

Owner's Manual
Page 71
... for up to three minutes after you close the door, turn off automatically. The controls for headlamps on This chime sounds if the driver or any passenger door is open when the parking lamps or headlamps are on. You can use the autolamp to: u turn on the lamps automatically at night u turn...
... for up to three minutes after you close the door, turn off automatically. The controls for headlamps on This chime sounds if the driver or any passenger door is open when the parking lamps or headlamps are on. You can use the autolamp to: u turn on the lamps automatically at night u turn...

Owner's Manual
Page 72
... right of the MAX position (within the DELAY range). This photocell controls the autolamp. The autolamp automatically turns the lamps on and off for the headlamps is nighttime, and the lamps turn on after you turn your vehicle off . If you cover it, the photocell reacts as if it is ON... to three minutes after you turn your vehicle. You can set the autolamp: 1. The further you move the thumbwheel back to OFF. Make sure the headlamp control is located in the top right corner of the photocell that is in the OFF position. To set the autolamp so the lamps stay...
... right of the MAX position (within the DELAY range). This photocell controls the autolamp. The autolamp automatically turns the lamps on and off for the headlamps is nighttime, and the lamps turn on after you turn your vehicle off . If you cover it, the photocell reacts as if it is ON... to three minutes after you turn your vehicle. You can set the autolamp: 1. The further you move the thumbwheel back to OFF. Make sure the headlamp control is located in the top right corner of the photocell that is in the OFF position. To set the autolamp so the lamps stay...

Owner's Manual
Page 73
Turn thumbwheel fully upward to turn on the instrument panel and the interior light 71 The thumbwheel controls the light on interior lights. To do this, use the thumbwheel to brighten. This wheel also turns on the interior lights with the light control on or off. Turn the thumbwheel down to dim the instrument panel light and up to the left of the steering wheel. Lighting Up the Interior and Instrument Panel Manual operation With the light control in the parking lamps or the headlamps position, you can brighten or dim the lights in the instrument panel.
Turn thumbwheel fully upward to turn on the instrument panel and the interior light 71 The thumbwheel controls the light on interior lights. To do this, use the thumbwheel to brighten. This wheel also turns on the interior lights with the light control on or off. Turn the thumbwheel down to dim the instrument panel light and up to the left of the steering wheel. Lighting Up the Interior and Instrument Panel Manual operation With the light control in the parking lamps or the headlamps position, you can brighten or dim the lights in the instrument panel.
Owner's Manual
Page 77
... . 75 When the high beams are ON, the high beam indicator light on the instrument panel comes on the high beams, turn the headlamp control knob to the headlamp ON position and push the turn , move the lever far enough to signal but not to latch. The high beam indicator light turns...
... . 75 When the high beams are ON, the high beam indicator light on the instrument panel comes on the high beams, turn the headlamp control knob to the headlamp ON position and push the turn , move the lever far enough to signal but not to latch. The high beam indicator light turns...

Owner's Manual
Page 78
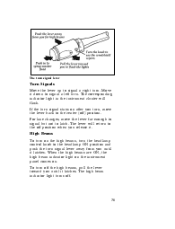
Flashing the Lights To flash the headlamps, pull the lever toward you can set to operate at varying intervals. Windshield Wipers and Washer To turn on the turn signal lever 76 For ... eighth detent is the LO position and the ninth detent is in heavier rain. To turn the knob toward you to activate the wipers. The headlamps will flash whether the headlamp knob is the HI position.
Flashing the Lights To flash the headlamps, pull the lever toward you can set to operate at varying intervals. Windshield Wipers and Washer To turn on the turn signal lever 76 For ... eighth detent is the LO position and the ninth detent is in heavier rain. To turn the knob toward you to activate the wipers. The headlamps will flash whether the headlamp knob is the HI position.
Owner's Manual
Page 146
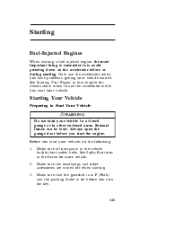
... Do not start your vehicle started. See Starting Your Engine in P (Park) and the parking brake is set before or during starting . Make sure the headlamps and other enclosed areas. Exhaust fumes can be toxic. Starting Fuel-Injected Engines When starting a fuel-injected engine, the most important thing to remember is...
... Do not start your vehicle started. See Starting Your Engine in P (Park) and the parking brake is set before or during starting . Make sure the headlamps and other enclosed areas. Exhaust fumes can be toxic. Starting Fuel-Injected Engines When starting a fuel-injected engine, the most important thing to remember is...

Owner's Manual
Page 243
Lights and Bulb Replacement It is a good idea to check the operation of the following lights frequently: u headlamps u tail lamps u brakelamps u hazard flasher u high-mount brakelamp u turn signals u license plate lamps The alignment of your headlamps should be checked if: u oncoming motorists frequently signal you to u the headlamps do not seem to give you enough light to see clearly at night turn off your vehicle's high beams when you do not have the high beams on u the headlamp beams are pointed substantially away from a position slightly down and to the right 243
Lights and Bulb Replacement It is a good idea to check the operation of the following lights frequently: u headlamps u tail lamps u brakelamps u hazard flasher u high-mount brakelamp u turn signals u license plate lamps The alignment of your headlamps should be checked if: u oncoming motorists frequently signal you to u the headlamps do not seem to give you enough light to see clearly at night turn off your vehicle's high beams when you do not have the high beams on u the headlamp beams are pointed substantially away from a position slightly down and to the right 243

Owner's Manual
Page 244
... bulbs. Do not remove the burned-out bulb unless you can immediately replace it with a new one. Headlamp Bulb The headlamps on your hand could cause the bulb to break the next time the headlamps are operated. Grasp the bulb only by its performance. If a bulb is removed for an extended period... of a headlamp 244 Parts of time, contaminants may enter the headlamp housing and affect its plastic base and do not touch the glass. When the lamp burns out, simply replace the bulb, rather than ...
... bulbs. Do not remove the burned-out bulb unless you can immediately replace it with a new one. Headlamp Bulb The headlamps on your hand could cause the bulb to break the next time the headlamps are operated. Grasp the bulb only by its performance. If a bulb is removed for an extended period... of a headlamp 244 Parts of time, contaminants may enter the headlamp housing and affect its plastic base and do not touch the glass. When the lamp burns out, simply replace the bulb, rather than ...

Owner's Manual
Page 245
Then slide the ring off the plastic base. When the grooves are aligned, push the bulb into the socket. If the headlamp was correctly aligned before you changed the bulb, you feel a "stop." Push the electrical connector into position. Remove the electrical connector from the socket. Keep ... ring by turning it 1/8 of the plastic base until it snaps, locking it from the bulb by rotating it clockwise until it again. 4. Turn the headlamps on and make sure that the headlamp switch is in place. Lock the ring into the socket by grasping the wire with the tabs in the...
Then slide the ring off the plastic base. When the grooves are aligned, push the bulb into the socket. If the headlamp was correctly aligned before you changed the bulb, you feel a "stop." Push the electrical connector into position. Remove the electrical connector from the socket. Keep ... ring by turning it 1/8 of the plastic base until it snaps, locking it from the bulb by rotating it clockwise until it again. 4. Turn the headlamps on and make sure that the headlamp switch is in place. Lock the ring into the socket by grasping the wire with the tabs in the...
Owner's Manual
Page 288
... . 225 296 Index B Backing up ...Basic vehicle warranty ...Battery ...acid, treating emergencies . . disarming a triggered system...triggering ...warning light ...Appeals (see Dispute settlement board) Assistance (see Headlamps) . . replacement, specifications . . Anti-theft lug nuts and key...Anti-theft system arming the system ...description ...disarming an untriggered system . .
... . 225 296 Index B Backing up ...Basic vehicle warranty ...Battery ...acid, treating emergencies . . disarming a triggered system...triggering ...warning light ...Appeals (see Dispute settlement board) Assistance (see Headlamps) . . replacement, specifications . . Anti-theft lug nuts and key...Anti-theft system arming the system ...description ...disarming an untriggered system . .
Owner's Manual
Page 290
Bulbs, replacing ...halogen ...headlamps ...high-mount brakelamp specifications ... ... ... ... ... ... ... ... ... 243 244 244 246 248 C Canada, customer assistance ...271 Canada, warranty information ...4 Canadian Motor Vehicle Arbitration Plan (CAMVAP) ...271 Capacities for ...
Bulbs, replacing ...halogen ...headlamps ...high-mount brakelamp specifications ... ... ... ... ... ... ... ... ... 243 244 244 246 248 C Canada, customer assistance ...271 Canada, warranty information ...4 Canadian Motor Vehicle Arbitration Plan (CAMVAP) ...271 Capacities for ...
Owner's Manual
Page 291
Cleaning your vehicle ...chrome and aluminum parts ...engine compartment ...exterior ...exterior lamps ...fabric ...headlamps ...instrument panel ...instrument panel lens ...interior ...interior lamps ...mirrors ...plastic parts ...polishing...rustproofing ...safety belts ...tail lamps ...upholstery and interior trim ...washing ...waxing ...wheels ...Climate ...
Cleaning your vehicle ...chrome and aluminum parts ...engine compartment ...exterior ...exterior lamps ...fabric ...headlamps ...instrument panel ...instrument panel lens ...interior ...interior lamps ...mirrors ...plastic parts ...polishing...rustproofing ...safety belts ...tail lamps ...upholstery and interior trim ...washing ...waxing ...wheels ...Climate ...

Owner's Manual
Page 297
H Hazard flashers ...Headlamps aiming ...autolamp system ...bulb specification ...checking alignment ...cleaning ...daytime running lights . semi-automatic system . High beams indicator light ...operation ...High-mount brakelamp . . description ...replacing the ...
H Hazard flashers ...Headlamps aiming ...autolamp system ...bulb specification ...checking alignment ...cleaning ...daytime running lights . semi-automatic system . High beams indicator light ...operation ...High-mount brakelamp . . description ...replacing the ...

Owner's Manual
Page 299
Lamps (continued) flashing the lamps ...hazard flashers ...headlamps ...high beams ...high-mount brakelamp ...illuminated entry system . . illuminated mirrors ...instrument panel, dimming . interior lamps ...replacing bulbs ...trailer ...Lane change indicator (see Turn Lap belts ......
Lamps (continued) flashing the lamps ...hazard flashers ...headlamps ...high beams ...high-mount brakelamp ...illuminated entry system . . illuminated mirrors ...instrument panel, dimming . interior lamps ...replacing bulbs ...trailer ...Lane change indicator (see Turn Lap belts ......
Scheduled Maintenance Guide 1st Printing
Page 33
Owner Maintenance Checks 33 u Check windshield washer spray and wiper operation. u Check headlamp alignment. nuts. u Check air pressure in spare tire. u Check the lap-shoulder belts for leaks or damage. At least twice a year: (i.e., every Spring and Fall) u Check radiator, heater and air-conditioning hoses for wear and function. u Check for worn tires and loose wheel lug u Check muffler, exhaust pipes, shields and clamps. u Check the power steering fluid level. Clean wiper blades with clean cloth dampened with washer fluid.
Owner Maintenance Checks 33 u Check windshield washer spray and wiper operation. u Check headlamp alignment. nuts. u Check air pressure in spare tire. u Check the lap-shoulder belts for leaks or damage. At least twice a year: (i.e., every Spring and Fall) u Check radiator, heater and air-conditioning hoses for wear and function. u Check for worn tires and loose wheel lug u Check muffler, exhaust pipes, shields and clamps. u Check the power steering fluid level. Clean wiper blades with clean cloth dampened with washer fluid.