Owner's Manual
Page 25
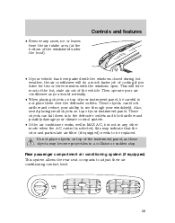
... works well in MAX A/C, but not in any snow, ice or leaves from the air intake area (at the bottom of the windshield under the hood). • If your vehicle has been parked with the windows open. Then operate your air conditioner as these objects may indicate that the odor and...
... works well in MAX A/C, but not in any snow, ice or leaves from the air intake area (at the bottom of the windshield under the hood). • If your vehicle has been parked with the windows open. Then operate your air conditioner as these objects may indicate that the odor and...
Owner's Manual
Page 105
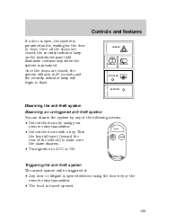
... (toward the PANIC LOCK rear of the following actions: • Unlock the doors by using the door key or the remote entry transmitter. • The hood is prearmed. Once all the doors are closed , the security indicator lamp on the instrument panel will be triggered if: • Any door or liftgate...
... (toward the PANIC LOCK rear of the following actions: • Unlock the doors by using the door key or the remote entry transmitter. • The hood is prearmed. Once all the doors are closed , the security indicator lamp on the instrument panel will be triggered if: • Any door or liftgate...
Owner's Manual
Page 185
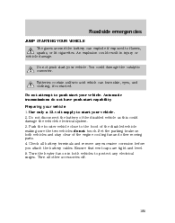
.... 185 Automatic transmissions do not touch. An explosion could damage the catalytic converter. Check all other moving parts. 4. Use only a 12-volt supply to the hood of the disabled vehicle as this could damage the vehicle's electrical system. 3. Roadside emergencies JUMP STARTING YOUR VEHICLE The gases around the battery can burn...
.... 185 Automatic transmissions do not touch. An explosion could damage the catalytic converter. Check all other moving parts. 4. Use only a 12-volt supply to the hood of the disabled vehicle as this could damage the vehicle's electrical system. 3. Roadside emergencies JUMP STARTING YOUR VEHICLE The gases around the battery can burn...
Owner's Manual
Page 192
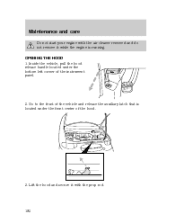
Go to the front of the vehicle and release the auxiliary latch that is running. Inside the vehicle, pull the hood release handle located under the front center of the instrument panel. 2. OPENING THE HOOD 1. Lift the hood and secure it with the air cleaner removed and do not remove it while the engine is located under the bottom left corner of the hood. 3. Maintenance and care Do not start your engine with the prop rod. 192
Go to the front of the vehicle and release the auxiliary latch that is running. Inside the vehicle, pull the hood release handle located under the front center of the instrument panel. 2. OPENING THE HOOD 1. Lift the hood and secure it with the air cleaner removed and do not remove it while the engine is located under the bottom left corner of the hood. 3. Maintenance and care Do not start your engine with the prop rod. 192
Owner's Manual
Page 194
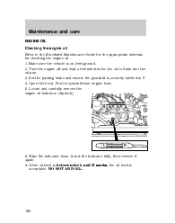
... the oil level is between the L and H marks, the oil level is securely latched in P. 4. Make sure the vehicle is on level ground. 2. Open the hood. L H 6. Turn the engine off and wait a few minutes for the oil to the Scheduled Maintenance Guide for the appropriate intervals for checking the engine oil...
... the oil level is between the L and H marks, the oil level is securely latched in P. 4. Make sure the vehicle is on level ground. 2. Open the hood. L H 6. Turn the engine off and wait a few minutes for the oil to the Scheduled Maintenance Guide for the appropriate intervals for checking the engine oil...
Owner's Manual
Page 209
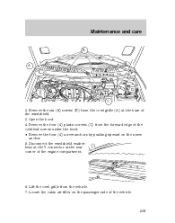
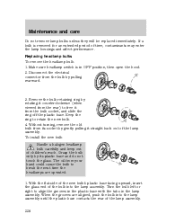
Lift the cowl grille from the forward edge of the vehicle. 209 Open the hood. 4. Remove the six (6) screws (B) from the cowl grille (A) at the rear corner of the windshield. 3. Maintenance and care B A C 2. Disconnect the windshield washer hose at the Y connector at the base of the engine compartment. 6. Remove the four (4) plastic screws (C) from the vehicle. 7. Locate the cabin air filter on the passenger side of the cowl leaf screen under the hood. • Remove the four (4) screw anchors by pushing upward on the screw anchor. 5.
Lift the cowl grille from the forward edge of the vehicle. 209 Open the hood. 4. Remove the six (6) screws (B) from the cowl grille (A) at the rear corner of the windshield. 3. Maintenance and care B A C 2. Disconnect the windshield washer hose at the Y connector at the base of the engine compartment. 6. Remove the four (4) plastic screws (C) from the vehicle. 7. Locate the cabin air filter on the passenger side of the cowl leaf screen under the hood. • Remove the four (4) screw anchors by pushing upward on the screw anchor. 5.
Owner's Manual
Page 211
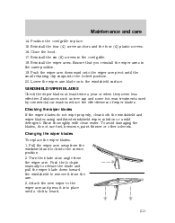
... both the windshield and wiper blades using undiluted windshield wiper solution or a mild detergent. Position the cowl grille in the same position. 19. Close the hood. 17. Rinse thoroughly with clean water. Push the wiper arm downward onto the wiper arm pivot until a click is heard. 211 WINDSHIELD WIPER BLADES Check...
... both the windshield and wiper blades using undiluted windshield wiper solution or a mild detergent. Position the cowl grille in the same position. 19. Close the hood. 17. Rinse thoroughly with clean water. Push the wiper arm downward onto the wiper arm pivot until a click is heard. 211 WINDSHIELD WIPER BLADES Check...
Owner's Manual
Page 226
... ring by gently pulling it from the rear) to align the grooves in the plastic base with the tabs in OFF position, then open the hood. 2. Grasp the bulb only by pulling rearward. 3. To install the new bulb: Handle a halogen headlamp bulb carefully and keep out of the lamp assembly. With...
... ring by gently pulling it from the rear) to align the grooves in the plastic base with the tabs in OFF position, then open the hood. 2. Grasp the bulb only by pulling rearward. 3. To install the new bulb: Handle a halogen headlamp bulb carefully and keep out of the lamp assembly. With...
Owner's Manual
Page 230
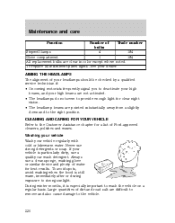
... clear in color except where noted. To replace all instrument panel lights - Washing your vehicle Wash your dealer. To avoid spots, avoid washing when the hood is still warm, immediately after or during exposure to wash the vehicle on a regular basis. Function 230 see your vehicle regularly with cold or lukewarm...
... clear in color except where noted. To replace all instrument panel lights - Washing your vehicle Wash your dealer. To avoid spots, avoid washing when the hood is still warm, immediately after or during exposure to wash the vehicle on a regular basis. Function 230 see your vehicle regularly with cold or lukewarm...
Owner's Manual
Page 236
...-AB Ford specification ESA-M6C25-A and DOT 3 Door weatherstrips Engine coolant Engine oil Motorcraft SAE 5W-30 Super Premium Motor Oil Door latch, hood Multi-Purpose Grease latch,auxiliary hood latch, door and liftgate hinges, striker plates, seat tracks, fuel filler door hinge. Lock cylinders Penetrating and Lock Lubricant Power steering Motorcraft...
...-AB Ford specification ESA-M6C25-A and DOT 3 Door weatherstrips Engine coolant Engine oil Motorcraft SAE 5W-30 Super Premium Motor Oil Door latch, hood Multi-Purpose Grease latch,auxiliary hood latch, door and liftgate hinges, striker plates, seat tracks, fuel filler door hinge. Lock cylinders Penetrating and Lock Lubricant Power steering Motorcraft...
Owner's Manual
Page 251
... Bed mats Bedliners Car/truck covers Cargo liners, interior Carpet floor mats Cleaners, waxes and polishes Flat splash guards Front end covers (full and mini) Hood deflectors Locking gas cap Lubricants and oils Molded splash guards Molded vinyl floor mats Rallye bars Rear air deflectors Rear decklid spoilers Side window air...
... Bed mats Bedliners Car/truck covers Cargo liners, interior Carpet floor mats Cleaners, waxes and polishes Flat splash guards Front end covers (full and mini) Hood deflectors Locking gas cap Lubricants and oils Molded splash guards Molded vinyl floor mats Rallye bars Rear air deflectors Rear decklid spoilers Side window air...
Owner's Manual
Page 257
... lights ...19 flash to pass ...20 high beam ...7,20 turning on and off ...19 warning chime ...11 Heating ...21 heating and air conditioning system ...21 Hood ...192 Ignition ...237,238 positions of the ignition ...81 Infant seats (see Safety seats) 137 Inspection/maintenance (I/M) testing ...224 Instrument panel cleaning ...233 cluster ...6 lighting...
... lights ...19 flash to pass ...20 high beam ...7,20 turning on and off ...19 warning chime ...11 Heating ...21 heating and air conditioning system ...21 Hood ...192 Ignition ...237,238 positions of the ignition ...81 Infant seats (see Safety seats) 137 Inspection/maintenance (I/M) testing ...224 Instrument panel cleaning ...233 cluster ...6 lighting...
Owner's Manual
Page 264
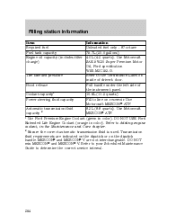
... Unleaded fuel only - 87 octane Fuel tank capacity 75.7L (20.0 gallons) Engine oil capacity (includes filter 4.0L (4.2 quarts). DO NOT mix MERCON and MERCON V. Hood release Pull handle under the left side of driver's door. Refer to line on the dipstick handle. Transmission fluid requirements are not interchangeable.
... Unleaded fuel only - 87 octane Fuel tank capacity 75.7L (20.0 gallons) Engine oil capacity (includes filter 4.0L (4.2 quarts). DO NOT mix MERCON and MERCON V. Hood release Pull handle under the left side of driver's door. Refer to line on the dipstick handle. Transmission fluid requirements are not interchangeable.
Owner Guide 1st Printing
Page 65
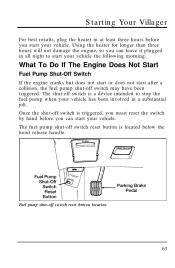
Once the shut-off switch may have been triggered. Starting Your Villager For best results, plug the heater in at least three hours before you can leave it plugged in a substantial jolt. What To Do If The ... button location 63 Fuel pump shut-off switch is a device intended to start after a collision, the fuel pump shut-off switch is located below the hood release handle.
Once the shut-off switch may have been triggered. Starting Your Villager For best results, plug the heater in at least three hours before you can leave it plugged in a substantial jolt. What To Do If The ... button location 63 Fuel pump shut-off switch is a device intended to start after a collision, the fuel pump shut-off switch is located below the hood release handle.

Owner Guide 1st Printing
Page 148
... using the door key, the keyless entry keypad (if equipped), or the remote keyless entry transmitter (if equipped) s the liftgate is opened or unlocked s the hood is opened 150 If the system is designed to lock the doors. When you remain in the lock. If you to open the door to...
... using the door key, the keyless entry keypad (if equipped), or the remote keyless entry transmitter (if equipped) s the liftgate is opened or unlocked s the hood is opened 150 If the system is designed to lock the doors. When you remain in the lock. If you to open the door to...

Owner Guide 1st Printing
Page 252
... in series or a 24-volt generator set). 2. Check all other . Turn off all battery terminals and remove any excessive corrosion before you need to the hood of the disabled vehicle. RWARNING Batteries contain sulfuric acid which burns skin, eyes, and clothing.
... in series or a 24-volt generator set). 2. Check all other . Turn off all battery terminals and remove any excessive corrosion before you need to the hood of the disabled vehicle. RWARNING Batteries contain sulfuric acid which burns skin, eyes, and clothing.

Owner Guide 1st Printing
Page 284
... those rules and should comply with the FCC's requirements, RF devices must not be installed only by Ford Motor Company. 289 Accessories Travel Equipment Aero Hood Deflector Bike Rack Adaptor (Attaches to Base Roof Rack) Four Season Base Roof Rack Multi Sport Removable Rack Multi Sport Bike Adaptor Multi Sport Ski...
... those rules and should comply with the FCC's requirements, RF devices must not be installed only by Ford Motor Company. 289 Accessories Travel Equipment Aero Hood Deflector Bike Rack Adaptor (Attaches to Base Roof Rack) Four Season Base Roof Rack Multi Sport Removable Rack Multi Sport Bike Adaptor Multi Sport Ski...

Owner Guide 1st Printing
Page 291
Servicing Your Villager If you plan to work under the hood while the engine is on: Set the parking brake fully and make sure the gearshift is securely latched in P (Park). WARNING Always remove the key ... is running. This will prevent your vehicle from moving parts. WARNING Do not start your vehicle from the ignition after you must work under the hood while the engine is off the engine. Take appropriate precautions with the air cleaner removed and do not remove it while the engine is securely...
Servicing Your Villager If you plan to work under the hood while the engine is on: Set the parking brake fully and make sure the gearshift is securely latched in P (Park). WARNING Always remove the key ... is running. This will prevent your vehicle from moving parts. WARNING Do not start your vehicle from the ignition after you must work under the hood while the engine is off the engine. Take appropriate precautions with the air cleaner removed and do not remove it while the engine is securely...
Owner Guide 1st Printing
Page 292
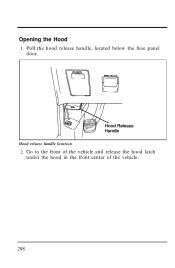
Go to the front of the vehicle and release the hood latch under the hood in the front center of the vehicle. 298 Hood release handle location 2. Pull the hood release handle, located below the fuse panel door. Opening the Hood 1.
Go to the front of the vehicle and release the hood latch under the hood in the front center of the vehicle. 298 Hood release handle location 2. Pull the hood release handle, located below the fuse panel door. Opening the Hood 1.

Owner Guide 1st Printing
Page 293
The hood latch and prop rod 299 Lift the hood and release the prop rod from its retaining clip. Servicing Your Villager 3. Place the end of the prop rod in the prop rod hole provided on the underside of the hood.
The hood latch and prop rod 299 Lift the hood and release the prop rod from its retaining clip. Servicing Your Villager 3. Place the end of the prop rod in the prop rod hole provided on the underside of the hood.
