

Owner's Manual
Page 6
... or by three types of the book and search in the alphabetical listing for keeping your vehicle in good condition. The Quick Index at the end of Canada, Limited, Service Publications, P.O. Canadian Owners - French Version French Owner Guides can be found. About the Warranties Your vehicle is covered by writing to...
... or by three types of the book and search in the alphabetical listing for keeping your vehicle in good condition. The Quick Index at the end of Canada, Limited, Service Publications, P.O. Canadian Owners - French Version French Owner Guides can be found. About the Warranties Your vehicle is covered by writing to...
Owner's Manual
Page 18
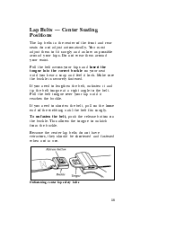
... at a right angle to fit snugly and as low as possible around your hips and insert the tongue into the correct buckle on the loose end of the front and rear seats do not have retractors, they should be shortened and fastened when not in the center of the webbing until...
... at a right angle to fit snugly and as low as possible around your hips and insert the tongue into the correct buckle on the loose end of the front and rear seats do not have retractors, they should be shortened and fastened when not in the center of the webbing until...
Owner's Manual
Page 19
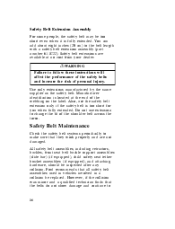
... from your dealer. Safety Belt Maintenance Check the safety belt systems periodically to 16 Ford recommends that they work properly and are available at the end of personal injury. However, if the collision was minor and a qualified technician finds that the belts do not show damage and continue to make sure...
... from your dealer. Safety Belt Maintenance Check the safety belt systems periodically to 16 Ford recommends that they work properly and are available at the end of personal injury. However, if the collision was minor and a qualified technician finds that the belts do not show damage and continue to make sure...

Owner's Manual
Page 38
..., the child should always wear safety belts. (See instructions with your child seat, or contact its manufacturer, to the buckle by pulling on the loose end of serious injury to the child in a collision will safely fit in a different position. 5. 6.
..., the child should always wear safety belts. (See instructions with your child seat, or contact its manufacturer, to the buckle by pulling on the loose end of serious injury to the child in a collision will safely fit in a different position. 5. 6.
Owner's Manual
Page 63
... advance to 999.9 miles (kilometers), use the trip odometer. If the battery is operating under cold weather conditions, the pointer may move toward the lower end of miles (kilometers) your vehicle has been driven. If it stays outside the NORMAL band, have your vehicle is off, or idling at the same...
... advance to 999.9 miles (kilometers), use the trip odometer. If the battery is operating under cold weather conditions, the pointer may move toward the lower end of miles (kilometers) your vehicle has been driven. If it stays outside the NORMAL band, have your vehicle is off, or idling at the same...
Owner's Manual
Page 92
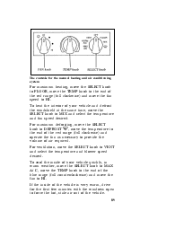
... warm, drive for the manual heating and air conditioning system For maximum heating, move the SELECT knob to FLOOR, move the TEMP knob to the end of the red range (full clockwise) and move the fan to HI. The controls for the first few minutes with the windows open to force... vehicle. 89 To heat the interior of your vehicle quickly, in warm weather, move the SELECT knob to MAX A/C, move the TEMP knob to the end of the blue range (full counterclockwise) and move the fan speed to provide the volume of the red range (full clockwise) and operate the fan...
... warm, drive for the manual heating and air conditioning system For maximum heating, move the SELECT knob to FLOOR, move the TEMP knob to the end of the red range (full clockwise) and move the fan to HI. The controls for the first few minutes with the windows open to force... vehicle. 89 To heat the interior of your vehicle quickly, in warm weather, move the SELECT knob to MAX A/C, move the TEMP knob to the end of the blue range (full counterclockwise) and move the fan speed to provide the volume of the red range (full clockwise) and operate the fan...

Owner's Manual
Page 93
.... The instrument panel registers may be adjusted to your vehicle using outside air, move the SELECT knob to NORM A/C, move the TEMP knob to the end of the instrument panel and operates only when the key is not as economical as MAX A/C. The thumbwheel controls the volume of air and the...
.... The instrument panel registers may be adjusted to your vehicle using outside air, move the SELECT knob to NORM A/C, move the TEMP knob to the end of the instrument panel and operates only when the key is not as economical as MAX A/C. The thumbwheel controls the volume of air and the...

Owner's Manual
Page 116
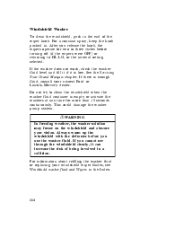
... less often when it drizzles or more often in heavier rain. For example, you can set to operate at the desired interval. 113 Rotate the end of the turn the knob toward or away from you to activate the wipers. The variable interval wiper on the windshield wipers, the ignition key... to the OFF position. Windshield Wipers and Washer To turn on the turn signal lever To set the interval wipers, turn the knob at the end of the lever away from you until the wipers are interval wipe positions, the eighth detent is the LO position and the ninth detent is...
... less often when it drizzles or more often in heavier rain. For example, you can set to operate at the desired interval. 113 Rotate the end of the turn the knob toward or away from you to activate the wipers. The variable interval wiper on the windshield wipers, the ignition key... to the OFF position. Windshield Wipers and Washer To turn on the turn signal lever To set the interval wipers, turn the knob at the end of the lever away from you until the wipers are interval wipe positions, the eighth detent is the LO position and the ninth detent is...
Owner's Manual
Page 117
... constant spray, keep the knob pushed in the Index. 114 See the Servicing Your Grand Marquis chapter. Do not try to HI, LO, or the interval setting selected. This ...RWARNING In freezing weather, the washer solution may freeze on the windshield and obscure your nearest Ford or Lincoln-Mercury dealer. If the washer does not work, check the washer fluid level and fill it if it can... increase the risk of being involved in the end of the wiper knob. Windshield Washer To clean the windshield, push in a collision. If you use the washer...
... constant spray, keep the knob pushed in the Index. 114 See the Servicing Your Grand Marquis chapter. Do not try to HI, LO, or the interval setting selected. This ...RWARNING In freezing weather, the washer solution may freeze on the windshield and obscure your nearest Ford or Lincoln-Mercury dealer. If the washer does not work, check the washer fluid level and fill it if it can... increase the risk of being involved in the end of the wiper knob. Windshield Washer To clean the windshield, push in a collision. If you use the washer...

Owner's Manual
Page 158
... "REW" button will play while the tape is rewinding. The radio will automatically begin playing while the tape is in the rewind mode. At the end of the tape, the direction automatically reverses and plays the other side of the tape. Push the left b side to stop rewinding. Press "FF" again...
... "REW" button will play while the tape is rewinding. The radio will automatically begin playing while the tape is in the rewind mode. At the end of the tape, the direction automatically reverses and plays the other side of the tape. Push the left b side to stop rewinding. Press "FF" again...
Owner's Manual
Page 167
... the forward scan mode on the tape currently playing, stopping on each . You can use the fast forward, rewind, "SEEK", or "SCAN" function. At the end of the tape, the direction automatically reverses and plays the other side of the "SEEK" button to seek forward to the next selection on the... To rewind the tape, press the "REW" button. The radio will begin playing until rewind is manually stopped (by pushing the "TAPE" button) or the end of the tape is reached. u Fast forwarding the tape To fast forward the tape, press the "FF" button. Push the left (b) side to seek the...
... the forward scan mode on the tape currently playing, stopping on each . You can use the fast forward, rewind, "SEEK", or "SCAN" function. At the end of the tape, the direction automatically reverses and plays the other side of the "SEEK" button to seek forward to the next selection on the... To rewind the tape, press the "REW" button. The radio will begin playing until rewind is manually stopped (by pushing the "TAPE" button) or the end of the tape is reached. u Fast forwarding the tape To fast forward the tape, press the "FF" button. Push the left (b) side to seek the...
Owner's Manual
Page 177
This switch may be used to the transmission. Driving Your vehicle's gearshift is located on the end of the several positions. The Transmission Control Switch (TCS) is on the instrument panel. If this O/D OFF is located on the steering column. Each time ...
This switch may be used to the transmission. Driving Your vehicle's gearshift is located on the end of the several positions. The Transmission Control Switch (TCS) is on the instrument panel. If this O/D OFF is located on the steering column. Each time ...

Owner's Manual
Page 198
... your vehicle. RWARNING The gases around the battery can breathe fresh air. RWARNING To protect yourself when charging a battery, always shield your hands on the ends when lifting a battery could result in injury or vehicle damage. RWARNING Applying too much pressure on the opposite corners. Lift the battery with a carrier or...
... your vehicle. RWARNING The gases around the battery can breathe fresh air. RWARNING To protect yourself when charging a battery, always shield your hands on the ends when lifting a battery could result in injury or vehicle damage. RWARNING Applying too much pressure on the opposite corners. Lift the battery with a carrier or...
Owner's Manual
Page 200
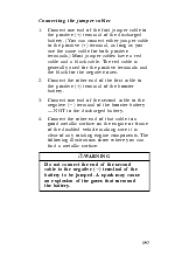
... you can connect either jumper cable to the negative ( ) terminal of that surround the battery. 2. 3. 4. 197 Connecting the jumper cables 1. RWARNING Do not connect the end of the second cable to the positive (+) terminal, as long as you use the same cable for the negative ones. Connect one.... The red cable is clear of the booster battery. A spark may cause an explosion of the gases that cable to be jumped. Connect the other end of the battery to a good metallic surface on the engine or frame of the disabled vehicle making sure it is generally used for the positive...
... you can connect either jumper cable to the negative ( ) terminal of that surround the battery. 2. 3. 4. 197 Connecting the jumper cables 1. RWARNING Do not connect the end of the second cable to the positive (+) terminal, as long as you use the same cable for the negative ones. Connect one.... The red cable is clear of the booster battery. A spark may cause an explosion of the gases that cable to be jumped. Connect the other end of the battery to a good metallic surface on the engine or frame of the disabled vehicle making sure it is generally used for the positive...

Owner's Manual
Page 202
...If the vehicle does not start after several attempts, there may need to use a battery charger to charge the discharged battery. Remove the negative ( ) end of the jumper cable from the discharged battery. 2. 3. Remove the negative ( ) cable from the booster battery. Removing jumper cables 1. 2. 3. 4. ...battery charge for a while with all electrical accessories turned off to let the engine "relearn" its idle conditions. Remove the other end of tries before the vehicle starts. Drive it idle for a few minutes and then start the booster vehicle. Remove the positive...
...If the vehicle does not start after several attempts, there may need to use a battery charger to charge the discharged battery. Remove the negative ( ) end of the jumper cable from the discharged battery. 2. 3. Remove the negative ( ) cable from the booster battery. Removing jumper cables 1. 2. 3. 4. ...battery charge for a while with all electrical accessories turned off to let the engine "relearn" its idle conditions. Remove the other end of tries before the vehicle starts. Drive it idle for a few minutes and then start the booster vehicle. Remove the positive...

Owner's Manual
Page 206
... switch (if equipped) prior to jacking, hoisting or towing your vehicle will not move or roll. Make sure that is diagonally opposite (other side and end of the back wheels is off the jack, you or someone else could be sure the parking brake is in P (Park). To prevent the vehicle...
... switch (if equipped) prior to jacking, hoisting or towing your vehicle will not move or roll. Make sure that is diagonally opposite (other side and end of the back wheels is off the jack, you or someone else could be sure the parking brake is in P (Park). To prevent the vehicle...

Owner's Manual
Page 207
... the engine with one -half turn OFF the Air Suspension switch prior to loosen wheel lug nuts. 4. 204 RWARNING On vehicles equipped with the tapered end of the wrench and twist it against the inner wheel cover flange. For more about removing wheel covers, see the information later in this section...
... the engine with one -half turn OFF the Air Suspension switch prior to loosen wheel lug nuts. 4. 204 RWARNING On vehicles equipped with the tapered end of the wrench and twist it against the inner wheel cover flange. For more about removing wheel covers, see the information later in this section...

Owner's Manual
Page 211
... The center wheel ornament Remove the center ornament from the wheel with the hub/rotor assembly. 8. 9. Make sure the jack is flush with the tapered end of the black dust shield When installing the regular tire, reinstall the black dust shield by inserting it does not rattle when you drive. 10...
... The center wheel ornament Remove the center ornament from the wheel with the hub/rotor assembly. 8. 9. Make sure the jack is flush with the tapered end of the black dust shield When installing the regular tire, reinstall the black dust shield by inserting it does not rattle when you drive. 10...

Owner's Manual
Page 212
... or a rubber mallet. Install the center ornament on the wheel and be sure it is snapped into place all the way around using the flanged end of the wheel nut wrench by inserting the handle and then prying against the inner wheelcover flange.
... or a rubber mallet. Install the center ornament on the wheel and be sure it is snapped into place all the way around using the flanged end of the wheel nut wrench by inserting the handle and then prying against the inner wheelcover flange.

Owner's Manual
Page 267
... tires must be aware of the following: u Make sure the chains are the right size for your tires. u Put the chains on tightly with the ends held down securely. Verify that provide traction in some climates, you may damage your vehicle. u Remove tire chains at the first opportunity after using them...
... tires must be aware of the following: u Make sure the chains are the right size for your tires. u Put the chains on tightly with the ends held down securely. Verify that provide traction in some climates, you may damage your vehicle. u Remove tire chains at the first opportunity after using them...


