
Owner's Manual
Page 7
... Practical hints ...What to do if ... ...Lamps in instrument cluster ...Lamp in center console...Messages in the display ...Where will I find ...? ...First aid kit...Vehicle tool kit ...Spare wheel ...Unlocking/locking in trunk...313 Technical data ...315 Spare parts service ...316 Warranty coverage ...317 Loss of Service and Warranty Information Booklet...
... Practical hints ...What to do if ... ...Lamps in instrument cluster ...Lamp in center console...Messages in the display ...Where will I find ...? ...First aid kit...Vehicle tool kit ...Spare wheel ...Unlocking/locking in trunk...313 Technical data ...315 Spare parts service ...316 Warranty coverage ...317 Loss of Service and Warranty Information Booklet...
Owner's Manual
Page 279
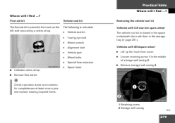
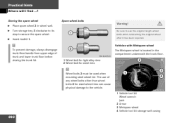
...and replace missing/expired items. 1 Retaining screw 2 Storage well casing 279 Remove first aid kit. Vehicles with full size tire spare wheel The vehicle tool kit is stored in the space underneath the trunk floor in the storage tray ( page 281). Loosen retaining screw 1 in the trunk on the ...left side secured by a velcro strap. Practical hints Where will I find ...? Vehicle tool kit The following is stored in the middle of storage well casing 2. Spare fuses Removing the vehicle tool kit Vehicles with Minispare wheel Lift up the trunk floor cover. First aid kit The first ...
...and replace missing/expired items. 1 Retaining screw 2 Storage well casing 279 Remove first aid kit. Vehicles with full size tire spare wheel The vehicle tool kit is stored in the space underneath the trunk floor in the storage tray ( page 281). Loosen retaining screw 1 in the trunk on the ...left side secured by a velcro strap. Practical hints Where will I find ...? Vehicle tool kit The following is stored in the middle of storage well casing 2. Spare fuses Removing the vehicle tool kit Vehicles with Minispare wheel Lift up the trunk floor cover. First aid kit The first ...
Owner's Manual
Page 280
... vehicle during a wheel change. Vehicles with Minispare wheel The vehicle jack is stored in the space underneath the trunk floor together with the vehicle tool kit in the direction of the vehicle. Otherwise you cannot place the storage well casing on level surface. To help avoid personal injury, use ...at the jack take -up brackets built into both sides of travel. The vehicle jack is always vertical (plumb line) when in the vehicle tool kit storage well casing ( page 279). Storage position Remove the vehicle jack from the area under the vehicle. Always lower the vehicle onto ...
... vehicle during a wheel change. Vehicles with Minispare wheel The vehicle jack is stored in the space underneath the trunk floor together with the vehicle tool kit in the direction of the vehicle. Otherwise you cannot place the storage well casing on level surface. To help avoid personal injury, use ...at the jack take -up brackets built into both sides of travel. The vehicle jack is always vertical (plumb line) when in the vehicle tool kit storage well casing ( page 279). Storage position Remove the vehicle jack from the area under the vehicle. Always lower the vehicle onto ...
Owner's Manual
Page 281
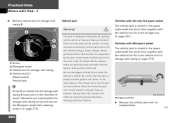
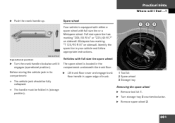
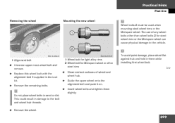
Identify the spare tire in upper edge of trunk. 1 Tool kit 2 Spare wheel 3 Storage tray Removing the spare wheel Remove tool kit 1. Operational position Vehicles with full size tire spare wheel The spare wheel is equipped with either a spare wheel with full size tire or a Minispare ...
Identify the spare tire in upper edge of trunk. 1 Tool kit 2 Spare wheel 3 Storage tray Removing the spare wheel Remove tool kit 1. Operational position Vehicles with full size tire spare wheel The spare wheel is equipped with either a spare wheel with full size tire or a Minispare ...
Owner's Manual
Page 282
... rims can cause physical damage to secure the spare wheel. Turn storage tray 3 clockwise to its stop to the vehicle. 1 Vehicle tool kit Wheel wrench Jack 2 Arrow 3 Minispare wheel 4 Vehicle tool kit storage well casing 282 Vehicles with Minispare wheel The Minispare wheel is located in wheel well. G Be sure to use...
... rims can cause physical damage to secure the spare wheel. Turn storage tray 3 clockwise to its stop to the vehicle. 1 Vehicle tool kit Wheel wrench Jack 2 Arrow 3 Minispare wheel 4 Vehicle tool kit storage well casing 282 Vehicles with Minispare wheel The Minispare wheel is located in wheel well. G Be sure to use...

Owner's Manual
Page 283
...wheel are different from upper edge of storage well casing. To prevent damage, always disengage trunk floor handle from those of travel . Remove vehicle tool kit storage well casing 4. Storing the Minispare wheel Place Minispare wheel 3 in the direction of travel , otherwise you cannot place the storage ...well casing ( page 279) on vehicle tool kit storage well casing 4 must point in the direction of the road wheels. G i The arrow 2 on top and secure the Minispare wheel ...
...wheel are different from upper edge of storage well casing. To prevent damage, always disengage trunk floor handle from those of travel . Remove vehicle tool kit storage well casing 4. Storing the Minispare wheel Place Minispare wheel 3 in the direction of travel , otherwise you cannot place the storage ...well casing ( page 279) on vehicle tool kit storage well casing 4 must point in the direction of the road wheels. G i The arrow 2 on top and secure the Minispare wheel ...
Owner's Manual
Page 288
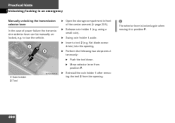
Swing coin holder 1 aside. Insert a tool 2 (e.g. Perform the following two steps simultaneously: Push the tool down. to position P. 288 Release coin holder 1 (e.g. i The selector lever is locked again when moving it to tow the vehicle. flat blade screwdriver) into the ... Manually unlocking the transmission selector lever In the case of the center armrest ( page 205). using a small coin). Move selector lever from position P. 1 Coin holder 2 Tool Reinstall the coin holder 1 after removing the...
Swing coin holder 1 aside. Insert a tool 2 (e.g. Perform the following two steps simultaneously: Push the tool down. to position P. 288 Release coin holder 1 (e.g. i The selector lever is locked again when moving it to tow the vehicle. flat blade screwdriver) into the ... Manually unlocking the transmission selector lever In the case of the center armrest ( page 205). using a small coin). Move selector lever from position P. 1 Coin holder 2 Tool Reinstall the coin holder 1 after removing the...
Owner's Manual
Page 299
... of wheel and wheel hub. Replace this wheel bolt with the alignment bolt 1 supplied in sand or dirt. Do not place wheel bolts in the tool kit. Wheel bolts 2 must be used when mounting steel wheel rims or the Minispare wheel. Remove the wheel. 299 Insert wheel bolts and tighten them...
... of wheel and wheel hub. Replace this wheel bolt with the alignment bolt 1 supplied in sand or dirt. Do not place wheel bolts in the tool kit. Wheel bolts 2 must be used when mounting steel wheel rims or the Minispare wheel. Remove the wheel. 299 Insert wheel bolts and tighten them...
Owner's Manual
Page 311
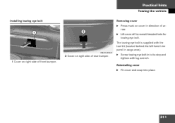
Reinstalling cover Fit cover and snap into place. 311 The towing eye bolt is supplied with lug wrench. Screw towing eye bolt in to reveal threaded hole for towing eye bolt. Lift cover off to its stop and tighten with the tool kit (located behind the left hand trim panel in direction of front bumper. Practical hints Towing the vehicle Installing towing eye bolt Removing cover Press mark on cover in cargo area). 2 Cover on right side of rear bumper. 1 Cover on right side of arrow.
Reinstalling cover Fit cover and snap into place. 311 The towing eye bolt is supplied with lug wrench. Screw towing eye bolt in to reveal threaded hole for towing eye bolt. Lift cover off to its stop and tighten with the tool kit (located behind the left hand trim panel in direction of front bumper. Practical hints Towing the vehicle Installing towing eye bolt Removing cover Press mark on cover in cargo area). 2 Cover on right side of rear bumper. 1 Cover on right side of arrow.

Owner's Manual
Page 312
.... Closing Attach the cover 1 in passenger compartment Opening Pull cover 1 open with a screw driver or similar tool. Slide out retainer 3 and remove cover by an authorized Mercedes-Benz Center. Fold the cover 1 in reverse order. 1 Cover 312 Have the cause determined and remedied by...cover 2. Install cover 2 in until it engages. Practical hints Fuses Fuses i Only install fuses that have been tested and approved by Mercedes-Benz and that have the specified amperage rating. Remove cover 1 rearward. Fuse chart The fuse chart is located in the passenger compartment....
.... Closing Attach the cover 1 in passenger compartment Opening Pull cover 1 open with a screw driver or similar tool. Slide out retainer 3 and remove cover by an authorized Mercedes-Benz Center. Fold the cover 1 in reverse order. 1 Cover 312 Have the cause determined and remedied by...cover 2. Install cover 2 in until it engages. Practical hints Fuses Fuses i Only install fuses that have been tested and approved by Mercedes-Benz and that have the specified amperage rating. Remove cover 1 rearward. Fuse chart The fuse chart is located in the passenger compartment....

Owner's Manual
Page 313
Remove cover 2. 1 Trim panel 2 Cover of auxiliary fuse box 3 Special fuse extractor 313 Closing fuse box Ensure that the sealing rubber is located in the spare wheel well. 4 Fuse box cover 5 Clamps Release clamps 5. Spare fuses Spare fuses are found in the vehicle tool kit in the trunk. Press the cover 4 down and secure with clamps 5. Remove cover 4. Practical hints Fuses Opening fuse box Auxiliary fuse box in trunk The auxiliary fuse box is properly positioned. Opening Pull away trim panel 1.
Remove cover 2. 1 Trim panel 2 Cover of auxiliary fuse box 3 Special fuse extractor 313 Closing fuse box Ensure that the sealing rubber is located in the spare wheel well. 4 Fuse box cover 5 Clamps Release clamps 5. Spare fuses Spare fuses are found in the vehicle tool kit in the trunk. Press the cover 4 down and secure with clamps 5. Remove cover 4. Practical hints Fuses Opening fuse box Auxiliary fuse box in trunk The auxiliary fuse box is properly positioned. Opening Pull away trim panel 1.
Owner's Manual
Page 348
... Side impact 61 Window curtain 61 Alarm Audible 72, 80 Canceling 80 Visual 79 Alarm system Anti-theft 79 Tow-away 80 Alignment bolt (vehicle tool kit) 299, 341 Anticorrosion/antifreeze 337 Antiglare Automatic* 144 Manual 144 Antilock brake system (ABS) 341 Anti-theft alarm system Arming 79 Canceling alarm 80...
... Side impact 61 Window curtain 61 Alarm Audible 72, 80 Canceling 80 Visual 79 Alarm system Anti-theft 79 Tow-away 80 Alignment bolt (vehicle tool kit) 299, 341 Anticorrosion/antifreeze 337 Antiglare Automatic* 144 Manual 144 Antilock brake system (ABS) 341 Anti-theft alarm system Arming 79 Canceling alarm 80...

Owner's Manual
Page 361
... 256 Messages in the display 261 Minispare wheel bolts 284 Spare wheel 281 Spare wheel bolts 282 Towing the vehicle 308 Vehicle jack 280 Vehicle tool kit 279 Premium unleaded gasoline 333 361
... 256 Messages in the display 261 Minispare wheel bolts 284 Spare wheel 281 Spare wheel bolts 282 Towing the vehicle 308 Vehicle jack 280 Vehicle tool kit 279 Premium unleaded gasoline 333 361

Owner's Manual
Page 362
... 218 SmartKey 84 Remote door unlock With Tele Aid* 216 Remote Vehicle Diagnostics 344 Removing Minispare wheel 283 Spare wheel 281 Vehicle battery 304 Vehicle tool kit 279 Wheel 299 Wiper blade insert 296 Wiper blades 296 Replacing Backup lamp bulbs 295 Brake lamp bulbs 295 Bulbs 290 Front lamp bulbs...
... 218 SmartKey 84 Remote door unlock With Tele Aid* 216 Remote Vehicle Diagnostics 344 Removing Minispare wheel 283 Spare wheel 281 Vehicle battery 304 Vehicle tool kit 279 Wheel 299 Wiper blade insert 296 Wiper blades 296 Replacing Backup lamp bulbs 295 Brake lamp bulbs 295 Bulbs 290 Front lamp bulbs...
Owner's Manual
Page 367
... Driving instructions 226 Retreads 242 Rims and tires 322 Service life 243 Temperature 244 Temperature grades 340 Tread depth 245 Wear pattern 244 Winter 245 Tools 279 367
... Driving instructions 226 Retreads 242 Rims and tires 322 Service life 243 Temperature 244 Temperature grades 340 Tread depth 245 Wear pattern 244 Winter 245 Tools 279 367

Owner's Manual
Page 368
Index Tow-away alarm 25, 80 Arming 80 Disarming 80 Disarming for transport 80 Towing eye bolt (vehicle tool kit) Installing 311 Towing the vehicle 308 Tracking services For stolen vehicle 217 Traction 142, 339, 345 Transmission see Automatic or manual transmission 238 Transmission ...
Index Tow-away alarm 25, 80 Arming 80 Disarming 80 Disarming for transport 80 Towing eye bolt (vehicle tool kit) Installing 311 Towing the vehicle 308 Tracking services For stolen vehicle 217 Traction 142, 339, 345 Transmission see Automatic or manual transmission 238 Transmission ...
Owner's Manual
Page 369
... Turn signals 251 Vehicle washing 251 Window cleaning 251 Wiper blades 251 Vehicle identification number (VIN) 318 Vehicle jack 280 Vehicle lighting Checking 234 Vehicle tool kit 279 Alignment bolt 279 Removing 279 Spare fuses 279 Special fuse puller 279 Towing eye bolt 279 Vehicle jack 279 Wheel bolts 279 Wheel...
... Turn signals 251 Vehicle washing 251 Window cleaning 251 Wiper blades 251 Vehicle identification number (VIN) 318 Vehicle jack 280 Vehicle lighting Checking 234 Vehicle tool kit 279 Alignment bolt 279 Removing 279 Spare fuses 279 Special fuse puller 279 Towing eye bolt 279 Vehicle jack 279 Wheel bolts 279 Wheel...