Owner's Manual
Page 147
... Set ...6-23 Audio Control Switch Operation* ...6-38 Safety Certification ...6-40 Interior Equipment ...6-41 Sunvisors ...6-41 Interior Lights ...6-41 Information Display ...6-44 Lighter ...6-47 Ashtray ...6-48 Cup Holder ...6-48 Bottle Holder ...6-49 Storage Compartments ...6-50 Accessory Socket ...6-52 *Some models. 6-1 Form No. 8S11-EA-03G J56J_8S11-EA-03G_Edition1.book Page 1 Tuesday, June 24...
... Set ...6-23 Audio Control Switch Operation* ...6-38 Safety Certification ...6-40 Interior Equipment ...6-41 Sunvisors ...6-41 Interior Lights ...6-41 Information Display ...6-44 Lighter ...6-47 Ashtray ...6-48 Cup Holder ...6-48 Bottle Holder ...6-49 Storage Compartments ...6-50 Accessory Socket ...6-52 *Some models. 6-1 Form No. 8S11-EA-03G J56J_8S11-EA-03G_Edition1.book Page 1 Tuesday, June 24...

Owner's Manual
Page 251
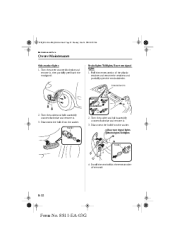
...J56J_8S11-EA-03G_Edition1.book Page 31 Tuesday, June 24, 2003 6:29 PM Maintenance and Care Owner Maintenance Your Mazda's headlights and fog lights have replaceable halogen bulbs. Remove the bulb by dropping a halogen bulb or breaking it is dangerous. Serious ...Light Bulbs Replacing the headlight, fog light and parking light bulbs Due to overheat and explode when lit. Socket 3. WARNING Handling Halogen Bulbs: When a halogen bulb breaks, it some other way. Always keep halogen bulbs out of the reach of the bulb with bare hands, body oil could be caused by an Authorized Mazda...
...J56J_8S11-EA-03G_Edition1.book Page 31 Tuesday, June 24, 2003 6:29 PM Maintenance and Care Owner Maintenance Your Mazda's headlights and fog lights have replaceable halogen bulbs. Remove the bulb by dropping a halogen bulb or breaking it is dangerous. Serious ...Light Bulbs Replacing the headlight, fog light and parking light bulbs Due to overheat and explode when lit. Socket 3. WARNING Handling Halogen Bulbs: When a halogen bulb breaks, it some other way. Always keep halogen bulbs out of the reach of the bulb with bare hands, body oil could be caused by an Authorized Mazda...
Owner's Manual
Page 252
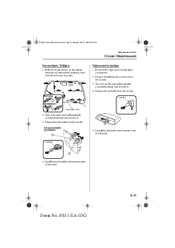
... the plastic retainer and remove the retainers and partially open the trunk side trim. Brake lights/Taillights, Rear turn signal lights Brake lights/Taillights Socket 4. Pull the center section of removal. 8-32 Form No. 8S11-EA-03G Turn the socket and bulb assembly counterclockwise and remove it , then partially peel back the mudguard. Turn the...
... the plastic retainer and remove the retainers and partially open the trunk side trim. Brake lights/Taillights, Rear turn signal lights Brake lights/Taillights Socket 4. Pull the center section of removal. 8-32 Form No. 8S11-EA-03G Turn the socket and bulb assembly counterclockwise and remove it , then partially peel back the mudguard. Turn the...
Owner's Manual
Page 253
...of removal. 8-33 Form No. 8S11-EA-03G Turn the socket and bulb assembly counterclockwise and remove it . 3. Reverse lights Taillights 5. Socket 4. Disconnect the bulb from the socket. Detach the electrical connector from the socket. 3. J56J_8S11-EA-03G_Edition1.book Page 33 Tuesday, June 24, ...2003 6:29 PM Maintenance and Care Owner Maintenance Reverse lights, Taillights 1. Turn the socket and bulb assembly counterclockwise and remove it . 4. Removal Socket Installation Trunk rear trim 2. Install the new bulb in the reverse order of the...
...of removal. 8-33 Form No. 8S11-EA-03G Turn the socket and bulb assembly counterclockwise and remove it . 3. Reverse lights Taillights 5. Socket 4. Disconnect the bulb from the socket. Detach the electrical connector from the socket. 3. J56J_8S11-EA-03G_Edition1.book Page 33 Tuesday, June 24, ...2003 6:29 PM Maintenance and Care Owner Maintenance Reverse lights, Taillights 1. Turn the socket and bulb assembly counterclockwise and remove it . 4. Removal Socket Installation Trunk rear trim 2. Install the new bulb in the reverse order of the...
Owner's Manual
Page 254
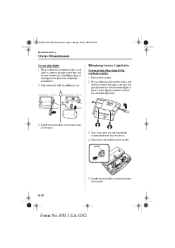
M Replacing Interior Light Bulbs Overhead light/Map lights (With overhead console) 1. Remove the screws. 2. Disconnect the bulb from the socket. Disconnect the bulb by carefully prying on the edge of the lens with a soft cloth to prevent damage to the lens and ...the reverse order of removal. 8-34 Form No. 8S11-EA-03G Socket 5. Wrap a flathead screwdriver with a soft cloth to prevent damage to the trim and gently insert it in the overhead light as shown in the figure, and then remove the overhead light unit. 3. Wrap a flathead screwdriver with a flathead screwdriver. 2. ...
M Replacing Interior Light Bulbs Overhead light/Map lights (With overhead console) 1. Remove the screws. 2. Disconnect the bulb from the socket. Disconnect the bulb by carefully prying on the edge of the lens with a soft cloth to prevent damage to the lens and ...the reverse order of removal. 8-34 Form No. 8S11-EA-03G Socket 5. Wrap a flathead screwdriver with a soft cloth to prevent damage to the trim and gently insert it in the overhead light as shown in the figure, and then remove the overhead light unit. 3. Wrap a flathead screwdriver with a flathead screwdriver. 2. ...

Owner's Manual
Page 255
...shown in the reverse order of removal. 4. Install the new bulb in the figure, and then remove the overhead light unit. Courtesy lights Edge 2. Disconnect the bulb from the socket. Disconnect the bulb by carefully prying on the edge of the lens with a soft cloth to prevent damage to the... lens and remove the lens by pulling it . 3. Socket Vanity mirror lights Edge 3. Wrap a flathead screwdriver with the screwdriver. 2. Install the new bulb in the reverse order of removal. 8-35 Form No. 8S11-...
...shown in the reverse order of removal. 4. Install the new bulb in the figure, and then remove the overhead light unit. Courtesy lights Edge 2. Disconnect the bulb from the socket. Disconnect the bulb by carefully prying on the edge of the lens with a soft cloth to prevent damage to the... lens and remove the lens by pulling it . 3. Socket Vanity mirror lights Edge 3. Wrap a flathead screwdriver with the screwdriver. 2. Install the new bulb in the reverse order of removal. 8-35 Form No. 8S11-...
Owner's Manual
Page 261
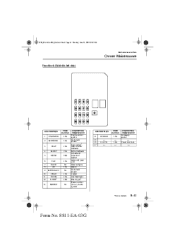
... Seat warmer , Rear window defroster Mirror defroster Windshield wiper and washer ABS unit*, SAS unit Reverse lights Heater Instrument cluster Lighter Overhead light * DESCRIPTION 14 15 16 17 R.CIGAR - D.LOCK - FUSE RATING 15A - 30A - PROTECTED COMPONENT Accessory socket - Power door lock - 12 13 R.WIP* MIRROR 10A 5A Rear wiper* Power control mirror, Audio...
... Seat warmer , Rear window defroster Mirror defroster Windshield wiper and washer ABS unit*, SAS unit Reverse lights Heater Instrument cluster Lighter Overhead light * DESCRIPTION 14 15 16 17 R.CIGAR - D.LOCK - FUSE RATING 15A - 30A - PROTECTED COMPONENT Accessory socket - Power door lock - 12 13 R.WIP* MIRROR 10A 5A Rear wiper* Power control mirror, Audio...
Owner's Manual
Page 296
...2003 6:29 PM Index A Accessory Socket ...6-52 Add-On Non-Genuine Parts and Accessories ...9-13 Air Bag Systems ...2-36 Air Filter ...8-21 Ambient Temperature Display ...6-46 Antenna ...6-16 Anti-Lock Brake System (ABS) ...5-8 Warning light ...5-8 Appearance Care ...8-42 Ashtray ......6-49 Brake/Clutch Fluid ...8-16 Brakes Anti-lock brake system (ABS) ...5-8 Foot brake ...5-4 Pad wear indicator ...5-9 Parking brake ...5-5 Warning light ...5-6 Break-In Period ...4-6 Bulb Replacement ...8-30 C Capacities ...10-4 Carbon Monoxide ...4-4 Catalytic Converter ...4-3 Cell Phones ...9-14 Center Box ...6-...
...2003 6:29 PM Index A Accessory Socket ...6-52 Add-On Non-Genuine Parts and Accessories ...9-13 Air Bag Systems ...2-36 Air Filter ...8-21 Ambient Temperature Display ...6-46 Antenna ...6-16 Anti-Lock Brake System (ABS) ...5-8 Warning light ...5-8 Appearance Care ...8-42 Ashtray ......6-49 Brake/Clutch Fluid ...8-16 Brakes Anti-lock brake system (ABS) ...5-8 Foot brake ...5-4 Pad wear indicator ...5-9 Parking brake ...5-5 Warning light ...5-6 Break-In Period ...4-6 Bulb Replacement ...8-30 C Capacities ...10-4 Carbon Monoxide ...4-4 Catalytic Converter ...4-3 Cell Phones ...9-14 Center Box ...6-...


