

Owner's Manual
Page 8
... 6:29 PM Your Vehicle at a Glance Dashboard Overview Driver-side air bag (page 2-36) Wiper and washer lever (page 5-42) Instrument cluster (page 5-25) Information display (page 6-44) Lighting control/Turn signals (page 5-40) Hazard warning flasher (page 5-45) Fog lights switch* (page 5-42) Audio system (page 6-16) Power window switches...
... 6:29 PM Your Vehicle at a Glance Dashboard Overview Driver-side air bag (page 2-36) Wiper and washer lever (page 5-42) Instrument cluster (page 5-25) Information display (page 6-44) Lighting control/Turn signals (page 5-40) Hazard warning flasher (page 5-45) Fog lights switch* (page 5-42) Audio system (page 6-16) Power window switches...
Owner's Manual
Page 122
... be changed between trip meter A and trip meter B by pressing the selector while they are displayed. J56J_8S11-EA-03G_Edition1.book Page 26 Tuesday, June 24, 2003 6:29 PM Driving Your Mazda Instrument Cluster and Indicators M Speedometer The speedometer indicates the speed of two trips. When trip meter... B is selected, TRIP B will be displayed as follows even when the ignition switch is recorded in the ACC or...
... be changed between trip meter A and trip meter B by pressing the selector while they are displayed. J56J_8S11-EA-03G_Edition1.book Page 26 Tuesday, June 24, 2003 6:29 PM Driving Your Mazda Instrument Cluster and Indicators M Speedometer The speedometer indicates the speed of two trips. When trip meter... B is selected, TRIP B will be displayed as follows even when the ignition switch is recorded in the ACC or...
Owner's Manual
Page 147
... features for Audio System ...6-16 Audio Set ...6-23 Audio Control Switch Operation* ...6-38 Safety Certification ...6-40 Interior Equipment ...6-41 Sunvisors ...6-41 Interior Lights ...6-41 Information Display ...6-44 Lighter ...6-47 Ashtray ...6-48 Cup Holder ...6-48 Bottle Holder ...6-49 Storage Compartments ...6-50 Accessory Socket ...6-52 *Some models. 6-1 Form No. 8S11-EA-03G J56J_8S11...
... features for Audio System ...6-16 Audio Set ...6-23 Audio Control Switch Operation* ...6-38 Safety Certification ...6-40 Interior Equipment ...6-41 Sunvisors ...6-41 Interior Lights ...6-41 Information Display ...6-44 Lighter ...6-47 Ashtray ...6-48 Cup Holder ...6-48 Bottle Holder ...6-49 Storage Compartments ...6-50 Accessory Socket ...6-52 *Some models. 6-1 Form No. 8S11-EA-03G J56J_8S11...
Owner's Manual
Page 151
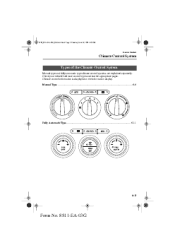
Climate control information is displayed on the information display. Check your vehicle's climate control type and read the appropriate pages. J56J_8S11-EA-03G_Edition1.book Page 5 Tuesday, June 24, 2003 6:29 PM Interior Comfort Climate Control System Types of the Climate Control System Manual type and fully automatic type climate control systems are explained separately. Manual Type ...6-6 Fully Automatic Type...6-11 6-5 Form No. 8S11-EA-03G
Climate control information is displayed on the information display. Check your vehicle's climate control type and read the appropriate pages. J56J_8S11-EA-03G_Edition1.book Page 5 Tuesday, June 24, 2003 6:29 PM Interior Comfort Climate Control System Types of the Climate Control System Manual type and fully automatic type climate control systems are explained separately. Manual Type ...6-6 Fully Automatic Type...6-11 6-5 Form No. 8S11-EA-03G
Owner's Manual
Page 158
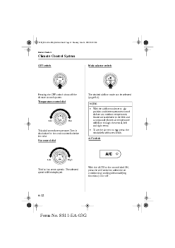
... for hot and counterclockwise for cold. Fan control dial Low High The fan has seven speeds. Temperature control dial The desired airflow mode can be displayed. The selected speed will flow through the central, left and right vents. , press the • To set the air vent to select the air conditioning...
... for hot and counterclockwise for cold. Fan control dial Low High The fan has seven speeds. Temperature control dial The desired airflow mode can be displayed. The selected speed will flow through the central, left and right vents. , press the • To set the air vent to select the air conditioning...

Owner's Manual
Page 171
... Medium Maximum About 5 seconds after selecting any mode, the volume function will be indicated. 6-25 Form No. 8S11-EA-03G The selected mode will be displayed. The volume increases in accordance with the increase in vehicle speed, and decreases as follows: Indication Turn Left Decrease bass Decrease mid-range Decrease treble...
... Medium Maximum About 5 seconds after selecting any mode, the volume function will be indicated. 6-25 Form No. 8S11-EA-03G The selected mode will be displayed. The volume increases in accordance with the increase in vehicle speed, and decreases as follows: Indication Turn Left Decrease bass Decrease mid-range Decrease treble...

Owner's Manual
Page 172
...), the preset channels will be indicated. Band selection Select a band by pressing the FM1 button ( ), FM2 button ( ) or AM button ( ). The selected mode will be displayed. Manual tuning Turning the manual tuning dial will be canceled. The easiest way to tune stations is being received, "ST" will change the frequency higher...
...), the preset channels will be indicated. Band selection Select a band by pressing the FM1 button ( ), FM2 button ( ) or AM button ( ). The selected mode will be displayed. Manual tuning Turning the manual tuning dial will be canceled. The easiest way to tune stations is being received, "ST" will change the frequency higher...

Owner's Manual
Page 173
...One stored station will be canceled. 6-27 Form No. 8S11-EA-03G To set channels. The preset channel number and station frequency will be displayed. To hold the auto memory button ( ) for about 2 seconds until a beep is heard; Depress a channel preset button for the other...NOTE Auto memory tuning This is now held in each station for about 2 seconds until a beep is disconnected), the preset channels will be displayed. Additional AM/FM stations can be stored without stopping. After scanning is completed, the station with the strongest frequencies in the memory. 3....
...One stored station will be canceled. 6-27 Form No. 8S11-EA-03G To set channels. The preset channel number and station frequency will be displayed. To hold the auto memory button ( ) for about 2 seconds until a beep is heard; Depress a channel preset button for the other...NOTE Auto memory tuning This is now held in each station for about 2 seconds until a beep is disconnected), the preset channels will be displayed. Additional AM/FM stations can be stored without stopping. After scanning is completed, the station with the strongest frequencies in the memory. 3....

Owner's Manual
Page 174
... tape eject button ( eject the cassette tape. ) to start play button ( ) is playing. If there isn't a cassette tape in the unit. The symbol will be displayed. To play . When is lit, the cassette tape's top side is pressed, "NO TAPE" will flash on . J56J_8S11-EA-03G_Edition1.book Page 28 Tuesday, June... tape insert Insert the cassette tape into the slot, open edge to the right and cassette tape will begin play, and "TAPE PLAY" will be displayed. When is lit, the bottom side is in the unit when the cassette tape play when a cassette tape is on and off. Form No. 8S11...
... tape eject button ( eject the cassette tape. ) to start play button ( ) is playing. If there isn't a cassette tape in the unit. The symbol will be displayed. To play . When is lit, the cassette tape's top side is pressed, "NO TAPE" will flash on . J56J_8S11-EA-03G_Edition1.book Page 28 Tuesday, June... tape insert Insert the cassette tape into the slot, open edge to the right and cassette tape will begin play, and "TAPE PLAY" will be displayed. When is lit, the bottom side is in the unit when the cassette tape play when a cassette tape is on and off. Form No. 8S11...

Owner's Manual
Page 175
... next selection. J56J_8S11-EA-03G_Edition1.book Page 29 Tuesday, June 24, 2003 6:29 PM Interior Comfort Audio System NOTE NOTE The cassette tape can be displayed). Press the APC button ( ) to cancel repeat play the cassette tape, press the button again. 6-29 Form No. 8S11-EA-03G Press the rewind button...
... next selection. J56J_8S11-EA-03G_Edition1.book Page 29 Tuesday, June 24, 2003 6:29 PM Interior Comfort Audio System NOTE NOTE The cassette tape can be displayed). Press the APC button ( ) to cancel repeat play the cassette tape, press the button again. 6-29 Form No. 8S11-EA-03G Press the rewind button...

Owner's Manual
Page 176
... track up with the arrow pointed to reverse through a track at high speed. Press the track down button MD slot Display button Reverse button Repeat button MD eject button Random button Display feed dial Inserting the MD Insert the MD, label-side up button ( ) once to skip forward to eject the MD...
... track up with the arrow pointed to reverse through a track at high speed. Press the track down button MD slot Display button Reverse button Repeat button MD eject button Random button Display feed dial Inserting the MD Insert the MD, label-side up button ( ) once to skip forward to eject the MD...
Owner's Manual
Page 177
... the MD player to randomly select the order of the songs. Random play . The next selection will be randomly selected ("RDM" will be completely displayed, rotate the display feed dial ( ) to start scan play . J56J_8S11-EA-03G_Edition1.book Page 31 Tuesday, June 24, 2003 6:29 PM Interior Comfort Audio System Music... scan This feature helps to find a program by playing about the first 10 seconds of each of the following displays: Track number/ Elapsed play back time Song title Disc title If the unit is no song or disc title recorded on the...
... the MD player to randomly select the order of the songs. Random play . The next selection will be randomly selected ("RDM" will be completely displayed, rotate the display feed dial ( ) to start scan play . J56J_8S11-EA-03G_Edition1.book Page 31 Tuesday, June 24, 2003 6:29 PM Interior Comfort Audio System Music... scan This feature helps to find a program by playing about the first 10 seconds of each of the following displays: Track number/ Elapsed play back time Song title Disc title If the unit is no song or disc title recorded on the...

Owner's Manual
Page 179
... scan button ( ) during play to start scan play operation (the track number will be repeated ("RPT" will flash). The current selection will be displayed). The next selection will be displayed). Repeat play . Press the repeat button ( ) once again to cancel repeat play This feature makes it possible to listen to a selection repeatedly...
... scan button ( ) during play to start scan play operation (the track number will be repeated ("RPT" will flash). The current selection will be displayed). The next selection will be displayed). Repeat play . Press the repeat button ( ) once again to cancel repeat play This feature makes it possible to listen to a selection repeatedly...

Owner's Manual
Page 180
... seconds after the beep is heard. 3. Form No. 8S11-EA-03G A beeping sound can be a short lapse before play . The CD cannot be displayed. Press the channel preset button for about 2 seconds will set the CD and begin play begins while the player reads the digital signals on the... CD. Simultaneously pressing the power/volume dial and the load button ( ) for about 2 seconds until a beep is displayed, insert the CD. When "IN" is heard. 2. The auto-loading mechanism will turn this waiting time. NOTE A CD cannot be label-side up ...
... seconds after the beep is heard. 3. Form No. 8S11-EA-03G A beeping sound can be a short lapse before play . The CD cannot be displayed. Press the channel preset button for about 2 seconds will set the CD and begin play begins while the player reads the digital signals on the... CD. Simultaneously pressing the power/volume dial and the load button ( ) for about 2 seconds until a beep is displayed, insert the CD. When "IN" is heard. 2. The auto-loading mechanism will turn this waiting time. NOTE A CD cannot be label-side up ...

Owner's Manual
Page 181
...is heard. 3. When the CD is heard. 3. Press and hold the CD eject button ( ) for about 2 seconds until a beep is off. When "IN" is displayed again, insert the next CD. NOTE • CDs will be ejected starting with the one with the lowest number. • All CDs in the tray... the channel preset button for the desired CD number within 15 seconds after the beep is heard. 2. The disc number and "DISC OUT" will be displayed. 2. Press and hold the load button ( ) for about 2 seconds until a beep is heard. 3. J56J_8S11-EA-03G_Edition1.book Page 35 Tuesday, June 24, 2003 6:...
...is heard. 3. When the CD is heard. 3. Press and hold the CD eject button ( ) for about 2 seconds until a beep is off. When "IN" is displayed again, insert the next CD. NOTE • CDs will be ejected starting with the one with the lowest number. • All CDs in the tray... the channel preset button for the desired CD number within 15 seconds after the beep is heard. 2. The disc number and "DISC OUT" will be displayed. 2. Press and hold the load button ( ) for about 2 seconds until a beep is heard. 3. J56J_8S11-EA-03G_Edition1.book Page 35 Tuesday, June 24, 2003 6:...

Owner's Manual
Page 182
...Press the track down button ( ) to skip back to reverse through a track at high speed. The current selection will be repeated ("RPT" will be displayed). Random play This feature allows the CD player to the beginning of the songs. Press the random button ( ) during play. If there isn't a...03G Press the scan button ( ) during play to the beginning of the next track. The next selection will be randomly selected ("RDM" will be displayed). Disc search Press the disc up button ( ) once to skip forward to advance through a track at high speed. NOTE Repeat play This feature ...
...Press the track down button ( ) to skip back to reverse through a track at high speed. The current selection will be repeated ("RPT" will be displayed). Random play This feature allows the CD player to the beginning of the songs. Press the random button ( ) during play. If there isn't a...03G Press the scan button ( ) during play to the beginning of the next track. The next selection will be randomly selected ("RDM" will be displayed). Disc search Press the disc up button ( ) once to skip forward to advance through a track at high speed. NOTE Repeat play This feature ...

Owner's Manual
Page 183
If the error indication does not disappear, consult an Authorized Mazda Dealer Check the CD for scratches or soiling CHECK MD MD is ...8S11-EA-03G If the error indication does not disappear, consult an Authorized Mazda Dealer Insert the CD properly. If the error indication does not disappear, consult an Authorized Mazda Dealer Insert another MD properly. J56J_8S11-EA-03G_Edition1.book Page 37 Tuesday,... Error Indications If you cannot clear the error indication, take the vehicle to an Authorized Mazda Dealer. If you see an error indication on the display, find the cause in the chart.
If the error indication does not disappear, consult an Authorized Mazda Dealer Check the CD for scratches or soiling CHECK MD MD is ...8S11-EA-03G If the error indication does not disappear, consult an Authorized Mazda Dealer Insert the CD properly. If the error indication does not disappear, consult an Authorized Mazda Dealer Insert another MD properly. J56J_8S11-EA-03G_Edition1.book Page 37 Tuesday,... Error Indications If you cannot clear the error indication, take the vehicle to an Authorized Mazda Dealer. If you see an error indication on the display, find the cause in the chart.
Owner's Manual
Page 190
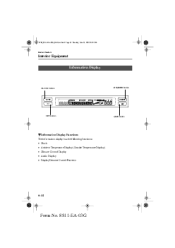
J56J_8S11-EA-03G_Edition1.book Page 44 Tuesday, June 24, 2003 6:29 PM Interior Comfort Interior Equipment Information Display CLOCK button DIMMER button SET button AMB button M Information Display Functions The information display has the following functions: • Clock • Ambient Temperature Display (Outside Temperature Display) • Climate Control Display • Audio Display • Display Dimmer Cancel Function 6-44 Form No. 8S11-EA-03G
J56J_8S11-EA-03G_Edition1.book Page 44 Tuesday, June 24, 2003 6:29 PM Interior Comfort Interior Equipment Information Display CLOCK button DIMMER button SET button AMB button M Information Display Functions The information display has the following functions: • Clock • Ambient Temperature Display (Outside Temperature Display) • Climate Control Display • Audio Display • Display Dimmer Cancel Function 6-44 Form No. 8S11-EA-03G
Owner's Manual
Page 191
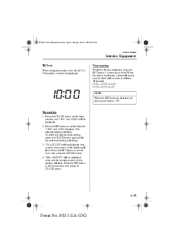
... 3. To select the desired clock setting, press the CLOCK button again while the preferred setting is displayed, press the SET button 1.5 seconds or more. Press the SET button to set the hour, then... to set the minutes, then press the CLOCK button. 6-45 Form No. 8S11-EA-03G The selected display will flash. ADJUST" will be reset as follows: (Example) 12:01-12:29→12:00 12...:30-12:59→1:00 NOTE When the SET button is displayed. J56J_8S11-EA-03G_Edition1.book Page 45 Tuesday, June 24, 2003 6:29 PM Interior Comfort Interior Equipment ...
... 3. To select the desired clock setting, press the CLOCK button again while the preferred setting is displayed, press the SET button 1.5 seconds or more. Press the SET button to set the hour, then... to set the minutes, then press the CLOCK button. 6-45 Form No. 8S11-EA-03G The selected display will flash. ADJUST" will be reset as follows: (Example) 12:01-12:29→12:00 12...:30-12:59→1:00 NOTE When the SET button is displayed. J56J_8S11-EA-03G_Edition1.book Page 45 Tuesday, June 24, 2003 6:29 PM Interior Comfort Interior Equipment ...

Owner's Manual
Page 192
...Fahrenheit to Centigrade or vice versa. • (With fully automatic climate control system) Press the AMB button again to switch the display from ambient temperature to the temperature set for the air conditioner. 6-46 Form No. 8S11-EA-03G To operate the climate control ... (page 6-16). To operate the audio system, refer to "Climate Control System" (page 6-2). Press the button again to return to the previous display illumination. NOTE • The displayed ambient temperature may vary from the actual ambient temperature depending on snowy or foggy roads, or in other situations when the...
...Fahrenheit to Centigrade or vice versa. • (With fully automatic climate control system) Press the AMB button again to switch the display from ambient temperature to the temperature set for the air conditioner. 6-46 Form No. 8S11-EA-03G To operate the climate control ... (page 6-16). To operate the audio system, refer to "Climate Control System" (page 6-2). Press the button again to return to the previous display illumination. NOTE • The displayed ambient temperature may vary from the actual ambient temperature depending on snowy or foggy roads, or in other situations when the...

