Owner's Manual
Page 135
When operating the hazard warning lights, both turn signal bulb may be heard when the driver's door is opened . J56J_8S11-EA-03G_Edition1.book Page 39 Tuesday, June 24, 2003 6:29 PM Driving Your Mazda Warning/Indicator Lights and Beep Sounds M Turn-Signal/Hazard Warning Indicator Lights Beep Sounds M Seat Belt Warning Beep If...
When operating the hazard warning lights, both turn signal bulb may be heard when the driver's door is opened . J56J_8S11-EA-03G_Edition1.book Page 39 Tuesday, June 24, 2003 6:29 PM Driving Your Mazda Warning/Indicator Lights and Beep Sounds M Turn-Signal/Hazard Warning Indicator Lights Beep Sounds M Seat Belt Warning Beep If...
Owner's Manual
Page 137
Right lane change OFF Left lane change -until the indicator flashes- and hold it flashes abnormally, the turn signal bulb may be driven with the headlights on when the ignition switch is applied. It will self-cancel after a turn on during daytime operation. NOTE Turn ... indicator light stays on the dashboard show which signal is completed. J56J_8S11-EA-03G_Edition1.book Page 41 Tuesday, June 24, 2003 6:29 PM Driving Your Mazda Switches and Controls M Daytime Running Lights (Canada) In Canada, vehicles must be burned out. 5-41 Form No. 8S11-EA-03G The signal will return to...
Right lane change OFF Left lane change -until the indicator flashes- and hold it flashes abnormally, the turn signal bulb may be driven with the headlights on when the ignition switch is applied. It will self-cancel after a turn on during daytime operation. NOTE Turn ... indicator light stays on the dashboard show which signal is completed. J56J_8S11-EA-03G_Edition1.book Page 41 Tuesday, June 24, 2003 6:29 PM Driving Your Mazda Switches and Controls M Daytime Running Lights (Canada) In Canada, vehicles must be burned out. 5-41 Form No. 8S11-EA-03G The signal will return to...

Owner's Manual
Page 221
... Fluid (ATF) ...8-18 Washer Fluid ...8-20 Body Lubrication ...8-21 Air Filter ...8-21 Wiper Blades ...8-23 Battery ...8-25 Tires ...8-26 Light Bulbs ...8-30 Fuses ...8-36 Appearance Care ...8-42 How to keep your Mazda in top condition. J56J_8S11-EA-03G_Edition1.book Page 1 Tuesday, June 24, 2003 6:29 PM 8 Maintenance and Care How to Minimize...
... Fluid (ATF) ...8-18 Washer Fluid ...8-20 Body Lubrication ...8-21 Air Filter ...8-21 Wiper Blades ...8-23 Battery ...8-25 Tires ...8-26 Light Bulbs ...8-30 Fuses ...8-36 Appearance Care ...8-42 How to keep your Mazda in top condition. J56J_8S11-EA-03G_Edition1.book Page 1 Tuesday, June 24, 2003 6:29 PM 8 Maintenance and Care How to Minimize...
Owner's Manual
Page 250
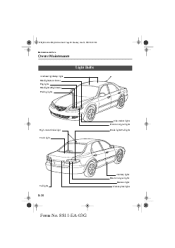
J56J_8S11-EA-03G_Edition1.book Page 30 Tuesday, June 24, 2003 6:29 PM Maintenance and Care Owner Maintenance Light Bulbs Overhead light/Map lights Headlights(Low beam) Fog lights Headlights (High beam) Parking lights Side-marker lights Front turn signal lights High-mount brake light Brake lights/Taillights Trunk light Courtesy lights Rear turn signal lights Reverse lights Taillights License plate lights 8-30 Form No. 8S11-EA-03G
J56J_8S11-EA-03G_Edition1.book Page 30 Tuesday, June 24, 2003 6:29 PM Maintenance and Care Owner Maintenance Light Bulbs Overhead light/Map lights Headlights(Low beam) Fog lights Headlights (High beam) Parking lights Side-marker lights Front turn signal lights High-mount brake light Brake lights/Taillights Trunk light Courtesy lights Rear turn signal lights Reverse lights Taillights License plate lights 8-30 Form No. 8S11-EA-03G

Owner's Manual
Page 251
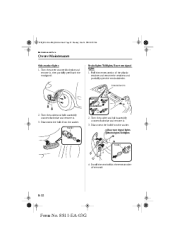
.... Socket 3. J56J_8S11-EA-03G_Edition1.book Page 31 Tuesday, June 24, 2003 6:29 PM Maintenance and Care Owner Maintenance Your Mazda's headlights and fog lights have replaceable halogen bulbs. Front turn signal lights 1. WARNING Handling Halogen Bulbs: When a halogen bulb breaks, it in the reverse order of children. Never touch the glass portion of the...
.... Socket 3. J56J_8S11-EA-03G_Edition1.book Page 31 Tuesday, June 24, 2003 6:29 PM Maintenance and Care Owner Maintenance Your Mazda's headlights and fog lights have replaceable halogen bulbs. Front turn signal lights 1. WARNING Handling Halogen Bulbs: When a halogen bulb breaks, it in the reverse order of children. Never touch the glass portion of the...
Owner's Manual
Page 252
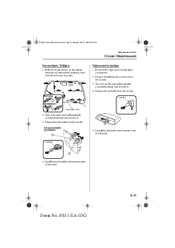
...and remove it , then partially peel back the mudguard. Disconnect the bulb from the socket. Rear turn signal lights 1. Pull the center section of removal. 8-32 Form No. 8S11-EA-03G Install the new bulb in the reverse order of the plastic retainer and remove the retainers ...and partially open the trunk side trim. Turn the socket and bulb assembly counterclockwise and remove it. 3. Brake lights/Taillights, Rear turn signal lights Brake lights/Taillights Socket 4. Trunk side trim Removal Installation 2. ...
...and remove it , then partially peel back the mudguard. Disconnect the bulb from the socket. Rear turn signal lights 1. Pull the center section of removal. 8-32 Form No. 8S11-EA-03G Install the new bulb in the reverse order of the plastic retainer and remove the retainers ...and partially open the trunk side trim. Turn the socket and bulb assembly counterclockwise and remove it. 3. Brake lights/Taillights, Rear turn signal lights Brake lights/Taillights Socket 4. Trunk side trim Removal Installation 2. ...
Owner's Manual
Page 253
...light component. 2. Disconnect the bulb from the socket. 3. Turn the socket and bulb assembly counterclockwise and remove it . 4. Socket 4. Removal Socket Installation Trunk rear trim 2. Reverse lights Taillights 5. Turn the socket and bulb assembly counterclockwise and remove it . 3. Install the new bulb in the reverse order of... removal. High-mount brake light 1. Detach the electrical connector from the socket. Install the new bulb in the reverse order of removal. 8-33 Form No. 8S11-EA-03G J56J_8S11-EA-03G_Edition1.book Page 33 Tuesday,...
...light component. 2. Disconnect the bulb from the socket. 3. Turn the socket and bulb assembly counterclockwise and remove it . 4. Socket 4. Removal Socket Installation Trunk rear trim 2. Reverse lights Taillights 5. Turn the socket and bulb assembly counterclockwise and remove it . 3. Install the new bulb in the reverse order of... removal. High-mount brake light 1. Detach the electrical connector from the socket. Install the new bulb in the reverse order of removal. 8-33 Form No. 8S11-EA-03G J56J_8S11-EA-03G_Edition1.book Page 33 Tuesday,...
Owner's Manual
Page 254
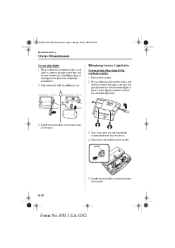
... the reverse order of the lens with a flathead screwdriver. 2. Socket 5. M Replacing Interior Light Bulbs Overhead light/Map lights (With overhead console) 1. Turn the socket and bulb assembly counterclockwise and remove it out. Remove the screws. 2. J56J_8S11-EA-03G_Edition1.book Page 34 Tuesday, June... 24, 2003 6:29 PM Maintenance and Care Owner Maintenance License plate lights 1. Disconnect the bulb by carefully prying on the edge of removal. 3. Wrap a flathead screwdriver with a soft cloth to prevent damage to the trim and...
... the reverse order of the lens with a flathead screwdriver. 2. Socket 5. M Replacing Interior Light Bulbs Overhead light/Map lights (With overhead console) 1. Turn the socket and bulb assembly counterclockwise and remove it out. Remove the screws. 2. J56J_8S11-EA-03G_Edition1.book Page 34 Tuesday, June... 24, 2003 6:29 PM Maintenance and Care Owner Maintenance License plate lights 1. Disconnect the bulb by carefully prying on the edge of removal. 3. Wrap a flathead screwdriver with a soft cloth to prevent damage to the trim and...

Owner's Manual
Page 255
... figure, and then remove the overhead light unit. Turn the socket and bulb assembly counterclockwise and remove it out. Install the new bulb in the reverse order of removal. 4. Disconnect the bulb from the socket. Install the new bulb in the reverse order of the lens with a soft cloth to prevent...book Page 35 Tuesday, June 24, 2003 6:29 PM Maintenance and Care Owner Maintenance Overhead light/Map lights (Without overhead console) 1. Disconnect the bulb by carefully prying on the edge of removal. 8-35 Form No. 8S11-EA-03G Wrap a flathead screwdriver with the screwdriver. 2.
... figure, and then remove the overhead light unit. Turn the socket and bulb assembly counterclockwise and remove it out. Install the new bulb in the reverse order of removal. 4. Disconnect the bulb from the socket. Install the new bulb in the reverse order of the lens with a soft cloth to prevent...book Page 35 Tuesday, June 24, 2003 6:29 PM Maintenance and Care Owner Maintenance Overhead light/Map lights (Without overhead console) 1. Disconnect the bulb by carefully prying on the edge of removal. 8-35 Form No. 8S11-EA-03G Wrap a flathead screwdriver with the screwdriver. 2.
Owner's Manual
Page 256
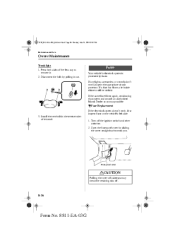
... to remove it out. Press both sides of removal. 1. If the same fuse blows again, avoid using that system and consult an Authorized Mazda Dealer as soon as possible. M Fuse Replacement If the electrical system doesn't work , inspect the appropriate circuit protector. If a fuse has blown..., the inside element will be melted. Turn off . 8-36 Form No. 8S11-EA-03G Disconnect the bulb by pulling it . 2. Fuse panel cover CAUTION Pulling the cover off sideways may break the retaining tabs off the ignition switch and other switches. ...
... to remove it out. Press both sides of removal. 1. If the same fuse blows again, avoid using that system and consult an Authorized Mazda Dealer as soon as possible. M Fuse Replacement If the electrical system doesn't work , inspect the appropriate circuit protector. If a fuse has blown..., the inside element will be melted. Turn off . 8-36 Form No. 8S11-EA-03G Disconnect the bulb by pulling it . 2. Fuse panel cover CAUTION Pulling the cover off sideways may break the retaining tabs off the ignition switch and other switches. ...

Owner's Manual
Page 293
J56J_8S11-EA-03G_Edition1.book Page 5 Tuesday, June 24, 2003 6:29 PM Specifications M Light Bulbs Exterior light Light bulb Headlights Front turn signal lights Parking lights Fog lights* Side-marker lights High-mount brake lights Rear turn signal lights Brake lights/Taillights Taillights ... 5*2 18.4 5 Category ECE R SAE H1 - H1 - - #2357A W5W - H3 - W5W - W16W #921 - - WY21W - W21/5W #7443 W21/5W #7443 W16W #921 W5W - Interior light Light bulb Trunk light Overhead light/Map lights Courtesy lights Vanity mirror lights *1Use *2 Wattage 3 5 5 1.2 Category ECE R - W5W W5W - SAE a 28/7W type...
J56J_8S11-EA-03G_Edition1.book Page 5 Tuesday, June 24, 2003 6:29 PM Specifications M Light Bulbs Exterior light Light bulb Headlights Front turn signal lights Parking lights Fog lights* Side-marker lights High-mount brake lights Rear turn signal lights Brake lights/Taillights Taillights ... 5*2 18.4 5 Category ECE R SAE H1 - H1 - - #2357A W5W - H3 - W5W - W16W #921 - - WY21W - W21/5W #7443 W21/5W #7443 W16W #921 W5W - Interior light Light bulb Trunk light Overhead light/Map lights Courtesy lights Vanity mirror lights *1Use *2 Wattage 3 5 5 1.2 Category ECE R - W5W W5W - SAE a 28/7W type...
Owner's Manual
Page 296
... Bottle Holder ...6-49 Brake/Clutch Fluid ...8-16 Brakes Anti-lock brake system (ABS) ...5-8 Foot brake ...5-4 Pad wear indicator ...5-9 Parking brake ...5-5 Warning light ...5-6 Break-In Period ...4-6 Bulb Replacement ...8-30 C Capacities ...10-4 Carbon Monoxide ...4-4 Catalytic Converter ...4-3 Cell Phones ...9-14 Center Box ...6-50 Center Console ...6-51 Child Restraint Child restraint precautions ...2-24 Installing child...
... Bottle Holder ...6-49 Brake/Clutch Fluid ...8-16 Brakes Anti-lock brake system (ABS) ...5-8 Foot brake ...5-4 Pad wear indicator ...5-9 Parking brake ...5-5 Warning light ...5-6 Break-In Period ...4-6 Bulb Replacement ...8-30 C Capacities ...10-4 Carbon Monoxide ...4-4 Catalytic Converter ...4-3 Cell Phones ...9-14 Center Box ...6-50 Center Console ...6-51 Child Restraint Child restraint precautions ...2-24 Installing child...
Owner's Manual
Page 298
... display ...6-46 Climate control display ...6-46 Clock ...6-45 Display dimmer cancel function ...6-46 Information display functions ...6-44 L Label Information ...10-2 Lane-Change Signals ...5-41 Light Bulbs Replacement ...8-30 Specifications ...10-5 Lighter ...6-47 Lighting Control ...5-40 Lubricant Quality ...10-3 M Maintenance Introduction ...8-2 Owner maintenance precautions ...8-8 Owner maintenance schedule ...8-7 Scheduled ...8-3 Manual Transaxle Operation ...5-9 Recommendations...
... display ...6-46 Climate control display ...6-46 Clock ...6-45 Display dimmer cancel function ...6-46 Information display functions ...6-44 L Label Information ...10-2 Lane-Change Signals ...5-41 Light Bulbs Replacement ...8-30 Specifications ...10-5 Lighter ...6-47 Lighting Control ...5-40 Lubricant Quality ...10-3 M Maintenance Introduction ...8-2 Owner maintenance precautions ...8-8 Owner maintenance schedule ...8-7 Scheduled ...8-3 Manual Transaxle Operation ...5-9 Recommendations...

