
Owner's Manual
Page 10
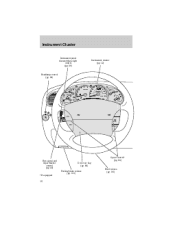
Instrument Cluster Instrument panel dimmer/dome light control (pg. 39) Instrument cluster (pg. 12) Headlamp control (pg. 38) CHECK GAGE DOOR AJAR 4 H CHECK ENGINE CHECK FUEL CAP 5 6 40 30 20 10 50 60 60 70 0 0 0 80 ...
Instrument Cluster Instrument panel dimmer/dome light control (pg. 39) Instrument cluster (pg. 12) Headlamp control (pg. 38) CHECK GAGE DOOR AJAR 4 H CHECK ENGINE CHECK FUEL CAP 5 6 40 30 20 10 50 60 60 70 0 0 0 80 ...
Owner's Manual
Page 35
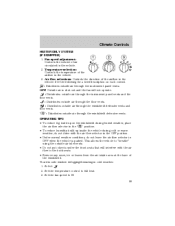
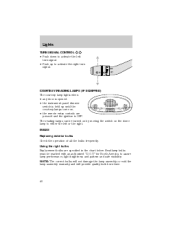
...place the air flow selector in the position. • To reduce humidity build up on each control. : Distributes outside air through the instrument panel vents. Select 2. Set the temperature control to the back seats. • Remove any snow, ice or leaves from the air intake ...the outside air inlet vents. • Do not put objects under the front seats that will not operate. : Distributes outside air through the instrument panel vents and the floor vents. : Distributes outside air through the floor vents. : Distributes outside air through the windshield defroster vents and floor vents...
...place the air flow selector in the position. • To reduce humidity build up on each control. : Distributes outside air through the instrument panel vents. Select 2. Set the temperature control to the back seats. • Remove any snow, ice or leaves from the air intake ...the outside air inlet vents. • Do not put objects under the front seats that will not operate. : Distributes outside air through the instrument panel vents and the floor vents. : Distributes outside air through the floor vents. : Distributes outside air through the windshield defroster vents and floor vents...
Owner's Manual
Page 36
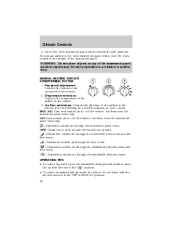
... the windshield during humid weather, place position. Air flows from the instrument panel vents only. : Distributes outside air through the instrument panel vents. MANUAL HEATING AND AIR CONDITIONING SYSTEM 1. Air flows from the instrument panel vents only. OFF: Outside air is shut out and the fan will...flow selector in the • To reduce humidity build up on each control. Fan speed adjustment: Controls the volume of the instrument panel as these objects may become projectiles in the vehicle. 2. A/C: Uses outside air through the windshield defroster vents and floor vents....
... the windshield during humid weather, place position. Air flows from the instrument panel vents only. : Distributes outside air through the instrument panel vents. MANUAL HEATING AND AIR CONDITIONING SYSTEM 1. Air flows from the instrument panel vents only. OFF: Outside air is shut out and the fan will...flow selector in the • To reduce humidity build up on each control. Fan speed adjustment: Controls the volume of the instrument panel as these objects may become projectiles in the vehicle. 2. A/C: Uses outside air through the windshield defroster vents and floor vents....
Owner's Manual
Page 37
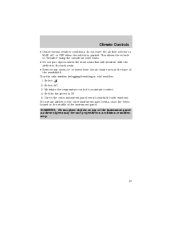
... towards the side windows To increase airflow to HI 5. Set the fan speed to the outer instrument panel vents, close the vents located in a collision or sudden stop. 37 To aid in side window defogging/demisting in MAX A/C or OFF when the vehicle ... the back seats. • Remove any snow, ice or leaves from the air intake area at the base of the instrument panel as these objects may become projectiles in the middle of the instrument panel. This allows the vehicle to "breathe" using the outside air inlet vents. • Do not put objects under the...
... towards the side windows To increase airflow to HI 5. Set the fan speed to the outer instrument panel vents, close the vents located in a collision or sudden stop. 37 To aid in side window defogging/demisting in MAX A/C or OFF when the vehicle ... the back seats. • Remove any snow, ice or leaves from the air intake area at the base of the instrument panel as these objects may become projectiles in the middle of the instrument panel. This allows the vehicle to "breathe" using the outside air inlet vents. • Do not put objects under the...

Owner's Manual
Page 38
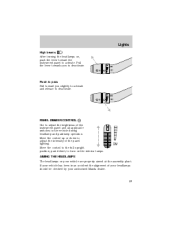
... with your headlamps at dusk or during these conditions. Failure to turn on . To activate: • the ignition must be turned on the parking lamps, instrument panel lamps, license plate lamps and tail lamps. Lights HEADLAMP CONTROL Turns the lamps off.
... with your headlamps at dusk or during these conditions. Failure to turn on . To activate: • the ignition must be turned on the parking lamps, instrument panel lamps, license plate lamps and tail lamps. Lights HEADLAMP CONTROL Turns the lamps off.
Owner's Manual
Page 39
Flash to pass Pull toward the instrument panel to activate. Move the control to the full upright position, past detent, to turn on your vehicle has been in the vehicle during headlamp and ... checked by your authorized Mazda dealer. If your vehicle are properly aimed at the assembly plant. AIMING THE HEADLAMPS The headlamps on the interior lamps. DIM 39 PANEL DIMMER CONTROL Use to deactivate. Pull the lever towards you slightly to activate and release to adjust the brightness of the instrument panel and all applicable...
Flash to pass Pull toward the instrument panel to activate. Move the control to the full upright position, past detent, to turn on your vehicle has been in the vehicle during headlamp and ... checked by your authorized Mazda dealer. If your vehicle are properly aimed at the assembly plant. AIMING THE HEADLAMPS The headlamps on the interior lamps. DIM 39 PANEL DIMMER CONTROL Use to deactivate. Pull the lever towards you slightly to activate and release to adjust the brightness of the instrument panel and all applicable...
Owner's Manual
Page 40
COURTESY/READING LAMPS (IF EQUIPPED) The courtesy lamp lights when: • any door is opened. • the instrument panel dimmer switch is OFF. Headlamp bulbs must be turned on by moving the switch on . • the remote entry controls are specified in the chart ...
COURTESY/READING LAMPS (IF EQUIPPED) The courtesy lamp lights when: • any door is opened. • the instrument panel dimmer switch is OFF. Headlamp bulbs must be turned on by moving the switch on . • the remote entry controls are specified in the chart ...
Owner's Manual
Page 41
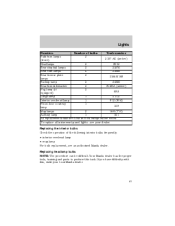
If you have difficulty with this task. see an authorized Mazda dealer. Replacing headlamp bulbs NOTE: The procedure can be difficult. Your Mazda dealer has the proper tools, training and parts to perform this , vistit your dealer. To replace all instrument panel lights - Replacing the interior bulbs Check the operation of bulbs Trade number Park... except where noted. Lights Function Number of the following interior bulbs frequently: • interior overhead lamp • map lamp For bulb replacement, see your local Mazda dealer. 41
If you have difficulty with this task. see an authorized Mazda dealer. Replacing headlamp bulbs NOTE: The procedure can be difficult. Your Mazda dealer has the proper tools, training and parts to perform this , vistit your dealer. To replace all instrument panel lights - Replacing the interior bulbs Check the operation of bulbs Trade number Park... except where noted. Lights Function Number of the following interior bulbs frequently: • interior overhead lamp • map lamp For bulb replacement, see your local Mazda dealer. 41
Owner's Manual
Page 49
...power point caps closed when not being used. The auxiliary power point is located on AUTO and release quickly. Press completely down on the instrument panel. Use the power point. The Maximum power each power point can cause damage not covered by your vehicle. Press and hold the bottom ... rocker switch to open fully without holding the control down Allows the driver's window to close the window. Press again to Passenger Compartment Fuse Panel in a blown fuse. Do not use of the rocker switch to open the window. One touch down . Exceeding these limits will result ...
...power point caps closed when not being used. The auxiliary power point is located on AUTO and release quickly. Press completely down on the instrument panel. Use the power point. The Maximum power each power point can cause damage not covered by your vehicle. Press and hold the bottom ... rocker switch to open fully without holding the control down Allows the driver's window to close the window. Press again to Passenger Compartment Fuse Panel in a blown fuse. Do not use of the rocker switch to open the window. One touch down . Exceeding these limits will result ...

Owner's Manual
Page 142
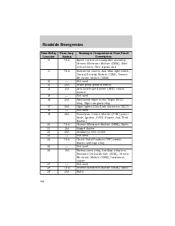
Pull the panel cover outward to access the fuses. 142 Roadside Emergencies Standard fuse amperage rating and color COLOR Fuse rating 2A 3A 4A 5A 7.5A 10A 15A ... Orange Red Blue Tan Natural Cartridge Fuse link maxi cartridge fuses Blue Blue - - Pink Pink Green Green Red Red - Yellow - Brown - Black Passenger compartment fuse panel The fuse panel is located on the left-hand side of the instrument panel facing the driver's side door.
Pull the panel cover outward to access the fuses. 142 Roadside Emergencies Standard fuse amperage rating and color COLOR Fuse rating 2A 3A 4A 5A 7.5A 10A 15A ... Orange Red Blue Tan Natural Cartridge Fuse link maxi cartridge fuses Blue Blue - - Pink Pink Green Green Red Red - Yellow - Brown - Black Passenger compartment fuse panel The fuse panel is located on the left-hand side of the instrument panel facing the driver's side door.
Owner's Manual
Page 144
Roadside Emergencies Fuse/Relay Location 10 Fuse Amp Rating 7.5A Passenger Compartment Fuse Panel Description Speed control servo/amplifier assembly, Generic Electronic Module (GEM), Shift lock actuator, Turn signals, 4x4 Instrument cluster, 4x4, Main light switch, Central Security Module (CSM), Generic Electronic Module (GEM...CPP) switch, Starter interrupt relay Not used Battery saver relay, Auxiliary relay box, Restraint Central Module (RCM), Generic Electronic Module (GEM), Instrument cluster Not used Generic Electronic Module (GEM), Radio Radio 11 7.5A 12 13 14 15 16 17 18 19 - 20A 10A -...
Roadside Emergencies Fuse/Relay Location 10 Fuse Amp Rating 7.5A Passenger Compartment Fuse Panel Description Speed control servo/amplifier assembly, Generic Electronic Module (GEM), Shift lock actuator, Turn signals, 4x4 Instrument cluster, 4x4, Main light switch, Central Security Module (CSM), Generic Electronic Module (GEM...CPP) switch, Starter interrupt relay Not used Battery saver relay, Auxiliary relay box, Restraint Central Module (RCM), Generic Electronic Module (GEM), Instrument cluster Not used Generic Electronic Module (GEM), Radio Radio 11 7.5A 12 13 14 15 16 17 18 19 - 20A 10A -...

Owner's Manual
Page 145
... Emergencies Fuse/Relay Location 30 31 32 33 34 35 36 Fuse Amp Rating 15A - 15A - Passenger Compartment Fuse Panel Description Not used Not used Not used Headlamps, Daytime Running Lamps (DRL) module, Instrument cluster Not used Horn relay (if not equipped with a Central Security Module) Not used Power distribution box The...
... Emergencies Fuse/Relay Location 30 31 32 33 34 35 36 Fuse Amp Rating 15A - 15A - Passenger Compartment Fuse Panel Description Not used Not used Not used Headlamps, Daytime Running Lamps (DRL) module, Instrument cluster Not used Horn relay (if not equipped with a Central Security Module) Not used Power distribution box The...
Owner's Manual
Page 180
...cause scratches. Your vehicle is present on your authorized Mazda dealer. • Never saturate the seat covers with water. CLEANING THE INSTRUMENT CLUSTER LENS Clean with a damp cloth, then dry with a dry cloth. Clean the outside of the instrument panel. The windshield or rear window is clean if ...beads do not form when you have been in contact with a non-abrasive cleaner. CLEANING THE INSTRUMENT PANEL Clean the instrument panel with a damp cloth, then dry with a dry cloth. Do not use household or glass cleaners as insect repellent and suntan lotion...
...cause scratches. Your vehicle is present on your authorized Mazda dealer. • Never saturate the seat covers with water. CLEANING THE INSTRUMENT CLUSTER LENS Clean with a damp cloth, then dry with a dry cloth. Clean the outside of the instrument panel. The windshield or rear window is clean if ...beads do not form when you have been in contact with a non-abrasive cleaner. CLEANING THE INSTRUMENT PANEL Clean the instrument panel with a damp cloth, then dry with a dry cloth. Do not use household or glass cleaners as insect repellent and suntan lotion...
Owner's Manual
Page 191
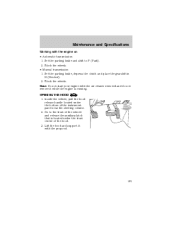
Inside the vehicle, pull the hood release handle located under the front center of the instrument panel near the steering column. 2. Block the wheels. Set the parking brake and shift to the front of the vehicle and release the auxiliary latch that ...
Inside the vehicle, pull the hood release handle located under the front center of the instrument panel near the steering column. 2. Block the wheels. Set the parking brake and shift to the front of the vehicle and release the auxiliary latch that ...

Owner's Manual
Page 238
... identification number (VIN) The vehicle identification number is attached to a metal tag and is located on the front door latch pillar on the driver side instrument panel. (Please note that a Certification Label be affixed to a vehicle and prescribe where the Certification Label may be located.
... identification number (VIN) The vehicle identification number is attached to a metal tag and is located on the front door latch pillar on the driver side instrument panel. (Please note that a Certification Label be affixed to a vehicle and prescribe where the Certification Label may be located.
Owner's Manual
Page 241
Index instrument cluster lens ...180 instrument panel ...180 interior ...180 Mazda car care products ...181 mirrors ...179 plastic parts ...179 washing ...176 waxing ...176 wheels ...177 windows ...181 wiper blades ...179 Clutch fluid ...222 operation while ...
Index instrument cluster lens ...180 instrument panel ...180 interior ...180 Mazda car care products ...181 mirrors ...179 plastic parts ...179 washing ...176 waxing ...176 wheels ...177 windows ...181 wiper blades ...179 Clutch fluid ...222 operation while ...

Owner's Manual
Page 242
... and air conditioning system ...35-36 Hood ...191 I Ignition ...110, 236 Infant seats (see Safety seats) ...97 Inspection/maintenance (I/M) testing ...219 Instrument panel cleaning ...180 cluster ...12, 180 lighting up panel and interior ...39 location of fuel ...214 safety information relating to pass ...39 high beam ...39 replacing bulbs ...41 turning on and...
... and air conditioning system ...35-36 Hood ...191 I Ignition ...110, 236 Infant seats (see Safety seats) ...97 Inspection/maintenance (I/M) testing ...219 Instrument panel cleaning ...180 cluster ...12, 180 lighting up panel and interior ...39 location of fuel ...214 safety information relating to pass ...39 high beam ...39 replacing bulbs ...41 turning on and...

Owner's Manual
Page 243
... ignition ...110 L Lamps bulb replacement specifications chart ...40 cargo lamps ...39 daytime running light ...38 fog lamps ...38 headlamps ...38 headlamps, flash to pass ...39 instrument panel, dimming ...39 interior lamps ...40-41 replacing bulbs ...40-41, 43, 45-46 Lane change indicator (see Turn signal) ...40 LATCH anchors ...106 Lights, warning...
... ignition ...110 L Lamps bulb replacement specifications chart ...40 cargo lamps ...39 daytime running light ...38 fog lamps ...38 headlamps ...38 headlamps, flash to pass ...39 instrument panel, dimming ...39 interior lamps ...40-41 replacing bulbs ...40-41, 43, 45-46 Lane change indicator (see Turn signal) ...40 LATCH anchors ...106 Lights, warning...