

Owner's Manual
Page 52
... the airflow to be left in any snow, ice or leaves from the air intake area (at the bottom of the windshield and underneath the hood). • Do not place objects over the defroster outlets. Once the vehicle has been "aired out", operate the climate control system as desired. • To...
... the airflow to be left in any snow, ice or leaves from the air intake area (at the bottom of the windshield and underneath the hood). • Do not place objects over the defroster outlets. Once the vehicle has been "aired out", operate the climate control system as desired. • To...

Owner's Manual
Page 59
... color except where noted. Install rubber boot on the bulb hooks. 9. Lights Function Number of the tabs. 5. To replace all instrument panel lights - Open the hood. 3. Remove the rubber boot from your dealer.
... color except where noted. Install rubber boot on the bulb hooks. 9. Lights Function Number of the tabs. 5. To replace all instrument panel lights - Open the hood. 3. Remove the rubber boot from your dealer.

Owner's Manual
Page 60
... remove from the lamp assembly. 3. To complete installation, follow the removal procedure in the OFF position. 2. Remove the two screws from lamp assembly. 5. Open the hood. The position lamps are located in the new bulb. 6. Disconnect the electrical connector from the lamp assembly by turning counterclockwise. 60 Remove the bulb socket...
... remove from the lamp assembly. 3. To complete installation, follow the removal procedure in the OFF position. 2. Remove the two screws from lamp assembly. 5. Open the hood. The position lamps are located in the new bulb. 6. Disconnect the electrical connector from the lamp assembly by turning counterclockwise. 60 Remove the bulb socket...

Owner's Manual
Page 79
If all doors and the hood are in the "DOOR" position. Sounding a panic alarm Press this control to unlock the driver's door. Locks and Security Unlocking the doors Press this control ...
If all doors and the hood are in the "DOOR" position. Sounding a panic alarm Press this control to unlock the driver's door. Locks and Security Unlocking the doors Press this control ...
Owner's Manual
Page 181
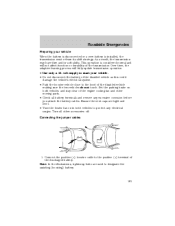
...; Do not disconnect the battery of the disabled vehicle as this could damage the vehicle's electrical system. • Park the booster vehicle close to the hood of the disabled vehicle making sure the two vehicles do not touch. Ensure the vent caps are used to designate the assisting (boosting) battery. - - + + 181...
...; Do not disconnect the battery of the disabled vehicle as this could damage the vehicle's electrical system. • Park the booster vehicle close to the hood of the disabled vehicle making sure the two vehicles do not touch. Ensure the vent caps are used to designate the assisting (boosting) battery. - - + + 181...
Owner's Manual
Page 210
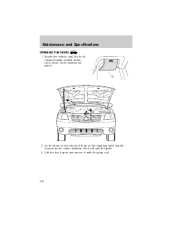
Inside the vehicle, pull the hood release handle located under the bottom of the vehicle, lift up on the auxiliary latch handle located in the center between the hood and the grille. 3. At the front of the instrument panel. 2. Maintenance and Specifications OPENING THE HOOD 1. Lift the hood open and secure it with the prop rod. 210
Inside the vehicle, pull the hood release handle located under the bottom of the vehicle, lift up on the auxiliary latch handle located in the center between the hood and the grille. 3. At the front of the instrument panel. 2. Maintenance and Specifications OPENING THE HOOD 1. Lift the hood open and secure it with the prop rod. 210
Owner's Manual
Page 214
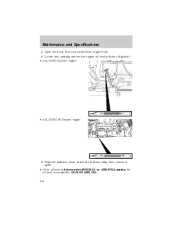
Open the hood. Locate and carefully remove the engine oil level indicator (dipstick). • 2.0L DOHC I4 Zetec engine ADD FULL • 3.0L DOHC V6 Duratec engine MIN MAX 6. Wipe the indicator clean. Protect yourself from engine heat. 5. DO NOT ADD OIL. 214 Insert the indicator fully, then remove it again. • If the oil level is between the MIN-MAX or ADD-FULL marks, the oil level is acceptable. Maintenance and Specifications 4.
Open the hood. Locate and carefully remove the engine oil level indicator (dipstick). • 2.0L DOHC I4 Zetec engine ADD FULL • 3.0L DOHC V6 Duratec engine MIN MAX 6. Wipe the indicator clean. Protect yourself from engine heat. 5. DO NOT ADD OIL. 214 Insert the indicator fully, then remove it again. • If the oil level is between the MIN-MAX or ADD-FULL marks, the oil level is acceptable. Maintenance and Specifications 4.
Owner's Manual
Page 253
... to pass ...55 high beam ...13, 54 replacing bulbs ...59 turning on and off ...54 warning chime ...15 Heating heating and air conditioning system ...50 Hood ...210 I Ignition ...130, 247 Infant seats (see Safety seats) ...122 Inspection/maintenance (I/M) testing ...233 Instrument panel cleaning ...201 cluster ...10 253
... to pass ...55 high beam ...13, 54 replacing bulbs ...59 turning on and off ...54 warning chime ...15 Heating heating and air conditioning system ...50 Hood ...210 I Ignition ...130, 247 Infant seats (see Safety seats) ...122 Inspection/maintenance (I/M) testing ...233 Instrument panel cleaning ...201 cluster ...10 253