
Owner's Manual
Page 6
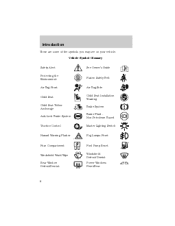
Introduction These are some of the symbols you may see on your vehicle. Vehicle Symbol Glossary Safety Alert Protecting the Environment Air Bag-Front See Owner's Guide Fasten Safety Belt Air Bag-Side Child Seat Installation Warning Brake System Brake Fluid Non-Petroleum Based Master Lighting Switch Fog Lamps-Front Child Seat Child Seat Tether Anchorage Anti-Lock Brake System Traction Control Hazard Warning Flasher Fuse Compartment Fuel Pump Reset Windshield Defrost/Demist Power Windows Front/Rear Windshield Wash/Wipe Rear Window Defrost/Demist 6
Introduction These are some of the symbols you may see on your vehicle. Vehicle Symbol Glossary Safety Alert Protecting the Environment Air Bag-Front See Owner's Guide Fasten Safety Belt Air Bag-Side Child Seat Installation Warning Brake System Brake Fluid Non-Petroleum Based Master Lighting Switch Fog Lamps-Front Child Seat Child Seat Tether Anchorage Anti-Lock Brake System Traction Control Hazard Warning Flasher Fuse Compartment Fuel Pump Reset Windshield Defrost/Demist Power Windows Front/Rear Windshield Wash/Wipe Rear Window Defrost/Demist 6
Owner's Manual
Page 47
... logo as shown. Avoid scratching the reverse side of the CD (the side without a label). • Dust, finger smudges, and dirt can damage, warp or fog CDs. 47 A clouded CD can be damaged. • A new CD may become clouded with a soft cloth. The CD player could be played. • ... not stick paper or tape on the heater when the vehicle is used . • Do not use anything that can decrease the amount of light reflected from the center to use record sprays, antistatic agents, or household spray cleaners. Do not use non-conventional discs such as shown above. When...
... logo as shown. Avoid scratching the reverse side of the CD (the side without a label). • Dust, finger smudges, and dirt can damage, warp or fog CDs. 47 A clouded CD can be damaged. • A new CD may become clouded with a soft cloth. The CD player could be played. • ... not stick paper or tape on the heater when the vehicle is used . • Do not use anything that can decrease the amount of light reflected from the center to use record sprays, antistatic agents, or household spray cleaners. Do not use non-conventional discs such as shown above. When...

Owner's Manual
Page 55
When the highbeams are activated, the fog lamps will illuminate. The fog lamp indicator light will not operate. Press the foglamp control to dim. 55 INSTRUMENT PANEL DIMMER CONTROL Use to adjust the brightness of the instrument panel. • Push .... • Push and hold bottom of control to activate the fog lamps. Press the fog lamp control again to deactivate. OFF FOG LAMP CONTROL (IF EQUIPPED) The fog lamps can only be turned on when the headlamp control is in the low beams position. Lights Flash to pass Pull toward you slightly to activate and...
When the highbeams are activated, the fog lamps will illuminate. The fog lamp indicator light will not operate. Press the foglamp control to dim. 55 INSTRUMENT PANEL DIMMER CONTROL Use to adjust the brightness of the instrument panel. • Push .... • Push and hold bottom of control to activate the fog lamps. Press the fog lamp control again to deactivate. OFF FOG LAMP CONTROL (IF EQUIPPED) The fog lamps can only be turned on when the headlamp control is in the low beams position. Lights Flash to pass Pull toward you slightly to activate and...

Owner's Manual
Page 57
... will remain on for 15 seconds after the door is shut. Press the controls on either side of the following lamps frequently: • Headlamps • Fog lamps (if equipped) • High-mount brake lamp • Brake lamps • Turn signal lamps 57 This map lamp will only come on at all.... Lights The dome lamp will stay on if the control is moved to the driver's side position, the lamp will remain on for 15 seconds after ...
... will remain on for 15 seconds after the door is shut. Press the controls on either side of the following lamps frequently: • Headlamps • Fog lamps (if equipped) • High-mount brake lamp • Brake lamps • Turn signal lamps 57 This map lamp will only come on at all.... Lights The dome lamp will stay on if the control is moved to the driver's side position, the lamp will remain on for 15 seconds after ...

Owner's Manual
Page 58
...time. Function Park/turn lamps (front) Headlamps Rear stop/tail lamps Rear turn lamps Rear license plate lamps Backup lamp Rear/turn/sidemarker Fog lamp (if equipped) Cargo lamp Interior overhead lamp 58 Number of the following interior bulbs frequently: • interior overhead lamp •... map lamp For bulb replacement, see an authorized Mazda dealer. If a bulb is removed for North America to assure lamp performance, light brightness and pattern and safe visibility. Lights • License plate lamp • Tail lamps • Back-up lamps Do not...
...time. Function Park/turn lamps (front) Headlamps Rear stop/tail lamps Rear turn lamps Rear license plate lamps Backup lamp Rear/turn/sidemarker Fog lamp (if equipped) Cargo lamp Interior overhead lamp 58 Number of the following interior bulbs frequently: • interior overhead lamp •... map lamp For bulb replacement, see an authorized Mazda dealer. If a bulb is removed for North America to assure lamp performance, light brightness and pattern and safe visibility. Lights • License plate lamp • Tail lamps • Back-up lamps Do not...

Owner's Manual
Page 61
...Install the bulb socket in reverse order. Replacing high-mount brake lamp bulbs For bulb replacement, see an authorized Mazda dealer. Connect the electrical connector to the new fog lamp bulb. 4. Disconnect the electrical connector from the liftgate. 2. Install the lamp assembly on liftgate with ... equipped) 1. Remove two screws and the license plate lamp assembly (located above the license plate) from the fog lamp bulb. 3. Replacing license plate lamp bulbs 1. Lights 5. Pull the bulb straight out of the socket and push in lamp assembly turning it clockwise, 5. Remove the...
...Install the bulb socket in reverse order. Replacing high-mount brake lamp bulbs For bulb replacement, see an authorized Mazda dealer. Connect the electrical connector to the new fog lamp bulb. 4. Disconnect the electrical connector from the liftgate. 2. Install the lamp assembly on liftgate with ... equipped) 1. Remove two screws and the license plate lamp assembly (located above the license plate) from the fog lamp bulb. 3. Replacing license plate lamp bulbs 1. Lights 5. Pull the bulb straight out of the socket and push in lamp assembly turning it clockwise, 5. Remove the...
Owner's Manual
Page 254
...82-84 key in ignition chime ...15 positions of the ignition ...130 L Lamps bulb replacement specifications chart ...58 cargo lamps ...55 daytime running light ...54 fog lamps ...55 headlamps ...54 headlamps, flash to pass ...55 instrument panel, dimming ...55 interior lamps ...56, 58 replacing bulbs ...57, 59...-61 Lane change indicator (see Turn signal) ...56 Liftgate ...75 Lights, warning and indicator ...10 air bag ...12 anti-lock brakes (ABS) ...13,...
...82-84 key in ignition chime ...15 positions of the ignition ...130 L Lamps bulb replacement specifications chart ...58 cargo lamps ...55 daytime running light ...54 fog lamps ...55 headlamps ...54 headlamps, flash to pass ...55 instrument panel, dimming ...55 interior lamps ...56, 58 replacing bulbs ...57, 59...-61 Lane change indicator (see Turn signal) ...56 Liftgate ...75 Lights, warning and indicator ...10 air bag ...12 anti-lock brakes (ABS) ...13,...


