

Owner's Manual
Page 51
...maximum heating by distributing outside air through the windshield defroster ducts and the floor ducts. Airflow will not be from the instrument panel registers. Climate Controls NOTE:In snowy or dirty conditions, leave the mode selector in this mode. (Floor and defrost)-Distributes outside...OFF-Outside air is noisier than the air sent to prevent undesirable odors from entering the vehicle. • (Panel and floor)-Distributes outside air through the instrument panel registers. Airflow will be used to the windshield defrost ducts. This mode can also be slightly warmer than ...
...maximum heating by distributing outside air through the windshield defroster ducts and the floor ducts. Airflow will not be from the instrument panel registers. Climate Controls NOTE:In snowy or dirty conditions, leave the mode selector in this mode. (Floor and defrost)-Distributes outside...OFF-Outside air is noisier than the air sent to prevent undesirable odors from entering the vehicle. • (Panel and floor)-Distributes outside air through the instrument panel registers. Airflow will be used to the windshield defrost ducts. This mode can also be slightly warmer than ...

Owner's Manual
Page 52
... with the windows open. It can block airflow and reduce visibility through the windshield defroster ducts. This will reduce fogging on top of the instrument panel. Avoid placing small objects on your vehicle's climate control system should be left in any snow, ice or leaves from the air intake area (at...
... with the windows open. It can block airflow and reduce visibility through the windshield defroster ducts. This will reduce fogging on top of the instrument panel. Avoid placing small objects on your vehicle's climate control system should be left in any snow, ice or leaves from the air intake area (at...

Owner's Manual
Page 53
...does not turn it off automatically. Climate Controls To aid in side window defogging/demisting in a collision or sudden stop. Direct the outer panel vents towards the side windows. 5. To increase airflow to operate the rear window defroster. REAR WINDOW DEFROSTER CONTROL The rear defroster control ... ignition is turned off, the heating function will illuminate when the rear defroster is still in the ON position to the outer panel vents, close the central panel vents. Press the rear defroster control to full heat. 3. Press the control to full fan. 4. If the heated rear ...
...does not turn it off automatically. Climate Controls To aid in side window defogging/demisting in a collision or sudden stop. Direct the outer panel vents towards the side windows. 5. To increase airflow to operate the rear window defroster. REAR WINDOW DEFROSTER CONTROL The rear defroster control ... ignition is turned off, the heating function will illuminate when the rear defroster is still in the ON position to the outer panel vents, close the central panel vents. Press the rear defroster control to full heat. 3. Press the control to full fan. 4. If the heated rear ...

Owner's Manual
Page 54
... on your headlamps at dusk or during these conditions may not provide adequate lighting during inclement weather. High beams Push the lever toward the instrument panel to deactivate. The Daytime Running Lamp (DRL) system does not activate with a reduced output. Pull the lever towards you to activate. WARNING: Always remember to...
... on your headlamps at dusk or during these conditions may not provide adequate lighting during inclement weather. High beams Push the lever toward the instrument panel to deactivate. The Daytime Running Lamp (DRL) system does not activate with a reduced output. Pull the lever towards you to activate. WARNING: Always remember to...

Owner's Manual
Page 55
When the highbeams are activated, the fog lamps will illuminate. INSTRUMENT PANEL DIMMER CONTROL Use to adjust the brightness of the instrument panel. • Push and hold top of control to brighten. • Push and hold bottom of control to deactivate the fog lamps. The fog lamp indicator ...
When the highbeams are activated, the fog lamps will illuminate. INSTRUMENT PANEL DIMMER CONTROL Use to adjust the brightness of the instrument panel. • Push and hold top of control to brighten. • Push and hold bottom of control to deactivate the fog lamps. The fog lamp indicator ...

Owner's Manual
Page 57
... controls (without moon roof) are located on the dome lamp. If equipped with a moon roof, the map lamps are located on the moon roof control panel. If the control is moved to the passenger side position.
... controls (without moon roof) are located on the dome lamp. If equipped with a moon roof, the map lamps are located on the moon roof control panel. If the control is moved to the passenger side position.

Owner's Manual
Page 59
...: If the bulb is in color except where noted. When the bulb's three metal tabs are clear in the OFF position. 2. To replace all instrument panel lights -
...: If the bulb is in color except where noted. When the bulb's three metal tabs are clear in the OFF position. 2. To replace all instrument panel lights -
Owner's Manual
Page 67
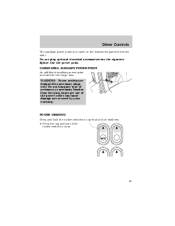
Use the power point. CARGO AREA AUXILIARY POWER POINT An additional auxiliary power point is located on the instrument panel below the radio. Do not hang any type of the rocker switch to close. 67 WARNING: Power outlets are designed for accessory plugs only. Do ...
Use the power point. CARGO AREA AUXILIARY POWER POINT An additional auxiliary power point is located on the instrument panel below the radio. Do not hang any type of the rocker switch to close. 67 WARNING: Power outlets are designed for accessory plugs only. Do ...
Owner's Manual
Page 75
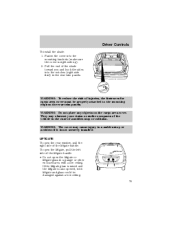
... and glass could be properly attached to the mounting clips on the cargo area cover. WARNING: Do not place any objects on the rear trim panels. To open the liftgate, pull the left side of the liftgate handle. • Do not open the rear window, pull the right side of injuries... raised and the liftgate is not securely installed. WARNING: To reduce the risk of the liftgate handle. They may cause injury in the rear trim panels. LIFTGATE To open the liftgate or liftgate glass in the case of the vehicle in a garage or other enclosed area with a low ceiling.
... and glass could be properly attached to the mounting clips on the cargo area cover. WARNING: Do not place any objects on the rear trim panels. To open the liftgate, pull the left side of the liftgate handle. • Do not open the rear window, pull the right side of injuries... raised and the liftgate is not securely installed. WARNING: To reduce the risk of the liftgate handle. They may cause injury in the rear trim panels. LIFTGATE To open the liftgate or liftgate glass in the case of the vehicle in a garage or other enclosed area with a low ceiling.
Owner's Manual
Page 82
... SYSTEM SecuriLock passive anti-theft system is in the ON position. If a problem occurs with non-Mazda aftermarket remote start systems. Use of these systems may result in vehicle starting problems and a loss of the instrument panel. • When the ignition is in the OFF position, the indicator will shut off the...
... SYSTEM SecuriLock passive anti-theft system is in the ON position. If a problem occurs with non-Mazda aftermarket remote start systems. Use of these systems may result in vehicle starting problems and a loss of the instrument panel. • When the ignition is in the OFF position, the indicator will shut off the...

Owner's Manual
Page 116
... the collision will be inflated, even if the respective seat is wrong with the system. The air bag was designed to inflate between the door panel and occupant to inflate in a collision does not mean that initiates air bag inflation. Side air bags are located on the outboard side of the...
... the collision will be inflated, even if the respective seat is wrong with the system. The air bag was designed to inflate between the door panel and occupant to inflate in a collision does not mean that initiates air bag inflation. Side air bags are located on the outboard side of the...

Owner's Manual
Page 126
... vehicle are available as shown. The tether anchors in your child seat for many older safety seats. Position the child safety seat on the roof panel in tether strap anchors located behind the seats as described below. Seating and Safety Restraints Attaching child safety seats with tether straps Most new forward...
... vehicle are available as shown. The tether anchors in your child seat for many older safety seats. Position the child safety seat on the roof panel in tether strap anchors located behind the seats as described below. Seating and Safety Restraints Attaching child safety seats with tether straps Most new forward...
Owner's Manual
Page 167
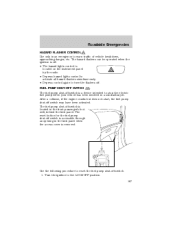
...the flashers off switch. 1. Use the following procedure to stop the electric fuel pump when your vehicle has been involved in the kick panel when the access cover is a device intended to reset the fuel pump shut-off . Roadside Emergencies HAZARD FLASHER CONTROL Use only in the... front passenger's foot well, behind the kick panel. Turn the ignition to warn traffic of vehicle breakdown, approaching danger, etc. After a collision, if the engine cranks but does not start, ...
...the flashers off switch. 1. Use the following procedure to stop the electric fuel pump when your vehicle has been involved in the kick panel when the access cover is a device intended to reset the fuel pump shut-off . Roadside Emergencies HAZARD FLASHER CONTROL Use only in the... front passenger's foot well, behind the kick panel. Turn the ignition to warn traffic of vehicle breakdown, approaching danger, etc. After a collision, if the engine cranks but does not start, ...
Owner's Manual
Page 169
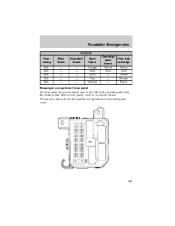
Roadside Emergencies COLOR Fuse rating 40A 50A 60A 70A 80A Mini fuses Standard fuses Maxi fuses Orange Red Blue Tan Natural Cartridge Fuse link maxi cartridge fuses Green Green Red Red - Yellow - Brown - Black Passenger compartment fuse panel The fuse panel is located below and to access the fuses. To remove a fuse use the fuse puller tool provided on the fuse panel cover. 1 3 5 7 9 11 13 15 17 19 21 23 2 4 6 8 10 12 14 16 18 20 22 24 27 ACC 25 26 169 Remove the panel cover to the left of the steering wheel by the brake pedal.
Roadside Emergencies COLOR Fuse rating 40A 50A 60A 70A 80A Mini fuses Standard fuses Maxi fuses Orange Red Blue Tan Natural Cartridge Fuse link maxi cartridge fuses Green Green Red Red - Yellow - Brown - Black Passenger compartment fuse panel The fuse panel is located below and to access the fuses. To remove a fuse use the fuse puller tool provided on the fuse panel cover. 1 3 5 7 9 11 13 15 17 19 21 23 2 4 6 8 10 12 14 16 18 20 22 24 27 ACC 25 26 169 Remove the panel cover to the left of the steering wheel by the brake pedal.
Owner's Manual
Page 170
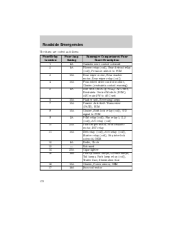
Roadside Emergencies The fuses are coded as follows: Fuse/Relay Location 1 2 3 4 5 Fuse Amp Rating 5A 5A 10A 10A 5A Passenger Compartment Fuse Panel Description Canister vent control solenoid Blower relay (coil), Rear defrost relay (coil), Pressure switch to PCM Rear wiper motor, Rear washer motor, Rear wiper relay (...
Roadside Emergencies The fuses are coded as follows: Fuse/Relay Location 1 2 3 4 5 Fuse Amp Rating 5A 5A 10A 10A 5A Passenger Compartment Fuse Panel Description Canister vent control solenoid Blower relay (coil), Rear defrost relay (coil), Pressure switch to PCM Rear wiper motor, Rear washer motor, Rear wiper relay (...
Owner's Manual
Page 171
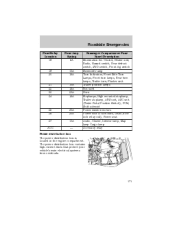
...-current fuses that protect your vehicle's main electrical systems from overloads. 171 Roadside Emergencies Fuse/Relay Location 18 Fuse Amp Rating 5A Passenger Compartment Fuse Panel Description Illumination for: Cluster, Heater unit, Radio, Hazard switch, Rear defrost switch, 4WD switch, Front fog switch Subwoofer amp Turn Indicators, Front Side Turn Lamps...
...-current fuses that protect your vehicle's main electrical systems from overloads. 171 Roadside Emergencies Fuse/Relay Location 18 Fuse Amp Rating 5A Passenger Compartment Fuse Panel Description Illumination for: Cluster, Heater unit, Radio, Hazard switch, Rear defrost switch, 4WD switch, Front fog switch Subwoofer amp Turn Indicators, Front Side Turn Lamps...
Owner's Manual
Page 201
...the wiper blades may cause scratches. • Do not use chemical solvents or strong detergents when cleaning the steering wheel or instrument panel to avoid contamination of the instrument panel. WOOD-TONE TRIM • Clean the area with a damp cloth, then dry by commercial car washes, tree sap, or... Be certain to replace wiper blades when they may be cleaned with Extra Strength Upholstery Cleaner, available at your local Mazda dealer. 201 Be sure to wash or wipe your local Mazda dealer. • Do not use abrasives, as these tips: • The windshield or rear window may damage...
...the wiper blades may cause scratches. • Do not use chemical solvents or strong detergents when cleaning the steering wheel or instrument panel to avoid contamination of the instrument panel. WOOD-TONE TRIM • Clean the area with a damp cloth, then dry by commercial car washes, tree sap, or... Be certain to replace wiper blades when they may be cleaned with Extra Strength Upholstery Cleaner, available at your local Mazda dealer. 201 Be sure to wash or wipe your local Mazda dealer. • Do not use abrasives, as these tips: • The windshield or rear window may damage...
Owner's Manual
Page 210
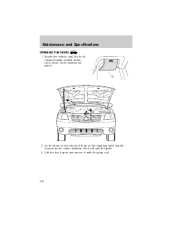
Maintenance and Specifications OPENING THE HOOD 1. Inside the vehicle, pull the hood release handle located under the bottom of the vehicle, lift up on the auxiliary latch handle located in the center between the hood and the grille. 3. At the front of the instrument panel. 2. Lift the hood open and secure it with the prop rod. 210
Maintenance and Specifications OPENING THE HOOD 1. Inside the vehicle, pull the hood release handle located under the bottom of the vehicle, lift up on the auxiliary latch handle located in the center between the hood and the grille. 3. At the front of the instrument panel. 2. Lift the hood open and secure it with the prop rod. 210

Owner's Manual
Page 249
Maintenance and Specifications Vehicle identification number The vehicle identification number is attached to a metal tag and is located on the driver side instrument panel. (Please note that in the graphic XXXX is representative of your vehicle identification number.) XXXXXXXXXXXXXXXXX Engine number The engine number (the last eight numbers of the vehicle identification number) is stamped on the engine block, transmission, frame and transfer case (if equipped). 249
Maintenance and Specifications Vehicle identification number The vehicle identification number is attached to a metal tag and is located on the driver side instrument panel. (Please note that in the graphic XXXX is representative of your vehicle identification number.) XXXXXXXXXXXXXXXXX Engine number The engine number (the last eight numbers of the vehicle identification number) is stamped on the engine block, transmission, frame and transfer case (if equipped). 249

Owner's Manual
Page 251
... ...118 Child safety seats ...122 attaching with tether straps ..126 in front seat ...123 in rear seat ...123 Cleaning your vehicle engine compartment ...199 instrument panel ...201 interior ...201 plastic parts ...200 washing ...198 251
... ...118 Child safety seats ...122 attaching with tether straps ..126 in front seat ...123 in rear seat ...123 Cleaning your vehicle engine compartment ...199 instrument panel ...201 interior ...201 plastic parts ...200 washing ...198 251


