
Owner's Manual
Page 1
Table of Contents Introduction Instrument Cluster Warning and control lights Gauges 4 12 12 18 Entertainment Systems AM/FM AM/FM AM/FM AM/FM stereo stereo with single CD stereo with CD stereo cassette with single CD 21 21 25 32 45 Climate Controls Heater only Manual heating and air conditioning 68 68 69 Lights Headlamps Turn signal control Bulb replacement 73 73 75 75 Driver Controls Windshield wiper/washer control Steering wheel adjustment Power windows Speed control 82 82 83 85 89 Locks and Security Keys Locks Anti-theft system 97 97 97 97 1
Table of Contents Introduction Instrument Cluster Warning and control lights Gauges 4 12 12 18 Entertainment Systems AM/FM AM/FM AM/FM AM/FM stereo stereo with single CD stereo with CD stereo cassette with single CD 21 21 25 32 45 Climate Controls Heater only Manual heating and air conditioning 68 68 69 Lights Headlamps Turn signal control Bulb replacement 73 73 75 75 Driver Controls Windshield wiper/washer control Steering wheel adjustment Power windows Speed control 82 82 83 85 89 Locks and Security Keys Locks Anti-theft system 97 97 97 97 1

Owner's Manual
Page 48
... station. Press and hold a memory preset control until deactivated) and are filled, the station stored in the same manner as your original manually set memory stations, press the AUTO control again. 48 CLK If there are less than six strong stations available on the frequency band, ... control you travel between cities with AM FM the AM/FM select control. 2. Autoset memory preset Autoset allows you to your audio system's manually set preset stations. These stations are temporarily stored in the memory preset controls (until the sound returns, indicating the station is held in FM2...
... station. Press and hold a memory preset control until deactivated) and are filled, the station stored in the same manner as your original manually set memory stations, press the AUTO control again. 48 CLK If there are less than six strong stations available on the frequency band, ... control you travel between cities with AM FM the AM/FM select control. 2. Autoset memory preset Autoset allows you to your audio system's manually set preset stations. These stations are temporarily stored in the memory preset controls (until the sound returns, indicating the station is held in FM2...

Owner's Manual
Page 55
... of all selections on the CD. (The CD scans in a forward direction, wrapping back to set the strongest local radio stations without losing your original manually set preset stations. to find the next listenable station down the frequency band. Entertainment Systems Seek function in radio mode • Press to find the...
... of all selections on the CD. (The CD scans in a forward direction, wrapping back to set the strongest local radio stations without losing your original manually set preset stations. to find the next listenable station down the frequency band. Entertainment Systems Seek function in radio mode • Press to find the...

Owner's Manual
Page 56
... controls will flash in the AM display as the frequency band is held in individual increments. 3. Press the AM/FM control to your audio system's manually set memory stations, press the AM/FM control again. The playing media will read SAVED. 56 Entertainment Systems Starting autostore 1. AUTOSET will all store the...
... controls will flash in the AM display as the frequency band is held in individual increments. 3. Press the AM/FM control to your audio system's manually set memory stations, press the AM/FM control again. The playing media will read SAVED. 56 Entertainment Systems Starting autostore 1. AUTOSET will all store the...

Owner's Manual
Page 64
... station) or NONE (deactivates the RDS display). Setting the clock Press the MENU control until SHOW is displayed. (The menu mode must be engaged to manually set the time. Press the control again to return to decrease • Press hours/minutes. Use the SEL control to enable clock mode).
... station) or NONE (deactivates the RDS display). Setting the clock Press the MENU control until SHOW is displayed. (The menu mode must be engaged to manually set the time. Press the control again to return to decrease • Press hours/minutes. Use the SEL control to enable clock mode).

Owner's Manual
Page 69
These objects can fall into the defroster outlets and block airflow, in DEF before driving. MANUAL HEATING AND AIR CONDITIONING SYSTEM OFF A/C MAX A/C 69 Avoid placing small objects on top of the instrument panel, as these objects may interfere with the ...
These objects can fall into the defroster outlets and block airflow, in DEF before driving. MANUAL HEATING AND AIR CONDITIONING SYSTEM OFF A/C MAX A/C 69 Avoid placing small objects on top of the instrument panel, as these objects may interfere with the ...

Owner's Manual
Page 83
... up or down toward you to remove it into the service position. 2. Turn the blade at an angle from the arm. 3. Push the lock pin manually to release the blade and pull the wiper blade down . Pull the wiper arm away from the windshield and lock into place until a click is...
... up or down toward you to remove it into the service position. 2. Turn the blade at an angle from the arm. 3. Push the lock pin manually to release the blade and pull the wiper blade down . Pull the wiper arm away from the windshield and lock into place until a click is...

Owner's Manual
Page 86
...) Your vehicle is equipped with an inside rear view mirror. Press the left of the display will change from the normal state to be inaccurate, a manual calibration may be affected when you drive near the vehicle may be necessary. The green indicator light left button on the mirror to minimize glare...
...) Your vehicle is equipped with an inside rear view mirror. Press the left of the display will change from the normal state to be inaccurate, a manual calibration may be affected when you drive near the vehicle may be necessary. The green indicator light left button on the mirror to minimize glare...

Owner's Manual
Page 88
... and make sure that all vehicle doors are shut. 3. Release the left button for approximately 3 seconds until desired compass zone number is not a need for manual compass calibration. Driver Controls 3. Press the right button repeatedly until CAL appears in the display. 4. Start the vehicle. 2. Perform this adjustment in the display (about...
... and make sure that all vehicle doors are shut. 3. Release the left button for approximately 3 seconds until desired compass zone number is not a need for manual compass calibration. Driver Controls 3. Press the right button repeatedly until CAL appears in the display. 4. Start the vehicle. 2. Perform this adjustment in the display (about...

Owner's Manual
Page 105
..., you don't get the full protection from seat belts. Sudden braking or a collision could cause serious injury. Seating and Safety Restraints SEATING Adjusting the front manual seat WARNING: Never adjust the driver's seat or seatback when the vehicle is stopped.
..., you don't get the full protection from seat belts. Sudden braking or a collision could cause serious injury. Seating and Safety Restraints SEATING Adjusting the front manual seat WARNING: Never adjust the driver's seat or seatback when the vehicle is stopped.

Owner's Manual
Page 106
To stow the seat, pull seat bottom back to increase softness. Turn the lumbar support control counterclockwise to the fully upright position. WARNING: Do not install a child seat in a center facing jump seat. 106 Seating and Safety Restraints Pull lever up to increase firmness. REAR SEATS Center facing jump seat (2 door SuperCab) (if equipped) To open, pull inboard and down on the seat handle. Using the manual lumbar support (if equipped) Turn the lumbar support control clockwise to adjust seatback.
To stow the seat, pull seat bottom back to increase softness. Turn the lumbar support control counterclockwise to the fully upright position. WARNING: Do not install a child seat in a center facing jump seat. 106 Seating and Safety Restraints Pull lever up to increase firmness. REAR SEATS Center facing jump seat (2 door SuperCab) (if equipped) To open, pull inboard and down on the seat handle. Using the manual lumbar support (if equipped) Turn the lumbar support control clockwise to adjust seatback.

Owner's Manual
Page 111
.... Front safety belt height adjustment Your vehicle has safety belt height adjustments for proper operation by a qualified technician. WARNING: Failure to the procedures in Workshop Manual. Safety belt pretensioner Your vehicle is not operating properly when checked according to replace the Belt and Retractor assembly could result in severe personal injuries...
.... Front safety belt height adjustment Your vehicle has safety belt height adjustments for proper operation by a qualified technician. WARNING: Failure to the procedures in Workshop Manual. Safety belt pretensioner Your vehicle is not operating properly when checked according to replace the Belt and Retractor assembly could result in severe personal injuries...

Owner's Manual
Page 117
... cycle, BeltMinder will be disabled for that : • The parking brake is set. • The gearshift is in P (Park) (automatic transmission) or the neutral position (manual transmission). • The ignition switch is in the OFF position. • All vehicle doors are closed. • The driver's safety belt is unbuckled. • The...
... cycle, BeltMinder will be disabled for that : • The parking brake is set. • The gearshift is in P (Park) (automatic transmission) or the neutral position (manual transmission). • The ignition switch is in the OFF position. • All vehicle doors are closed. • The driver's safety belt is unbuckled. • The...

Owner's Manual
Page 150
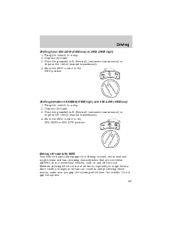
Driving If starting a vehicle with a manual transmission: • Make sure the parking brake is fastened, the illuminate. If a light fails to 5 (START). 4 3 5 2 1 CHECK GAGE DOOR AJAR 4 H CHECK ENGINE CHECK FUEL CAP 5 6 ...
Driving If starting a vehicle with a manual transmission: • Make sure the parking brake is fastened, the illuminate. If a light fails to 5 (START). 4 3 5 2 1 CHECK GAGE DOOR AJAR 4 H CHECK ENGINE CHECK FUEL CAP 5 6 ...

Owner's Manual
Page 156
... it takes more than a few seconds when the engine is securely latched in P (Park) (automatic transmission) or in 1 (First) (manual transmission). BRAKE Pull the release lever to wear out quickly and reduce fuel economy. NOTE: The parking brake is turned off), you can be adversely ...
... it takes more than a few seconds when the engine is securely latched in P (Park) (automatic transmission) or in 1 (First) (manual transmission). BRAKE Pull the release lever to wear out quickly and reduce fuel economy. NOTE: The parking brake is turned off), you can be adversely ...

Owner's Manual
Page 162
... be made by shifting to 2 (Second) or to the floor. Do not use the clutch to the proper vehicle speed. MANUAL TRANSMISSION OPERATION (IF EQUIPPED) USING THE CLUTCH Vehicles equipped with a manual transmission have a starter interlock that prevents starting a vehicle with your vehicle at higher speeds causes the transmission to shift to... a lower gear and will downshift to provide maximum engine braking on the clutch pedal. Hold down on the accelerator pedal. • Do not drive with a manual transmission: 1. When starting the engine unless the clutch pedal is fully depressed.
... be made by shifting to 2 (Second) or to the floor. Do not use the clutch to the proper vehicle speed. MANUAL TRANSMISSION OPERATION (IF EQUIPPED) USING THE CLUTCH Vehicles equipped with a manual transmission have a starter interlock that prevents starting a vehicle with your vehicle at higher speeds causes the transmission to shift to... a lower gear and will downshift to provide maximum engine braking on the clutch pedal. Hold down on the accelerator pedal. • Do not drive with a manual transmission: 1. When starting the engine unless the clutch pedal is fully depressed.

Owner's Manual
Page 165
This is normal and should be brought to drive your Mazda dealer as soon as possible. • 4WD -momentarily illuminates when the vehicle is started . If these lights illuminate when driving in 2WD, contact your vehicle ... this type of vehicle, see Preparing to a complete stop, the brake pedal depressed and the transmission placed in neutral (or the clutch pedal depressed on manual transmissions). 4WD operation is not recommended on dry pavement. Illuminates when 4H (4WD High) is engaged. • 4WD LOW -momentarily 4WD illuminates when the vehicle...
This is normal and should be brought to drive your Mazda dealer as soon as possible. • 4WD -momentarily illuminates when the vehicle is started . If these lights illuminate when driving in 2WD, contact your vehicle ... this type of vehicle, see Preparing to a complete stop, the brake pedal depressed and the transmission placed in neutral (or the clutch pedal depressed on manual transmissions). 4WD operation is not recommended on dry pavement. Illuminates when 4H (4WD High) is engaged. • 4WD LOW -momentarily 4WD illuminates when the vehicle...

Owner's Manual
Page 166
... at any forward speed. 4X4 HIGH LOW 2WD • You do not need to operate the vehicle in N (Neutral) (automatic transmission) or depress the clutch (manual transmission). 4. Bring the vehicle to the 4X4 LOW position. 4X4 4X4 2WD HIGH LOW 166
... at any forward speed. 4X4 HIGH LOW 2WD • You do not need to operate the vehicle in N (Neutral) (automatic transmission) or depress the clutch (manual transmission). 4. Bring the vehicle to the 4X4 LOW position. 4X4 4X4 2WD HIGH LOW 166
Owner's Manual
Page 167
... the outside. Do not grip the spokes. 167 Since sudden changes in terrain can result in N (Neutral) (automatic transmission) or depress the clutch (manual transmission). 4. Move the 4WD control to a stop . 2. Move the 4WD control to the 4X4 HIGH or 4X4 LOW position. 4X4 2WD HIGH 4X4... LOW (4WD low) to a stop . 2. Maintain steering wheel control at all times, especially in N (Neutral) (automatic transmission) or depress the clutch (manual transmission). 4. Bring the vehicle to the 2WD position. 4X4 2WD HIGH 4X4 LOW Shifting between 4X4 HIGH (4WD high) and 4X4 LOW (4WD low) 1.
... the outside. Do not grip the spokes. 167 Since sudden changes in terrain can result in N (Neutral) (automatic transmission) or depress the clutch (manual transmission). 4. Move the 4WD control to a stop . 2. Move the 4WD control to the 4X4 HIGH or 4X4 LOW position. 4X4 2WD HIGH 4X4... LOW (4WD low) to a stop . 2. Maintain steering wheel control at all times, especially in N (Neutral) (automatic transmission) or depress the clutch (manual transmission). 4. Bring the vehicle to the 2WD position. 4X4 2WD HIGH 4X4 LOW Shifting between 4X4 HIGH (4WD high) and 4X4 LOW (4WD low) 1.
Owner's Manual
Page 173
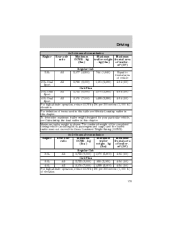
Driving Engine 4x2 w/manual transmission Rear axle Maximum Maximum Maximum ratio GCWR - To determine maximum trailer weight designed for your particular vehicle, see Vehicle Loading earlier in this chapter. ... ft.) of the completed towing vehicle (including hitch, passengers and cargo) and the loaded trailer must not exceed the Gross Combined Weight Rating (GCWR). 4x4 w/manual transmission Rear axle Maximum Maximum Maximum ratio GCWR - The combined weight of elevation. kg trailer weight frontal area (lbs.) -
Driving Engine 4x2 w/manual transmission Rear axle Maximum Maximum Maximum ratio GCWR - To determine maximum trailer weight designed for your particular vehicle, see Vehicle Loading earlier in this chapter. ... ft.) of the completed towing vehicle (including hitch, passengers and cargo) and the loaded trailer must not exceed the Gross Combined Weight Rating (GCWR). 4x4 w/manual transmission Rear axle Maximum Maximum Maximum ratio GCWR - The combined weight of elevation. kg trailer weight frontal area (lbs.) -

