
Owner's Manual
Page 8
Introduction These are some of the symbols you may see on your vehicle. Vehicle Symbol Glossary Safety Alert Protecting the Environment Air Bag-Front See Owner's Guide Fasten Safety Belt Air Bag-Side Child Seat Installation Warning Brake System Brake Fluid Non-Petroleum Based Master Lighting Switch Fog Lamps-Front Child Seat Child Seat Tether Anchorage Anti-Lock Brake System Traction Control Hazard Warning Flasher Fuse Compartment Fuel Pump Reset Windshield Defrost/Demist Power Windows Front/Rear Windshield Wash/Wipe Rear Window Defrost/Demist 8
Introduction These are some of the symbols you may see on your vehicle. Vehicle Symbol Glossary Safety Alert Protecting the Environment Air Bag-Front See Owner's Guide Fasten Safety Belt Air Bag-Side Child Seat Installation Warning Brake System Brake Fluid Non-Petroleum Based Master Lighting Switch Fog Lamps-Front Child Seat Child Seat Tether Anchorage Anti-Lock Brake System Traction Control Hazard Warning Flasher Fuse Compartment Fuel Pump Reset Windshield Defrost/Demist Power Windows Front/Rear Windshield Wash/Wipe Rear Window Defrost/Demist 8
Owner's Manual
Page 73
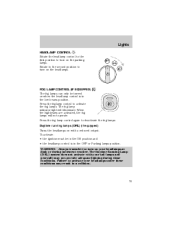
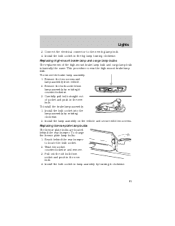
...turned on the headlamps. Failure to activate your tail lamps and generally may result in the OFF or Parking lamps position. The fog lamp indicator light will not operate. Rotate to the second position to turn on when the headlamp control is in a collision. 73 Daytime running ...DRL) (if equipped) Turns the headlamps on the parking lamps. Press the foglamp control to deactivate the fog lamps. Press the fog lamp control again to activate the fog lamps. Lights HEADLAMP CONTROL Rotate the headlamp control to the first position to turn on with your headlamps under these ...
...turned on the headlamps. Failure to activate your tail lamps and generally may result in the OFF or Parking lamps position. The fog lamp indicator light will not operate. Rotate to the second position to turn on when the headlamp control is in a collision. 73 Daytime running ...DRL) (if equipped) Turns the headlamps on the parking lamps. Press the foglamp control to deactivate the fog lamps. Press the fog lamp control again to activate the fog lamps. Lights HEADLAMP CONTROL Rotate the headlamp control to the first position to turn on with your headlamps under these ...

Owner's Manual
Page 75
...either the left turn signal. • Push up lamps Do not remove lamp bulbs unless they can be replaced immediately with daytime running lights, use of the turn signal. • In vehicles equipped with new ones. BULBS Replacing exterior bulbs Check the operation of time, contaminants... • the remote entry controls are pressed and the ignition is removed for an extended period of the following lamps frequently: • Headlamps • Fog lamps (if equipped) • High-mount brake lamp • Brake lamps • Turn signal lamps • License plate lamp • Tail lamps ...
...either the left turn signal. • Push up lamps Do not remove lamp bulbs unless they can be replaced immediately with daytime running lights, use of the turn signal. • In vehicles equipped with new ones. BULBS Replacing exterior bulbs Check the operation of time, contaminants... • the remote entry controls are pressed and the ignition is removed for an extended period of the following lamps frequently: • Headlamps • Fog lamps (if equipped) • High-mount brake lamp • Brake lamps • Turn signal lamps • License plate lamp • Tail lamps ...
Owner's Manual
Page 76
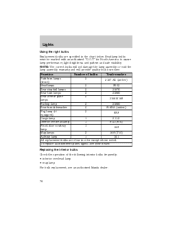
see an authorized Mazda dealer. 76 Headlamp bulbs must be marked with an authorized "D.O.T." for North America to assure lamp performance, light brightness and pattern and safe visibility. To replace all instrument panel lights - Replacing the interior bulbs Check the operation of bulbs Trade number ...Park/turn lamps 2 3157 AK (amber) (front) Headlamps 2 9003 Rear stop/tail lamps 2 3157K Rear turn lamps 2 3156K Rear license plate 2 3156K/168 lamps Backup lamp 2 3156K Rear/turn/sidemarker 2 916NA (amber) Fog...
see an authorized Mazda dealer. 76 Headlamp bulbs must be marked with an authorized "D.O.T." for North America to assure lamp performance, light brightness and pattern and safe visibility. To replace all instrument panel lights - Replacing the interior bulbs Check the operation of bulbs Trade number ...Park/turn lamps 2 3157 AK (amber) (front) Headlamps 2 9003 Rear stop/tail lamps 2 3157K Rear turn lamps 2 3156K Rear license plate 2 3156K/168 lamps Backup lamp 2 3156K Rear/turn/sidemarker 2 916NA (amber) Fog...
Owner's Manual
Page 80
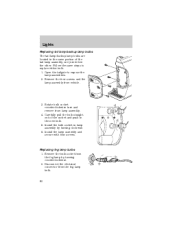
...tail lamp assembly, one just below the other. Remove the bulb socket from vehicle. 3. Rotate bulb socket counterclockwise turn and remove from the fog lamp bulb. 80 Install the bulb socket in the new bulb. 5. Install the lamp assembly and secure with four screws. Disconnect the ...electrical connector from lamp assembly. 4. Remove the four screws and the lamp assembly from the fog lamp by turning clockwise. 6. Lights Replacing tail lamp/backup lamp bulbs The tail lamp/backup lamp bulbs are located in the same portion of the socket and...
...tail lamp assembly, one just below the other. Remove the bulb socket from vehicle. 3. Rotate bulb socket counterclockwise turn and remove from the fog lamp bulb. 80 Install the bulb socket in the new bulb. 5. Install the lamp assembly and secure with four screws. Disconnect the ...electrical connector from lamp assembly. 4. Remove the four screws and the lamp assembly from the fog lamp by turning clockwise. 6. Lights Replacing tail lamp/backup lamp bulbs The tail lamp/backup lamp bulbs are located in the same portion of the socket and...
Owner's Manual
Page 81
... and remove. 3. Install the bulb socket in the new bulb. Remove the two screws and lamp assembly from socket and push in the fog lamp turning clockwise. Replacing license plate lamp bulbs The license plate bulbs are located behind the rear bumper to the new... bulb socket in the new bulb. 4. Install the bulb socket into the lamp assembly by rotating clockwise. 2. To change the license plate lamp bulbs: 1. Lights 3. Connect the electrical connector to locate the bulb socket. 2. This procedure covers the high-mount brake lamp bulb. To remove the brake lamp assembly: 1....
... and remove. 3. Install the bulb socket in the new bulb. Remove the two screws and lamp assembly from socket and push in the fog lamp turning clockwise. Replacing license plate lamp bulbs The license plate bulbs are located behind the rear bumper to the new... bulb socket in the new bulb. 4. Install the bulb socket into the lamp assembly by rotating clockwise. 2. To change the license plate lamp bulbs: 1. Lights 3. Connect the electrical connector to locate the bulb socket. 2. This procedure covers the high-mount brake lamp bulb. To remove the brake lamp assembly: 1....

Owner's Manual
Page 283
...102-103 key in ignition chime ...17 positions of the ignition ...148 L Lamps bulb replacement specifications chart ...76 cargo lamps ...74 daytime running light ...73 fog lamps ...73 headlamps ...73 headlamps, flash to pass ...74 instrument panel, dimming ...74 interior lamps ...75-76 replacing bulbs ..75, 77-78..., 80-81 Lane change indicator (see Turn signal) ...75 LATCH anchors ...145 Lights, warning and indicator ...12 air bag ...14-15 anti-lock ...
...102-103 key in ignition chime ...17 positions of the ignition ...148 L Lamps bulb replacement specifications chart ...76 cargo lamps ...74 daytime running light ...73 fog lamps ...73 headlamps ...73 headlamps, flash to pass ...74 instrument panel, dimming ...74 interior lamps ...75-76 replacing bulbs ..75, 77-78..., 80-81 Lane change indicator (see Turn signal) ...75 LATCH anchors ...145 Lights, warning and indicator ...12 air bag ...14-15 anti-lock ...


