
Owner's Manual
Page 54
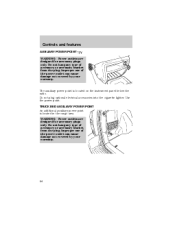
Do not hang any type of the power outlet can cause damage not covered by your warranty. 54 The auxiliary power point is located in the cargo area. Improper use of accessory or accessory bracket from the plug. Improper use of accessory or accessory bracket from the plug. ...power point is located on the instrument panel below the radio. Do not hang any type of the power outlet can cause damage not covered by your warranty. Do not plug optional electrical accessories into the cigarette lighter. Controls and features AUXILIARY POWER POINT WARNING: Power outlets ...
Do not hang any type of the power outlet can cause damage not covered by your warranty. 54 The auxiliary power point is located in the cargo area. Improper use of accessory or accessory bracket from the plug. Improper use of accessory or accessory bracket from the plug. ...power point is located on the instrument panel below the radio. Do not hang any type of the power outlet can cause damage not covered by your warranty. Do not plug optional electrical accessories into the cigarette lighter. Controls and features AUXILIARY POWER POINT WARNING: Power outlets ...
Owner's Manual
Page 55
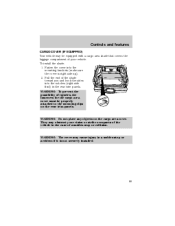
...the fasteners for the cargo area cover must be equipped with a cargo area shade that covers the luggage compartment of your vision or strike occupants of the vehicle in the case of the shade toward you and hook the sides into the mounting brackets (make sure the cover is not securely ...or accident if it is right side up). 2. They may obstruct your vehicle. Fasten the cover into the notches (right side first) in a sudden stop or collision. To install the shade: 1. Controls and features CARGO COVER (IF EQUIPPED) Your vehicle may be properly attached to the mounting clips on the...
...the fasteners for the cargo area cover must be equipped with a cargo area shade that covers the luggage compartment of your vision or strike occupants of the vehicle in the case of the shade toward you and hook the sides into the mounting brackets (make sure the cover is not securely ...or accident if it is right side up). 2. They may obstruct your vehicle. Fasten the cover into the notches (right side first) in a sudden stop or collision. To install the shade: 1. Controls and features CARGO COVER (IF EQUIPPED) Your vehicle may be properly attached to the mounting clips on the...
Owner's Manual
Page 139
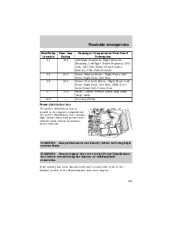
... Front, Left Front, Right Rear, Left Rear, GEM (Door Lock Relay Coil), Power Seat 10A Audio, Cluster, Interior Lamp, Map Lamp Cargo Lamp - Accessory Relay 25 26 27 ACC Power distribution box The power distribution box is located in the engine compartment. WARNING: Always disconnect the..., Left/Right Trailer Stoplamp, ABS Unit, ASC Unit (Brake Pedal Position Switch), PCM, Shift Solenoid 30A Power Window Motor - WARNING: Always replace the cover to the Battery section of the Maintenance and care chapter. 139 Right Front, Left Front, Right Rear, Left Rear 30A Power Door Lock Motor -
... Front, Left Front, Right Rear, Left Rear, GEM (Door Lock Relay Coil), Power Seat 10A Audio, Cluster, Interior Lamp, Map Lamp Cargo Lamp - Accessory Relay 25 26 27 ACC Power distribution box The power distribution box is located in the engine compartment. WARNING: Always disconnect the..., Left/Right Trailer Stoplamp, ABS Unit, ASC Unit (Brake Pedal Position Switch), PCM, Shift Solenoid 30A Power Window Motor - WARNING: Always replace the cover to the Battery section of the Maintenance and care chapter. 139 Right Front, Left Front, Right Rear, Left Rear 30A Power Door Lock Motor -
Owner's Manual
Page 144
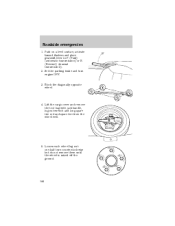
Set the parking brake and turn counterclockwise but do not remove them until the wheel is raised off the ground. 144 Block the diagonally opposite wheel. 4. Loosen each wheel lug nut one-half turn engine OFF. 3. Lift the cargo cover and remove the tool bag with jack handle, lug nut wrench and long spare tire rod and spare tire from the wheel well. 5. Park on a level surface, activate hazard flashers and place gearshift lever in P (Park) (automatic transmission) or R (Reverse) (manual transmission). 2. Roadside emergencies 1.
Set the parking brake and turn counterclockwise but do not remove them until the wheel is raised off the ground. 144 Block the diagonally opposite wheel. 4. Loosen each wheel lug nut one-half turn engine OFF. 3. Lift the cargo cover and remove the tool bag with jack handle, lug nut wrench and long spare tire rod and spare tire from the wheel well. 5. Park on a level surface, activate hazard flashers and place gearshift lever in P (Park) (automatic transmission) or R (Reverse) (manual transmission). 2. Roadside emergencies 1.
Owner's Manual
Page 147
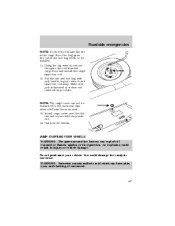
... can explode if exposed to the back seat clips when a full size tire is fastened so it does not rattle when you drive. NOTE: The cargo cover can not be installed. 11. JUMP STARTING YOUR VEHICLE WARNING: The gases around the battery can burn skin, eyes, and clothing, if contacted. 147 Install... cargo cover over the flat tire and secure with jack handle, lug nut wrench and spare tire rod away. Roadside emergencies NOTE: To stow the full size ...
... can explode if exposed to the back seat clips when a full size tire is fastened so it does not rattle when you drive. NOTE: The cargo cover can not be installed. 11. JUMP STARTING YOUR VEHICLE WARNING: The gases around the battery can burn skin, eyes, and clothing, if contacted. 147 Install... cargo cover over the flat tire and secure with jack handle, lug nut wrench and spare tire rod away. Roadside emergencies NOTE: To stow the full size ...
Owner's Manual
Page 225
... adding ...169 fluid, refill capacities ...212 fluid, specifications ...214 lubricant specifications ...214 parking ...109 shift interlock ...111 Break-in period ...3 C Capacities for refilling fluids ...212 Cargo cover ...55 Certification Label ...216 Child safety restraints ...92 child safety belts ...92 Child safety seats ...93-94 attaching with tether straps ...97 in front seat...
... adding ...169 fluid, refill capacities ...212 fluid, specifications ...214 lubricant specifications ...214 parking ...109 shift interlock ...111 Break-in period ...3 C Capacities for refilling fluids ...212 Cargo cover ...55 Certification Label ...216 Child safety restraints ...92 child safety belts ...92 Child safety seats ...93-94 attaching with tether straps ...97 in front seat...


