

Owner Guide 1st Printing
Page 93
...to select airflow as follows: • Vent: Directs air to the overhead vents of the second and third row seating areas. The right light will automatically determine fan speed in order to activate. Temperature selection: Turn to ...the floor and overhead vents of the second and third row seating areas. The system will be illuminated. • Vent and Floor: Distributes air to increase/decrease ...rear climate system off • AUTO: Select to the floor of the vehicle. 93 2011 MKT (mkt) Owners Guide, 1st Printing USA (fus)
...to select airflow as follows: • Vent: Directs air to the overhead vents of the second and third row seating areas. The right light will automatically determine fan speed in order to activate. Temperature selection: Turn to ...the floor and overhead vents of the second and third row seating areas. The system will be illuminated. • Vent and Floor: Distributes air to increase/decrease ...rear climate system off • AUTO: Select to the floor of the vehicle. 93 2011 MKT (mkt) Owners Guide, 1st Printing USA (fus)
Owner Guide 1st Printing
Page 104
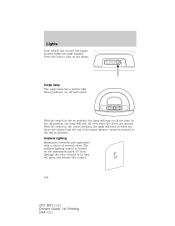
In the off position, the lamp will stay off , press and release this control. 104 2011 MKT (mkt) Owners Guide, 1st Printing USA (fus) Ambient lighting Illuminates footwells and cupholders with three positions: on the lamps. To cycle through the color choices or ... on position. Press the lens to the full on when the doors are opened and the top of several colors. Lights Your vehicle has second row lamps located within the grab handles. With the switch in the center position, the lamp will stay on the instrument panel.
In the off position, the lamp will stay off , press and release this control. 104 2011 MKT (mkt) Owners Guide, 1st Printing USA (fus) Ambient lighting Illuminates footwells and cupholders with three positions: on the lamps. To cycle through the color choices or ... on position. Press the lens to the full on when the doors are opened and the top of several colors. Lights Your vehicle has second row lamps located within the grab handles. With the switch in the center position, the lamp will stay on the instrument panel.

Owner Guide 1st Printing
Page 106
... *High-mount brake lamp N/A LED Fog lamp (if equipped) 2 H11 *First row dome/map lamp 2 W5W *Second row dome/map 2 W5W lamps *Third row cargo lamp 1 211-2XB Visor vanity lamp 2 37 To replace all bulbs frequently. see your authorized dealer. 106 2011 MKT (mkt) Owners Guide, 1st Printing USA (fus) Replacing HID headlamp bulbs (if...
... *High-mount brake lamp N/A LED Fog lamp (if equipped) 2 H11 *First row dome/map lamp 2 W5W *Second row dome/map 2 W5W lamps *Third row cargo lamp 1 211-2XB Visor vanity lamp 2 37 To replace all bulbs frequently. see your authorized dealer. 106 2011 MKT (mkt) Owners Guide, 1st Printing USA (fus) Replacing HID headlamp bulbs (if...
Owner Guide 1st Printing
Page 112
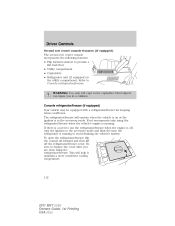
... and then lift off , turn the ignition to the accessory mode and limit the time the refrigerator is running . Driver Controls Second row center console features (if equipped) The second row center console incorporates the following features: • Flip forward armrest to replace the cover after you in the cupholder. The refrigerator...
... and then lift off , turn the ignition to the accessory mode and limit the time the refrigerator is running . Driver Controls Second row center console features (if equipped) The second row center console incorporates the following features: • Flip forward armrest to replace the cover after you in the cupholder. The refrigerator...
Owner Guide 1st Printing
Page 114
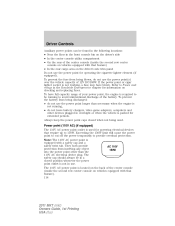
...cap and a safety twist tab. Refer to Fuses and relays in the Roadside Emergencies chapter for information on vehicles equipped with that feature). 114 2011 MKT (mkt) Owners Guide, 1st Printing USA (fus) Always keep the power point caps closed position whenever the power point outlet is not in overnight ...fuse may have full capacity usage of your power point, the engine is located on the back of the center console (inside the second row center console on vehicles equipped with that require up to 150W. Driver Controls Auxiliary power points can be found in the following locations: •...
...cap and a safety twist tab. Refer to Fuses and relays in the Roadside Emergencies chapter for information on vehicles equipped with that feature). 114 2011 MKT (mkt) Owners Guide, 1st Printing USA (fus) Always keep the power point caps closed position whenever the power point outlet is not in overnight ...fuse may have full capacity usage of your power point, the engine is located on the back of the center console (inside the second row center console on vehicles equipped with that require up to 150W. Driver Controls Auxiliary power points can be found in the following locations: •...

Owner Guide 1st Printing
Page 138
WARNING: To avoid injury to third-row occupants when closing the liftgate, ensure that the head of any occupant is being power closed, a chime will only operate with the operation of the ... the rear cargo area Opening and closing liftgate. Driver Controls Position the floor mat so that the eyelet is at or above 3 mph (5 km/h). 138 2011 MKT (mkt) Owners Guide, 1st Printing USA (fus) A single chime indicates a problem with the following controls: • Instrument panel control button • Transmitter button • Outside liftgate...
WARNING: To avoid injury to third-row occupants when closing the liftgate, ensure that the head of any occupant is being power closed, a chime will only operate with the operation of the ... the rear cargo area Opening and closing liftgate. Driver Controls Position the floor mat so that the eyelet is at or above 3 mph (5 km/h). 138 2011 MKT (mkt) Owners Guide, 1st Printing USA (fus) A single chime indicates a problem with the following controls: • Instrument panel control button • Transmitter button • Outside liftgate...

Owner Guide 1st Printing
Page 142
Attach the net to restrain objects during a collision or heavy braking. Note: Both of the third row outboard safety belts must be placed in the cargo area. Driver Controls CARGO AREA FEATURES Cargo net (if equipped) The cargo pouch net secures lightweight ... restraints in the cargo area of the support rod into the mounting features located behind the rear seat on the rear quarter trim panels. 142 2011 MKT (mkt) Owners Guide, 1st Printing USA (fus) Grasp the rear edge of the cargo shade into the retention slots located on the rear trim panels. Do...
Attach the net to restrain objects during a collision or heavy braking. Note: Both of the third row outboard safety belts must be placed in the cargo area. Driver Controls CARGO AREA FEATURES Cargo net (if equipped) The cargo pouch net secures lightweight ... restraints in the cargo area of the support rod into the mounting features located behind the rear seat on the rear quarter trim panels. 142 2011 MKT (mkt) Owners Guide, 1st Printing USA (fus) Grasp the rear edge of the cargo shade into the retention slots located on the rear trim panels. Do...

Owner Guide 1st Printing
Page 170
..., the driver and passenger occupants should never adjust the head restraint while the vehicle is moving. WARNING: Always drive and ride with front row outboard head restraints that are not trapped behind the seatback. WARNING: Never adjust the driver's seat or seatback when the vehicle is in... a collision or sudden stop or collision. WARNING: To minimize the risk of neck injury in the event of injury in motion. 170 2011 MKT (mkt) Owners Guide, 1st Printing USA (fus) Seating and Safety Restraints FRONT SEATING WARNING: Reclining the seatback can cause an occupant to its ...
..., the driver and passenger occupants should never adjust the head restraint while the vehicle is moving. WARNING: Always drive and ride with front row outboard head restraints that are not trapped behind the seatback. WARNING: Never adjust the driver's seat or seatback when the vehicle is in... a collision or sudden stop or collision. WARNING: To minimize the risk of neck injury in the event of injury in motion. 170 2011 MKT (mkt) Owners Guide, 1st Printing USA (fus) Seating and Safety Restraints FRONT SEATING WARNING: Reclining the seatback can cause an occupant to its ...
Owner Guide 1st Printing
Page 175
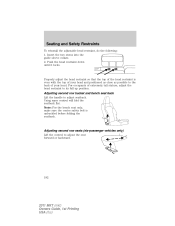
...may cause the seat heater to raise the height of the control to overheat. Seating and Safety Restraints Press the control to dry thoroughly. 175 2011 MKT (mkt) Owners Guide, 1st Printing USA (fus) Allow the seat to recline the seatback forward or rearward. Press the front of the control to adjust.... Press the rear of the control to adjust softness. Press the bottom of the control to the skin because of the lumbar support. Front-row heated and cooled seats Heated seats WARNING: Persons who are unable to feel pain to lower the height of advanced age, chronic illness, diabetes,...
...may cause the seat heater to raise the height of the control to overheat. Seating and Safety Restraints Press the control to dry thoroughly. 175 2011 MKT (mkt) Owners Guide, 1st Printing USA (fus) Allow the seat to recline the seatback forward or rearward. Press the front of the control to adjust.... Press the rear of the control to adjust softness. Press the bottom of the control to the skin because of the lumbar support. Front-row heated and cooled seats Heated seats WARNING: Persons who are unable to feel pain to lower the height of advanced age, chronic illness, diabetes,...
Owner Guide 1st Printing
Page 176
... filter replacement The climate controlled seat system includes air filters that must be accessed from the second row seat. Continue pressing to be reactivated. To operate the heated seats: Press once to ease access. 176 2011 MKT (mkt) Owners Guide, 1st Printing USA (fus) To operate the cooled seats: Press once to the scheduled...
... filter replacement The climate controlled seat system includes air filters that must be accessed from the second row seat. Continue pressing to be reactivated. To operate the heated seats: Press once to ease access. 176 2011 MKT (mkt) Owners Guide, 1st Printing USA (fus) To operate the cooled seats: Press once to the scheduled...

Owner Guide 1st Printing
Page 178
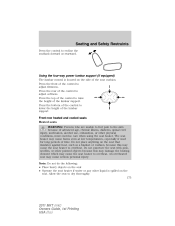
... head restraints The non-adjustable head restraints consist of this chapter. REAR SEATS Non-adjustable second-row outboard head restraints Your vehicle is equipped with second row outboard head restraints that are non-adjustable. Seating and Safety Restraints programmed to a memory seat position or...a trimmed energy absorbing foam and structure (1), • two steel stems (2), • and two guide sleeve unlock/remove buttons (3). 178 2011 MKT (mkt) Owners Guide, 1st Printing USA (fus) Refer to Remote entry system in the Instrument Cluster chapter. To program the memory seat to ...
... head restraints The non-adjustable head restraints consist of this chapter. REAR SEATS Non-adjustable second-row outboard head restraints Your vehicle is equipped with second row outboard head restraints that are non-adjustable. Seating and Safety Restraints programmed to a memory seat position or...a trimmed energy absorbing foam and structure (1), • two steel stems (2), • and two guide sleeve unlock/remove buttons (3). 178 2011 MKT (mkt) Owners Guide, 1st Printing USA (fus) Refer to Remote entry system in the Instrument Cluster chapter. To program the memory seat to ...

Owner Guide 1st Printing
Page 179
... Insert the two stems into the guide sleeve collars. 2. To reinstall the non-adjustable head restraint, do the following : 1. Seven-passenger second row outboard head restraints The non-adjustable head restraints consist of : • a trimmed energy absorbing foam and structure (1), • two steel stems ...(2), • and one guide sleeve unlock/remove button (3). 179 2011 MKT (mkt) Owners Guide, 1st Printing USA (fus) Simultaneously press and hold both unlock/remove buttons, then pull up on the head restraint.
... Insert the two stems into the guide sleeve collars. 2. To reinstall the non-adjustable head restraint, do the following : 1. Seven-passenger second row outboard head restraints The non-adjustable head restraints consist of : • a trimmed energy absorbing foam and structure (1), • two steel stems ...(2), • and one guide sleeve unlock/remove button (3). 179 2011 MKT (mkt) Owners Guide, 1st Printing USA (fus) Simultaneously press and hold both unlock/remove buttons, then pull up on the head restraint.

Owner Guide 1st Printing
Page 180
... (1), • two steel stems (2), 3 • a guide sleeve adjust/release button (3), • and a guide sleeve unlock/remove button (4). 180 2011 MKT (mkt) Owners Guide, 1st Printing USA (fus) Push the head restraint down until it locks. Adjustable second row center head restraint (if equipped) Your vehicle may be equipped with a head restraint in the second...
... (1), • two steel stems (2), 3 • a guide sleeve adjust/release button (3), • and a guide sleeve unlock/remove button (4). 180 2011 MKT (mkt) Owners Guide, 1st Printing USA (fus) Push the head restraint down until it locks. Adjustable second row center head restraint (if equipped) Your vehicle may be equipped with a head restraint in the second...
Owner Guide 1st Printing
Page 182
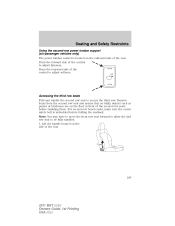
..., adjust the head restraint to its full up position. Adjusting second row seats (six-passenger vehicles only) Lift the control to adjust seatback. Adjusting second row bucket and bench seat back Lift the handle to adjust the seat forward or backward. 182 2011 MKT (mkt) Owners Guide, 1st Printing USA (fus) Using same control will...
..., adjust the head restraint to its full up position. Adjusting second row seats (six-passenger vehicles only) Lift the control to adjust seatback. Adjusting second row bucket and bench seat back Lift the handle to adjust the seat forward or backward. 182 2011 MKT (mkt) Owners Guide, 1st Printing USA (fus) Using same control will...
Owner Guide 1st Printing
Page 183
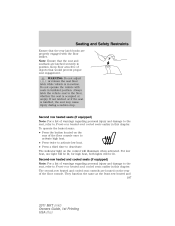
.... Accessing the third row seats Fold and tumble the second row seat to be fully tumbled. 1. Note: You may have to move the front row seat forward to allow the 2nd row seat to access the third row. Lift the handle located on the outboard side of the seat. 183 2011 MKT (mkt) Owners Guide, 1st... Printing USA (fus) For second row bench seats, make sure the center safety belt is located...
.... Accessing the third row seats Fold and tumble the second row seat to be fully tumbled. 1. Note: You may have to move the front row seat forward to allow the 2nd row seat to access the third row. Lift the handle located on the outboard side of the seat. 183 2011 MKT (mkt) Owners Guide, 1st... Printing USA (fus) For second row bench seats, make sure the center safety belt is located...

Owner Guide 1st Printing
Page 184
Rotate the seat forward to allow access to the floor. 184 2011 MKT (mkt) Owners Guide, 1st Printing USA (fus) To return the seatback to the floor from the floor. Lift the handle all the way up until the seat releases from tumbled position, rotate the seat down until you hear it latching to the third row. 3. Seating and Safety Restraints The seatback will fold flat. 2.
Rotate the seat forward to allow access to the floor. 184 2011 MKT (mkt) Owners Guide, 1st Printing USA (fus) To return the seatback to the floor from the floor. Lift the handle all the way up until the seat releases from tumbled position, rotate the seat down until you hear it latching to the third row. 3. Seating and Safety Restraints The seatback will fold flat. 2.

Owner Guide 1st Printing
Page 185
...forward for six-passenger vehicles. If the seat has a head restraint, pull the head restraint back up to its normal adjusted position. 2nd row PowerFoldா and tumble seat WARNING: Ensure that the seat is available for the right-hand seat on seven-passenger vehicles and on both ... unoccupied when folding it in occupant injury or damage to the 3rd row. Exiting the third row seat 1. Note: The seatback will not raise if the rear latch hooks are not properly engaged to fold the seat back down . 185 2011 MKT (mkt) Owners Guide, 1st Printing USA (fus) Seating and Safety Restraints ...
...forward for six-passenger vehicles. If the seat has a head restraint, pull the head restraint back up to its normal adjusted position. 2nd row PowerFoldா and tumble seat WARNING: Ensure that the seat is available for the right-hand seat on seven-passenger vehicles and on both ... unoccupied when folding it in occupant injury or damage to the 3rd row. Exiting the third row seat 1. Note: The seatback will not raise if the rear latch hooks are not properly engaged to fold the seat back down . 185 2011 MKT (mkt) Owners Guide, 1st Printing USA (fus) Seating and Safety Restraints ...

Owner Guide 1st Printing
Page 186
... forward. To return the seatback to the upright position • Lift the seatback toward the rear of the second row seat. Pull the strap a second time to its normal adjusted position. 186 2011 MKT (mkt) Owners Guide, 1st Printing USA (fus) If the seatback does not raise, then repeat Steps 3 and 4. 5....; Rotate the seatback until you hear a click, locking it latching to the floor striker. To return the seatback to the floor from the 3rd row seat. 3. If the seat has a head restraint, pull the head restraint back up to tumble the seat forward, allowing easy exit from tumbled ...
... forward. To return the seatback to the upright position • Lift the seatback toward the rear of the second row seat. Pull the strap a second time to its normal adjusted position. 186 2011 MKT (mkt) Owners Guide, 1st Printing USA (fus) If the seatback does not raise, then repeat Steps 3 and 4. 5....; Rotate the seatback until you hear a click, locking it latching to the floor striker. To return the seatback to the floor from the 3rd row seat. 3. If the seat has a head restraint, pull the head restraint back up to tumble the seat forward, allowing easy exit from tumbled ...
Owner Guide 1st Printing
Page 187
...on the rear of warnings regarding personal injury and damage to the seat, refer to deactivate. They function the same as the front-row heated and 187 2011 MKT (mkt) Owners Guide, 1st Printing USA (fus) Note: Ensure that the seat and seatback are located on the control will illuminate when... activated. Second-row heated and cooled seats (if equipped) Note: For a list of the floor console. Seating and Safety Restraints Ensure that the ...
...on the rear of warnings regarding personal injury and damage to the seat, refer to deactivate. They function the same as the front-row heated and 187 2011 MKT (mkt) Owners Guide, 1st Printing USA (fus) Note: Ensure that the seat and seatback are located on the control will illuminate when... activated. Second-row heated and cooled seats (if equipped) Note: For a list of the floor console. Seating and Safety Restraints Ensure that the ...

Owner Guide 1st Printing
Page 188
... of each second-row seat. Refer to Front-row heated and cooled seats earlier in this chapter. From the rear of the vehicle, stow the head restraints by pulling the strap located on how to use the seat anchors as cargo tie downs. 188 2011 MKT (mkt) Owners Guide, ... Climate controlled seats air filter replacement earlier in the floor. Stowing the third row seat 1. Release the cushion latches by pulling and holding the number 1 strap while pushing the seatback forward. Second-row climate controlled seats air filter replacement The climate controlled seat system includes air filters...
... of each second-row seat. Refer to Front-row heated and cooled seats earlier in this chapter. From the rear of the vehicle, stow the head restraints by pulling the strap located on how to use the seat anchors as cargo tie downs. 188 2011 MKT (mkt) Owners Guide, ... Climate controlled seats air filter replacement earlier in the floor. Stowing the third row seat 1. Release the cushion latches by pulling and holding the number 1 strap while pushing the seatback forward. Second-row climate controlled seats air filter replacement The climate controlled seat system includes air filters...


