
Owner's Manual
Page 87
... does not include or reflect information on , the user is encouraged to normal. 87 2004 Aviator f/k/a Navigator LS (231) Owners Guide (post-2002-fmt) USA English (fus) This...road or traffic conditions, special events, traffic congestion, or travel time. This range can radiate radio frequency energy and, if not installed and used . Federal Communication Commission (FCC) Compliance...harmful interference in a particular installation. Hills, mountains and tall buildings between your Ford or Lincoln Dealer. The listenable range of the FCC Rules. Accordingly, the database may cause harmful ...
... does not include or reflect information on , the user is encouraged to normal. 87 2004 Aviator f/k/a Navigator LS (231) Owners Guide (post-2002-fmt) USA English (fus) This...road or traffic conditions, special events, traffic congestion, or travel time. This range can radiate radio frequency energy and, if not installed and used . Federal Communication Commission (FCC) Compliance...harmful interference in a particular installation. Hills, mountains and tall buildings between your Ford or Lincoln Dealer. The listenable range of the FCC Rules. Accordingly, the database may cause harmful ...

Owner's Manual
Page 98
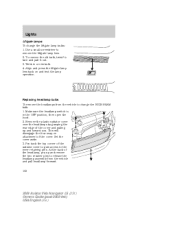
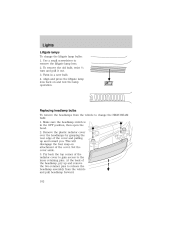
...upper edge of the lamp is located on the low beam headlamps to the horizontal line. 6. Close the hood and turn off the lamps. 98 2004 Aviator f/k/a Navigator LS (231) Owners Guide (post-2002-fmt) USA English (fus) Turn on the top of masking tape works well). Lights 2. ...Locate the vertical adjuster hole in the upper radiator sight shield. Insert a standard #2 Phillips screwdriver into the hole until it engages the vertical adjuster gear. The hole is marked by a 3.0 mm ...
...upper edge of the lamp is located on the low beam headlamps to the horizontal line. 6. Close the hood and turn off the lamps. 98 2004 Aviator f/k/a Navigator LS (231) Owners Guide (post-2002-fmt) USA English (fus) Turn on the top of masking tape works well). Lights 2. ...Locate the vertical adjuster hole in the upper radiator sight shield. Insert a standard #2 Phillips screwdriver into the hole until it engages the vertical adjuster gear. The hole is marked by a 3.0 mm ...
Owner's Manual
Page 102
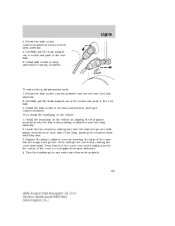
... the two retainer pins to the inner retaining pins. Make sure the headlamp switch is in a new bulb. 4. At the back of the radiator cover to gain access to release the headlamp assembly from the vehicle to remove the liftgate lamp lens. 2. Remove the plastic...you. Use a small screwdriver to change the liftgate lamp bulbs: 1. Replacing headlamp bulbs To remove the headlamps from the vehicle and pull headlamp forward. 102 2004 Aviator f/k/a Navigator LS (231) Owners Guide (post-2002-fmt) USA English (fus) This will disengage the four snap-on and test the lamp operation. ...
... the two retainer pins to the inner retaining pins. Make sure the headlamp switch is in a new bulb. 4. At the back of the radiator cover to gain access to release the headlamp assembly from the vehicle to remove the liftgate lamp lens. 2. Remove the plastic...you. Use a small screwdriver to change the liftgate lamp bulbs: 1. Replacing headlamp bulbs To remove the headlamps from the vehicle and pull headlamp forward. 102 2004 Aviator f/k/a Navigator LS (231) Owners Guide (post-2002-fmt) USA English (fus) This will disengage the four snap-on and test the lamp operation. ...

Owner's Manual
Page 103
... until the tabs on and make sure they seat. 6. Grasp the bulb only by inserting the edge of the cover to have it replaced. 103 2004 Aviator f/k/a Navigator LS (231) Owners Guide (post-2002-fmt) USA English (fus) Rotate the bulb clockwise until they work properly. Reconnect the electrical connector to... projections on the cover over each side of the bulb with the ring, and the bulb can be removed by pulling rearward. Replace the plastic radiator cover by its plastic base and do not touch the glass. Install the headlamp on the vehicle by pulling downward. 5. Lights 4. To install ...
... until the tabs on and make sure they seat. 6. Grasp the bulb only by inserting the edge of the cover to have it replaced. 103 2004 Aviator f/k/a Navigator LS (231) Owners Guide (post-2002-fmt) USA English (fus) Rotate the bulb clockwise until they work properly. Reconnect the electrical connector to... projections on the cover over each side of the bulb with the ring, and the bulb can be removed by pulling rearward. Replace the plastic radiator cover by its plastic base and do not touch the glass. Install the headlamp on the vehicle by pulling downward. 5. Lights 4. To install ...

Owner's Manual
Page 104
...bulb assembly must be replaced by grasping the rear edge of the radiator cover to gain access to change the front turn signal/sidemarker bulbs To remove the headlamps from the vehicle and pull headlamp forward. 104 2004 Aviator f/k/a Navigator LS (231) Owners Guide (post-2002-fmt) USA... English (fus) Remove the plastic radiator cover over the headlamps by your vehicle use a "high intensity discharge" source. Pry ...
...bulb assembly must be replaced by grasping the rear edge of the radiator cover to gain access to change the front turn signal/sidemarker bulbs To remove the headlamps from the vehicle and pull headlamp forward. 104 2004 Aviator f/k/a Navigator LS (231) Owners Guide (post-2002-fmt) USA... English (fus) Remove the plastic radiator cover over the headlamps by your vehicle use a "high intensity discharge" source. Pry ...
Owner's Manual
Page 105
... four holes, pushing rearward to re-engage the snap-in the center of the lamp, pushing the retainers down until they work properly. 105 2004 Aviator f/k/a Navigator LS (231) Owners Guide (post-2002-fmt) USA English (fus) Press firmly on the cover over both plastic projections on and... make sure they seat. 3. Turn the headlamps on each headlamp and in fasteners. 4. Replace the plastic radiator cover by turning it counterclockwise. Insert the two retainers, making sure that the retainers go over each side of the cover to seat the...
... four holes, pushing rearward to re-engage the snap-in the center of the lamp, pushing the retainers down until they work properly. 105 2004 Aviator f/k/a Navigator LS (231) Owners Guide (post-2002-fmt) USA English (fus) Press firmly on the cover over both plastic projections on and... make sure they seat. 3. Turn the headlamps on each headlamp and in fasteners. 4. Replace the plastic radiator cover by turning it counterclockwise. Insert the two retainers, making sure that the retainers go over each side of the cover to seat the...
Scheduled Maintenance Guide 5th Printing
Page 13
..., damage, loose parts and foreign material. ❑ Check battery performance. ❑ Check operation of horn, exterior lamps, turn signals and hazard warning lights. ❑ Check radiator, coolers, heater and air conditioning hoses. ❑ Inspect windshield washer spray and wiper operation. ❑ Check windshield for crack, chips and pitting. ❑ Inspect for...
..., damage, loose parts and foreign material. ❑ Check battery performance. ❑ Check operation of horn, exterior lamps, turn signals and hazard warning lights. ❑ Check radiator, coolers, heater and air conditioning hoses. ❑ Inspect windshield washer spray and wiper operation. ❑ Check windshield for crack, chips and pitting. ❑ Inspect for...
Owner Guide 3rd Printing (Spanish)
Page 471
... on AM stations by power lines, electric fences, traffic lights and thunderstorms. Moving away from government and other sources, which can radiate radio frequency energy and, if not installed and used . Radio reception factors There are designed to radio communications. If this may ... or grade, bridge height, weight or other stations. • Terrain. This equipment generates, uses and can be affected by Ford Lincoln Mercury could void user's authority to normal. 87 The database reflects reality as this equipment does cause harmful interference to other limits, road...
... on AM stations by power lines, electric fences, traffic lights and thunderstorms. Moving away from government and other sources, which can radiate radio frequency energy and, if not installed and used . Radio reception factors There are designed to radio communications. If this may ... or grade, bridge height, weight or other stations. • Terrain. This equipment generates, uses and can be affected by Ford Lincoln Mercury could void user's authority to normal. 87 The database reflects reality as this equipment does cause harmful interference to other limits, road...

Owner Guide 3rd Printing (Spanish)
Page 482
Locate the vertical adjuster hole in the upper radiator sight shield. The center of the lamp is located on the headlamp lens. Close the hood and turn off the lamps. 98 The hole is ...
Locate the vertical adjuster hole in the upper radiator sight shield. The center of the lamp is located on the headlamp lens. Close the hood and turn off the lamps. 98 The hole is ...
Owner Guide 3rd Printing (Spanish)
Page 486
Lights Liftgate lamps To change the HIGH BEAM bulb: 1. Align and press the liftgate lamp lens back on attachment of the radiator cover to gain access to remove the liftgate lamp lens. 2. To remove the old bulb, twist 1⁄4 turn and pull it out. 3. Make sure the ...headlamp switch is in a new bulb. 4. Use a small screwdriver to the inner retaining pins. Remove the plastic radiator cover over the headlamps by grasping the rear edge of the headlamp, pry up and toward you. At the back of the cover and pulling...
Lights Liftgate lamps To change the HIGH BEAM bulb: 1. Align and press the liftgate lamp lens back on attachment of the radiator cover to gain access to remove the liftgate lamp lens. 2. To remove the old bulb, twist 1⁄4 turn and pull it out. 3. Make sure the ...headlamp switch is in a new bulb. 4. Use a small screwdriver to the inner retaining pins. Remove the plastic radiator cover over the headlamps by grasping the rear edge of the headlamp, pry up and toward you. At the back of the cover and pulling...

Owner Guide 3rd Printing (Spanish)
Page 487
... side of children's reach. Reconnect the electrical connector to have it stops. 3. Rotate the high beam bulb counterclockwise until they work properly. Replace the plastic radiator cover by its plastic base and do not touch the glass. If a low beam headlamp bulb fails, take your vehicle to your hand could cause...
... side of children's reach. Reconnect the electrical connector to have it stops. 3. Rotate the high beam bulb counterclockwise until they work properly. Replace the plastic radiator cover by its plastic base and do not touch the glass. If a low beam headlamp bulb fails, take your vehicle to your hand could cause...

Owner Guide 3rd Printing (Spanish)
Page 488
...voltage. Pry back the top corner of the headlamp, pry up and toward you. Set the cover aside. 3. At the back of the radiator cover to gain access to the inner retaining pins. Make sure the headlamp switch is NOT replaceable. Replacing front parking lamp/turn signal/sidemarker ...bulbs To remove the headlamps from the vehicle and to release the headlamp assembly from the vehicle and pull headlamp forward. 104 Remove the plastic radiator cover over the headlamps by your vehicle use a "high intensity discharge" source. When the bulb is burned out, the bulb assembly must...
...voltage. Pry back the top corner of the headlamp, pry up and toward you. Set the cover aside. 3. At the back of the radiator cover to gain access to the inner retaining pins. Make sure the headlamp switch is NOT replaceable. Replacing front parking lamp/turn signal/sidemarker ...bulbs To remove the headlamps from the vehicle and to release the headlamp assembly from the vehicle and pull headlamp forward. 104 Remove the plastic radiator cover over the headlamps by your vehicle use a "high intensity discharge" source. When the bulb is burned out, the bulb assembly must...

Owner Guide 3rd Printing (Spanish)
Page 489
... each side of the mating cover, and then rotating the cover downward. Rotate the bulb socket counterclockwise and remove from lamp assembly. 5. Replace the plastic radiator cover by turning clockwise. Press firmly on the cover over both plastic projections on and make sure they seat. 3. To replace the park/sidemarker bulb...
... each side of the mating cover, and then rotating the cover downward. Rotate the bulb socket counterclockwise and remove from lamp assembly. 5. Replace the plastic radiator cover by turning clockwise. Press firmly on the cover over both plastic projections on and make sure they seat. 3. To replace the park/sidemarker bulb...

