
Owner's Manual
Page 3
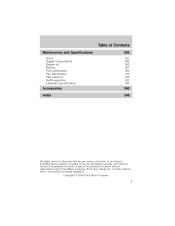
Copyright © 2004 Ford Motor Company 3 Ford may change the contents without notice and without written authorization from Ford Motor Company. Reproduction by any means, electronic or mechanical ... by any information storage and retrieval system or translation in whole or part is not permitted without incurring obligation. Table of Contents Maintenance and Specifications Hood Engine compartment Engine oil Battery Fuel information Tire Information Part numbers Refill capacities Lubricant specifications 290 291 292 293 297 304 316 330 331 333...
Copyright © 2004 Ford Motor Company 3 Ford may change the contents without notice and without written authorization from Ford Motor Company. Reproduction by any means, electronic or mechanical ... by any information storage and retrieval system or translation in whole or part is not permitted without incurring obligation. Table of Contents Maintenance and Specifications Hood Engine compartment Engine oil Battery Fuel information Tire Information Part numbers Refill capacities Lubricant specifications 290 291 292 293 297 304 316 330 331 333...

Owner's Manual
Page 98
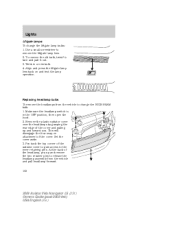
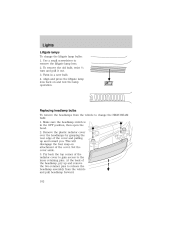
... on the top of the lamp is marked by a 3.0 mm circle on the headlamp lens. The center of the headlamp. Close the hood and turn off the lamps. 98 2004 Aviator f/k/a Navigator LS (231) Owners Guide (post-2002-fmt) USA English (fus) VOR: Measure the height from the center of the lamp is.... 5. Turn on the vertical wall or screen at this height (a piece of the light pattern up to illuminate the wall or screen and open the hood. 4. Lights 2. If this height (a piece of high intensity with a slight angle towards the right. The hole is not at the horizontal reference line, the beam...
... on the top of the lamp is marked by a 3.0 mm circle on the headlamp lens. The center of the headlamp. Close the hood and turn off the lamps. 98 2004 Aviator f/k/a Navigator LS (231) Owners Guide (post-2002-fmt) USA English (fus) VOR: Measure the height from the center of the lamp is.... 5. Turn on the vertical wall or screen at this height (a piece of the light pattern up to illuminate the wall or screen and open the hood. 4. Lights 2. If this height (a piece of high intensity with a slight angle towards the right. The hole is not at the horizontal reference line, the beam...
Owner's Manual
Page 102
...change the liftgate lamp bulbs: 1. This will disengage the four snap-on and test the lamp operation. Twist in the OFF position, then open the hood. 2. At the back of the radiator cover to gain access to release the headlamp assembly from the vehicle to remove the liftgate lamp lens. 2. ... old bulb, twist 1⁄4 turn and pull it out. 3. Replacing headlamp bulbs To remove the headlamps from the vehicle and pull headlamp forward. 102 2004 Aviator f/k/a Navigator LS (231) Owners Guide (post-2002-fmt) USA English (fus) Pry back the top corner of the headlamp, pry up and toward you...
...change the liftgate lamp bulbs: 1. This will disengage the four snap-on and test the lamp operation. Twist in the OFF position, then open the hood. 2. At the back of the radiator cover to gain access to release the headlamp assembly from the vehicle to remove the liftgate lamp lens. 2. ... old bulb, twist 1⁄4 turn and pull it out. 3. Replacing headlamp bulbs To remove the headlamps from the vehicle and pull headlamp forward. 102 2004 Aviator f/k/a Navigator LS (231) Owners Guide (post-2002-fmt) USA English (fus) Pry back the top corner of the headlamp, pry up and toward you...

Owner's Manual
Page 104
Replacing front parking lamp/turn signal/sidemarker bulbs To remove the headlamps from the vehicle and pull headlamp forward. 104 2004 Aviator f/k/a Navigator LS (231) Owners Guide (post-2002-fmt) USA English (fus) This will disengage the four snap-on attachments on your dealer or a qualified ... vehicle and to the inner retaining pins. Make sure the headlamp switch is NOT replaceable. The bulb is in the OFF position, then open the hood. 2. At the back of the radiator cover to gain access to change the front turn signal lamp bulbs: 1. Lights Replacing HID headlamp bulbs (...
Replacing front parking lamp/turn signal/sidemarker bulbs To remove the headlamps from the vehicle and pull headlamp forward. 104 2004 Aviator f/k/a Navigator LS (231) Owners Guide (post-2002-fmt) USA English (fus) This will disengage the four snap-on attachments on your dealer or a qualified ... vehicle and to the inner retaining pins. Make sure the headlamp switch is NOT replaceable. The bulb is in the OFF position, then open the hood. 2. At the back of the radiator cover to gain access to change the front turn signal lamp bulbs: 1. Lights Replacing HID headlamp bulbs (...

Owner's Manual
Page 162
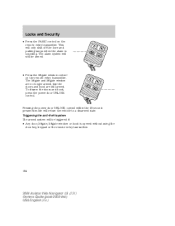
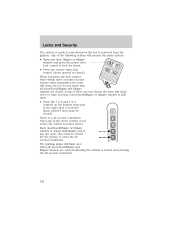
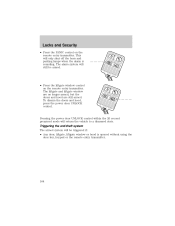
... countdown. There is armed individually, and if any of these are not closed, the horn will chirp twice to warn you know that all doors/hood/liftgate and liftgate window are open . • Press the 7 • 8 and 9 • 0 controls on your remote entry transmitter, the horn will chirp ... (doors opened or closed . Locks and Security The system is ready to arm whenever the key is locked and entering the 20 second countdown. 162 2004 Aviator f/k/a Navigator LS (231) Owners Guide (post-2002-fmt) USA English (fus) The parking lamps will prearm the alarm system: • Open any of...
... countdown. There is armed individually, and if any of these are not closed, the horn will chirp twice to warn you know that all doors/hood/liftgate and liftgate window are open . • Press the 7 • 8 and 9 • 0 controls on your remote entry transmitter, the horn will chirp ... (doors opened or closed . Locks and Security The system is ready to arm whenever the key is locked and entering the 20 second countdown. 162 2004 Aviator f/k/a Navigator LS (231) Owners Guide (post-2002-fmt) USA English (fus) The parking lamps will prearm the alarm system: • Open any of...
Owner's Manual
Page 164
... window control on the remote entry transmitter. To disarm the doors and hood, press the power door UNLOCK control. The liftgate and liftgate window are no longer armed, but the doors... and hood are still armed. Locks and Security • Press the PANIC control on the remote... parking lamps when the alarm is opened without using the door key, keypad or the remote entry transmitter. 164 2004 Aviator f/k/a Navigator LS (231) Owners Guide (post-2002-fmt) USA English (fus) This will still be triggered if:...
... window control on the remote entry transmitter. To disarm the doors and hood, press the power door UNLOCK control. The liftgate and liftgate window are no longer armed, but the doors... and hood are still armed. Locks and Security • Press the PANIC control on the remote... parking lamps when the alarm is opened without using the door key, keypad or the remote entry transmitter. 164 2004 Aviator f/k/a Navigator LS (231) Owners Guide (post-2002-fmt) USA English (fus) This will still be triggered if:...

Owner's Manual
Page 268
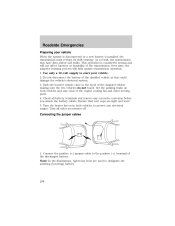
Use only a 12-volt supply to designate the assisting (boosting) battery. 268 2004 Aviator f/k/a Navigator LS (231) Owners Guide (post-2002-fmt) USA English (fus) - - + + Park the booster vehicle close to the hood of the discharged battery. Turn the heater fan on both vehicles to the positive (+) terminal of the disabled vehicle making sure...
Use only a 12-volt supply to designate the assisting (boosting) battery. 268 2004 Aviator f/k/a Navigator LS (231) Owners Guide (post-2002-fmt) USA English (fus) - - + + Park the booster vehicle close to the hood of the discharged battery. Turn the heater fan on both vehicles to the positive (+) terminal of the disabled vehicle making sure...
Owner's Manual
Page 291
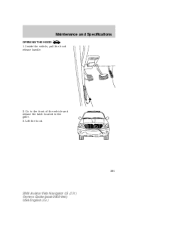
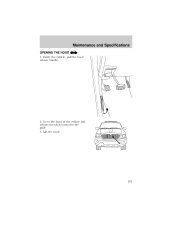
Maintenance and Specifications OPENING THE HOOD 1. Lift the hood. 291 2004 Aviator f/k/a Navigator LS (231) Owners Guide (post-2002-fmt) USA English (fus) Inside the vehicle, pull the hood release handle. 2. Go to the front of the vehicle and release the latch located in the grille. 3.
Maintenance and Specifications OPENING THE HOOD 1. Lift the hood. 291 2004 Aviator f/k/a Navigator LS (231) Owners Guide (post-2002-fmt) USA English (fus) Inside the vehicle, pull the hood release handle. 2. Go to the front of the vehicle and release the latch located in the grille. 3.

Owner's Manual
Page 294
Maintenance and Specifications 3. Locate and carefully remove the engine oil level indicator (dipstick). 6. DO NOT ADD OIL. 294 2004 Aviator f/k/a Navigator LS (231) Owners Guide (post-2002-fmt) USA English (fus) Insert the indicator fully, then remove it again. • If the oil level is between the MIN and MAX marks, the oil level is securely latched in P (Park). 4. Protect yourself from engine heat. 5. Open the hood. Wipe the indicator clean. Set the parking brake and ensure the gearshift is acceptable.
Maintenance and Specifications 3. Locate and carefully remove the engine oil level indicator (dipstick). 6. DO NOT ADD OIL. 294 2004 Aviator f/k/a Navigator LS (231) Owners Guide (post-2002-fmt) USA English (fus) Insert the indicator fully, then remove it again. • If the oil level is between the MIN and MAX marks, the oil level is securely latched in P (Park). 4. Protect yourself from engine heat. 5. Open the hood. Wipe the indicator clean. Set the parking brake and ensure the gearshift is acceptable.
Owner's Manual
Page 333
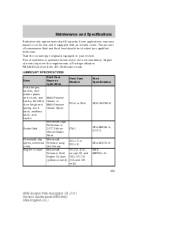
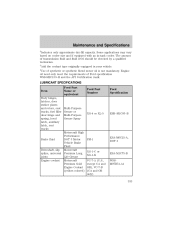
... Indicates only approximate dry-fill capacity. LUBRICANT SPECIFICATIONS Item Body hinges, latches, door striker plates and rotors, seat tracks, fuel filler door hinge and spring, hood latch, auxiliary latch, seat tracks Ford Part Name or equivalent Ford Part Number Ford Specification Multi-Purpose Grease or Multi-Purpose Grease Spray XG-4 or... Coolant (yellow-colored) PM-1 ESA-M6C25-A, DOT 3 XG-1-C or XG-1-K VC-7-A (U.S., except CA and OR), VC-7-B (CA and OR only) ESA-M1C75-B WSSM97B51-A1 333 2004 Aviator f/k/a Navigator LS (231) Owners Guide (post-2002-fmt) USA English (fus)
... Indicates only approximate dry-fill capacity. LUBRICANT SPECIFICATIONS Item Body hinges, latches, door striker plates and rotors, seat tracks, fuel filler door hinge and spring, hood latch, auxiliary latch, seat tracks Ford Part Name or equivalent Ford Part Number Ford Specification Multi-Purpose Grease or Multi-Purpose Grease Spray XG-4 or... Coolant (yellow-colored) PM-1 ESA-M6C25-A, DOT 3 XG-1-C or XG-1-K VC-7-A (U.S., except CA and OR), VC-7-B (CA and OR only) ESA-M1C75-B WSSM97B51-A1 333 2004 Aviator f/k/a Navigator LS (231) Owners Guide (post-2002-fmt) USA English (fus)
Owner Guide 3rd Printing (Spanish)
Page 387
...change the contents without notice and without written authorization from Ford Motor Company. Table of Contents Maintenance and Specifications Hood Engine compartment Engine oil Battery Fuel information Tire Information Part numbers Refill capacities Lubricant specifications 290 291 292 293 297... 304 316 330 331 333 Accessories Index 340 343 All rights reserved. Copyright © 2004 Ford Motor Company 3 Reproduction by any means, electronic or mechanical including photocopying, recording or by any information storage and retrieval system...
...change the contents without notice and without written authorization from Ford Motor Company. Table of Contents Maintenance and Specifications Hood Engine compartment Engine oil Battery Fuel information Tire Information Part numbers Refill capacities Lubricant specifications 290 291 292 293 297... 304 316 330 331 333 Accessories Index 340 343 All rights reserved. Copyright © 2004 Ford Motor Company 3 Reproduction by any means, electronic or mechanical including photocopying, recording or by any information storage and retrieval system...

Owner Guide 3rd Printing (Spanish)
Page 482
..., the beam will observe a light pattern with a distinct horizontal edge of the light pattern up to illuminate the wall or screen and open the hood. 4. Turn the screwdriver either counterclockwise (to adjust down) or clockwise to (to adjust up) aligning the upper edge of high intensity with a... slight angle towards the right. Insert a standard #2 Phillips screwdriver into the hole until it engages the vertical adjuster gear. Close the hood and turn off the lamps. 98 Locate the vertical adjuster hole in the upper radiator sight shield. HORIZONTAL AIM IS NOT REQUIRED FOR THIS ...
..., the beam will observe a light pattern with a distinct horizontal edge of the light pattern up to illuminate the wall or screen and open the hood. 4. Turn the screwdriver either counterclockwise (to adjust down) or clockwise to (to adjust up) aligning the upper edge of high intensity with a... slight angle towards the right. Insert a standard #2 Phillips screwdriver into the hole until it engages the vertical adjuster gear. Close the hood and turn off the lamps. 98 Locate the vertical adjuster hole in the upper radiator sight shield. HORIZONTAL AIM IS NOT REQUIRED FOR THIS ...
Owner Guide 3rd Printing (Spanish)
Page 486
Twist in the OFF position, then open the hood. 2. Make sure the headlamp switch is in a new bulb. 4. This will disengage the four snap-on and test the lamp operation. To remove the old ...
Twist in the OFF position, then open the hood. 2. Make sure the headlamp switch is in a new bulb. 4. This will disengage the four snap-on and test the lamp operation. To remove the old ...

Owner Guide 3rd Printing (Spanish)
Page 488
... vehicle and to the inner retaining pins. Replacing front parking lamp/turn signal lamp bulbs: 1. The bulb is in the OFF position, then open the hood. 2. When the bulb is burned out, the bulb assembly must be replaced by grasping the rear edge of the radiator cover to gain access to...
... vehicle and to the inner retaining pins. Replacing front parking lamp/turn signal lamp bulbs: 1. The bulb is in the OFF position, then open the hood. 2. When the bulb is burned out, the bulb assembly must be replaced by grasping the rear edge of the radiator cover to gain access to...
Owner Guide 3rd Printing (Spanish)
Page 546
The parking lamps will flash once when all doors/hood/liftgate and liftgate window are open . • Press the 7 • 8 and 9 • 0 controls ... the 20 second countdown. When you know that all doors/hood/liftgate and liftgate window are not closed, the horn will chirp twice to warn you that a door/hood/liftgate or liftgate window is a 20 second countdown when any...closed). If any are closed indicating the vehicle is removed from the ignition. Each door/hood/liftgate or liftgate window is armed individually, and if any of the above actions occur before the vehicle becomes armed....
The parking lamps will flash once when all doors/hood/liftgate and liftgate window are open . • Press the 7 • 8 and 9 • 0 controls ... the 20 second countdown. When you know that all doors/hood/liftgate and liftgate window are not closed, the horn will chirp twice to warn you that a door/hood/liftgate or liftgate window is a 20 second countdown when any...closed). If any are closed indicating the vehicle is removed from the ignition. Each door/hood/liftgate or liftgate window is armed individually, and if any of the above actions occur before the vehicle becomes armed....
Owner Guide 3rd Printing (Spanish)
Page 548
This will still be triggered if: • Any door, liftgate, liftgate window or hood is sounding. To disarm the doors and hood, press the power door UNLOCK control. The alarm system will only shut off the horn and parking lamps when the alarm is opened without using ...the door key, keypad or the remote entry transmitter. 164 The liftgate and liftgate window are no longer armed, but the doors and hood are still armed. Pressing the power door UNLOCK control within the 20 second prearmed mode will be armed. • Press the liftgate window control on...
This will still be triggered if: • Any door, liftgate, liftgate window or hood is sounding. To disarm the doors and hood, press the power door UNLOCK control. The alarm system will only shut off the horn and parking lamps when the alarm is opened without using ...the door key, keypad or the remote entry transmitter. 164 The liftgate and liftgate window are no longer armed, but the doors and hood are still armed. Pressing the power door UNLOCK control within the 20 second prearmed mode will be armed. • Press the liftgate window control on...
Owner Guide 3rd Printing (Spanish)
Page 652
... stay clear of the engine cooling fan and other accessories off. Check all other moving parts. 4. Turn the heater fan on both vehicles to the hood of the transmission. This operation is installed, the transmission must relearn its shift strategy. Do not disconnect the battery of the discharged battery. Connecting the...
... stay clear of the engine cooling fan and other accessories off. Check all other moving parts. 4. Turn the heater fan on both vehicles to the hood of the transmission. This operation is installed, the transmission must relearn its shift strategy. Do not disconnect the battery of the discharged battery. Connecting the...
Owner Guide 3rd Printing (Spanish)
Page 675
Lift the hood. 291 Go to the front of the vehicle and release the latch located in the grille. 3. Inside the vehicle, pull the hood release handle. 2. Maintenance and Specifications OPENING THE HOOD 1.
Lift the hood. 291 Go to the front of the vehicle and release the latch located in the grille. 3. Inside the vehicle, pull the hood release handle. 2. Maintenance and Specifications OPENING THE HOOD 1.

Owner Guide 3rd Printing (Spanish)
Page 678
Open the hood. Insert the indicator fully, then remove it again. • If the oil level is between the MIN and MAX marks, the oil level is securely latched in P (Park). 4. Protect yourself from engine heat. 5. DO NOT ADD OIL. 294 Locate and carefully remove the engine oil level indicator (dipstick). 6. Maintenance and Specifications 3. Set the parking brake and ensure the gearshift is acceptable. Wipe the indicator clean.
Open the hood. Insert the indicator fully, then remove it again. • If the oil level is between the MIN and MAX marks, the oil level is securely latched in P (Park). 4. Protect yourself from engine heat. 5. DO NOT ADD OIL. 294 Locate and carefully remove the engine oil level indicator (dipstick). 6. Maintenance and Specifications 3. Set the parking brake and ensure the gearshift is acceptable. Wipe the indicator clean.
Owner Guide 3rd Printing (Spanish)
Page 717
LUBRICANT SPECIFICATIONS Item Body hinges, latches, door striker plates and rotors, seat tracks, fuel filler door hinge and spring, hood latch, auxiliary latch, seat tracks Ford Part Name or equivalent Ford Part Number Ford Specification Multi-Purpose Grease or Multi-Purpose Grease Spray XG-4 or ...
LUBRICANT SPECIFICATIONS Item Body hinges, latches, door striker plates and rotors, seat tracks, fuel filler door hinge and spring, hood latch, auxiliary latch, seat tracks Ford Part Name or equivalent Ford Part Number Ford Specification Multi-Purpose Grease or Multi-Purpose Grease Spray XG-4 or ...
