Owner Guide 2nd Printing
Page 1
Table of Contents Table of Contents Introduction Instrument Cluster Warning and control lights Gauges 4 10 10 14 Entertainment Systems AM/FM stereo with CD AM/FM stereo cassette with CD Navigation system 16 16 20 24 Climate Controls Electronic automatic temperature control 72 72 Lights Headlamps Turn signal control Bulb replacement 80 80 84 84 Driver Controls Windshield wiper/washer control Steering wheel adjustment Power windows Mirrors Speed control Message center 90 90 92 94 96 99 110 Locks and Security Keys Locks Anti-theft system 124 124 124 128 1
Table of Contents Table of Contents Introduction Instrument Cluster Warning and control lights Gauges 4 10 10 14 Entertainment Systems AM/FM stereo with CD AM/FM stereo cassette with CD Navigation system 16 16 20 24 Climate Controls Electronic automatic temperature control 72 72 Lights Headlamps Turn signal control Bulb replacement 80 80 84 84 Driver Controls Windshield wiper/washer control Steering wheel adjustment Power windows Mirrors Speed control Message center 90 90 92 94 96 99 110 Locks and Security Keys Locks Anti-theft system 124 124 124 128 1

Owner Guide 2nd Printing
Page 13
... Trip odometer display. Turn signal: Illuminates when the left or right turn /tail lamps bulb has burned out. High beams: Illuminates when the high beam headlamps are turned on or flash faster, check for a burned out bulb. Low washer fluid (if equipped): Illuminates when the windshield washer fluid is open. Instrument...
... Trip odometer display. Turn signal: Illuminates when the left or right turn /tail lamps bulb has burned out. High beams: Illuminates when the high beam headlamps are turned on or flash faster, check for a burned out bulb. Low washer fluid (if equipped): Illuminates when the windshield washer fluid is open. Instrument...

Owner Guide 2nd Printing
Page 14
... chime: Sounds when the headlamps or parking lamps are on, the ignition is off the engine and let the engine cool. If it enters the red section, the engine is ...
... chime: Sounds when the headlamps or parking lamps are on, the ignition is off the engine and let the engine cool. If it enters the red section, the engine is ...
Owner Guide 2nd Printing
Page 80
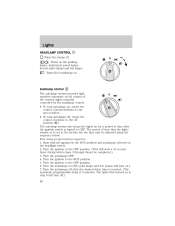
Autolamp control The autolamp system provides light sensitive automatic on-off control of the exterior lights normally controlled by the headlamp control. • To turn autolamps off position (O). Turn the ignition to the OFF position. 6. Turn the ignition to the RUN position. 5. ...Turn the autolamps off after the ignition switch is turned to the off , rotate the control clockwise to OFF. Turns the headlamps on , rotate the control counterclockwise to the OFF position. (This will turn off . The period of time after the desired delay time is reached...
Autolamp control The autolamp system provides light sensitive automatic on-off control of the exterior lights normally controlled by the headlamp control. • To turn autolamps off position (O). Turn the ignition to the OFF position. 6. Turn the ignition to the RUN position. 5. ...Turn the autolamps off after the ignition switch is turned to the off , rotate the control clockwise to OFF. Turns the headlamps on , rotate the control counterclockwise to the OFF position. (This will turn off . The period of time after the desired delay time is reached...
Owner Guide 2nd Printing
Page 81
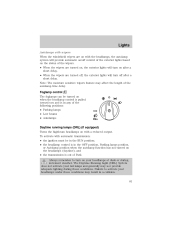
... OFF position, Parking lamps position, or Autolamp position when the autolamp function has not turned on the headlamps (daytime); Foglamp control The foglamps can be turned on when the headlamp control is pulled toward you and is in any of the following positions: • Parking lamps &#...8226; Low beams • Autolamps Daytime running lamps (DRL) (if equipped) Turns the highbeam headlamps on with automatic transmission: • the ignition must be in a collision. 81 The Daytime Running Light (DRL) System does not activate your tail...
... OFF position, Parking lamps position, or Autolamp position when the autolamp function has not turned on the headlamps (daytime); Foglamp control The foglamps can be turned on when the headlamp control is pulled toward you and is in any of the following positions: • Parking lamps &#...8226; Low beams • Autolamps Daytime running lamps (DRL) (if equipped) Turns the highbeam headlamps on with automatic transmission: • the ignition must be in a collision. 81 The Daytime Running Light (DRL) System does not activate your tail...

Owner Guide 2nd Printing
Page 82
Park the vehicle on the interior lights. PANEL DIMMER CONTROL Use to adjust the brightness of the instrument panel during parklamp, headlamp and autolamp operation. • Rotate up to brighten. • Rotate down to dim. • Rotate fully up to turn on a level surface approximately 7.6... High beams Pull toward you until control stops to activate. Note: The panel dimmer control is equipped with VOL (Visual Optical Left) headlamps. 1. Repeat to deactivate. HEADLAMP VERTICAL AIM ADJUSTMENT Your vehicle is not active when the autolamp system has determined that it . 82
Park the vehicle on the interior lights. PANEL DIMMER CONTROL Use to adjust the brightness of the instrument panel during parklamp, headlamp and autolamp operation. • Rotate up to brighten. • Rotate down to dim. • Rotate fully up to turn on a level surface approximately 7.6... High beams Pull toward you until control stops to activate. Note: The panel dimmer control is equipped with VOL (Visual Optical Left) headlamps. 1. Repeat to deactivate. HEADLAMP VERTICAL AIM ADJUSTMENT Your vehicle is not active when the autolamp system has determined that it . 82

Owner Guide 2nd Printing
Page 83
... at the top of masking tape works well). Measure the height from the measurement of the center of the low beam lamp to adjust the headlamp up or down. 6. subtract 50 mm (2.1 in ) from the measurement of the center of the low beam lamp to the ground and mark a 2.4 meter ...reference line 2. subtract 50 mm (2.1 in ) from the center of the lamp is marked by a 3.0 mm circle on the low beam headlamps to be adjusted. 5. The center of your headlamp to the ground. • (3) Twenty five feet • (4) Horizontal reference line 3. HORIZONTAL AIM IS NOT REQUIRED FOR THIS VEHICLE AND ...
... at the top of masking tape works well). Measure the height from the measurement of the center of the low beam lamp to adjust the headlamp up or down. 6. subtract 50 mm (2.1 in ) from the measurement of the center of the low beam lamp to the ground and mark a 2.4 meter ...reference line 2. subtract 50 mm (2.1 in ) from the center of the lamp is marked by a 3.0 mm circle on the low beam headlamps to be adjusted. 5. The center of your headlamp to the ground. • (3) Twenty five feet • (4) Horizontal reference line 3. HORIZONTAL AIM IS NOT REQUIRED FOR THIS VEHICLE AND ...

Owner Guide 2nd Printing
Page 84
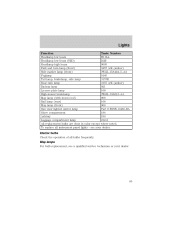
... burn time. 84 Lights TURN SIGNAL CONTROL • Push down to activate the left turn signal. • Push up to activate the right turn signal. Headlamp bulbs must be marked with an authorized "D.O.T." INTERIOR LAMPS Map lamps (if equipped) The map lamps and controls are specified in front of all the...
... burn time. 84 Lights TURN SIGNAL CONTROL • Push down to activate the left turn signal. • Push up to activate the right turn signal. Headlamp bulbs must be marked with an authorized "D.O.T." INTERIOR LAMPS Map lamps (if equipped) The map lamps and controls are specified in front of all the...
Owner Guide 2nd Printing
Page 85
Lights Function Trade Number Headlamp low beam H11LL Headlamp low beam (HID) D2R Headlamp high beam 9005 Park and turn lamp (front) 3457 A/K (amber) Side marker lamp (front) 3W4Z-15A424-5-AA Foglamp 9145 Tail lamp, brakelamp, side lamp 3157K ...
Lights Function Trade Number Headlamp low beam H11LL Headlamp low beam (HID) D2R Headlamp high beam 9005 Park and turn lamp (front) 3457 A/K (amber) Side marker lamp (front) 3W4Z-15A424-5-AA Foglamp 9145 Tail lamp, brakelamp, side lamp 3157K ...
Owner Guide 2nd Printing
Page 86
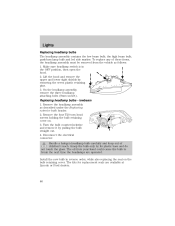
... must be removed from your hand could cause the bulb to break the next time the headlamps are avaliable at Lincoln or Ford dealers. 86 Install the new bulb in the OFF position, then open the hood. 2. Remove the four T20 torx head screws holding the ... retaining cover on the bulb retaining cover. Grasp the bulb only by pulling the bulb straight out. 4. To replace any of children's reach. Make sure headlamp switch is in reverse order, while also replacing the seal on . 3. Lift the hood and remove the upper and lower sight shields by removing the...
... must be removed from your hand could cause the bulb to break the next time the headlamps are avaliable at Lincoln or Ford dealers. 86 Install the new bulb in the OFF position, then open the hood. 2. Remove the four T20 torx head screws holding the ... retaining cover on the bulb retaining cover. Grasp the bulb only by pulling the bulb straight out. 4. To replace any of children's reach. Make sure headlamp switch is in reverse order, while also replacing the seal on . 3. Lift the hood and remove the upper and lower sight shields by removing the...
Owner Guide 2nd Printing
Page 87
... as described under the Replacing exterior bulb header. 2. Replacing headlamp bulbs - Install the new assembly in reverse order, while also replacing the seal on the bulb retaining cover. The kits for replacement seals are avaliable at Lincoln or Ford dealers. Remove the four T20 torx head screws holding the bulb retaining cover...
... as described under the Replacing exterior bulb header. 2. Replacing headlamp bulbs - Install the new assembly in reverse order, while also replacing the seal on the bulb retaining cover. The kits for replacement seals are avaliable at Lincoln or Ford dealers. Remove the four T20 torx head screws holding the bulb retaining cover...

Owner Guide 2nd Printing
Page 88
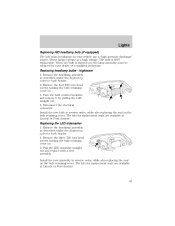
Replacing foglamp bulbs 1. Install the new bulb in reverse order. Turn the bulb counterclockwise and pull it straight out of the headlamp assembly. Install the new bulb in reverse order. 88 Rotate the foglamp bulb counterclockwise and remove from the foglamp bulb. 2. Remove the headlamp assembly as described under the Replacing exterior bulb header. 2. Make sure the headlamp switch is in the OFF position and disconnect the electrical connector from the foglamp. Lights Replacing front parking lamp/turn signal lamp bulbs 1.
Replacing foglamp bulbs 1. Install the new bulb in reverse order. Turn the bulb counterclockwise and pull it straight out of the headlamp assembly. Install the new bulb in reverse order. 88 Rotate the foglamp bulb counterclockwise and remove from the foglamp bulb. 2. Remove the headlamp assembly as described under the Replacing exterior bulb header. 2. Make sure the headlamp switch is in the OFF position and disconnect the electrical connector from the foglamp. Lights Replacing front parking lamp/turn signal lamp bulbs 1.

Owner Guide 2nd Printing
Page 186
... other enclosed areas. Exhaust fumes can start your vehicle immediately. If you smell exhaust fumes inside your vehicle, have the vehicle checked. Make sure the headlamps and electrical accessories are off. • Make sure the parking brake is set. • Make sure the gearshift is in other dry ground cover. Do...
... other enclosed areas. Exhaust fumes can start your vehicle immediately. If you smell exhaust fumes inside your vehicle, have the vehicle checked. Make sure the headlamps and electrical accessories are off. • Make sure the parking brake is set. • Make sure the gearshift is in other dry ground cover. Do...
Owner Guide 2nd Printing
Page 212
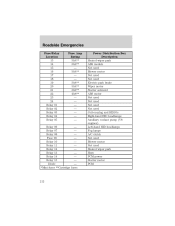
... motor Starter solenoid ABS motor Not used Not used Not used Not used Coil-on-plug and HEGOs Right-hand HID headlamps Auxiliary coolant pump (V8 engines) Left-hand HID headlamps Fog lamps A/C clutch Not used Blower motor Not used Heated wiper park Horn PCM power Starter motor PCM Relay 06 - Relay...
... motor Starter solenoid ABS motor Not used Not used Not used Not used Coil-on-plug and HEGOs Right-hand HID headlamps Auxiliary coolant pump (V8 engines) Left-hand HID headlamps Fog lamps A/C clutch Not used Blower motor Not used Heated wiper park Horn PCM power Starter motor PCM Relay 06 - Relay...
Owner Guide 2nd Printing
Page 288
... 288 GVWR (Gross Vehicle Weight Rating) ...202 calculating ...202 definition ...202 driving with a heavy load ...202 location ...202 H Hazard flashers ...205 Head restraints ...139, 144 Headlamps ...80 aiming ...82 autolamp system ...80 bulb specifications ...84 daytime running lights ...81 flash to pass ...82 replacing bulbs ...86-87 turning on and off...
... 288 GVWR (Gross Vehicle Weight Rating) ...202 calculating ...202 definition ...202 driving with a heavy load ...202 location ...202 H Hazard flashers ...205 Head restraints ...139, 144 Headlamps ...80 aiming ...82 autolamp system ...80 bulb specifications ...84 daytime running lights ...81 flash to pass ...82 replacing bulbs ...86-87 turning on and off...
Owner Guide 2nd Printing
Page 289
... the ignition ...185 valet key ...124 L Lamps autolamp system ...80 bulb replacement specifications chart ...84 cargo lamps ...82 daytime running light ...81 fog lamps ...81 headlamps ...80 headlamps, flash to pass ...82 instrument panel, dimming ...82 interior lamps ...84-85 replacing bulbs ...84, 86-89 Lane change indicator (see Turn signal) ...84...
... the ignition ...185 valet key ...124 L Lamps autolamp system ...80 bulb replacement specifications chart ...84 cargo lamps ...82 daytime running light ...81 fog lamps ...81 headlamps ...80 headlamps, flash to pass ...82 instrument panel, dimming ...82 interior lamps ...84-85 replacing bulbs ...84, 86-89 Lane change indicator (see Turn signal) ...84...