Owner Guide 4th Printing
Page 6
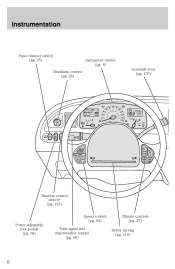
Instrumentation Panel dimmer switch (pg. 25) Headlamp control (pg. 25) Instrument cluster (pg. 8) Gearshift lever (pg. 135) CHECK CAP CIRCLE SLOWLY 50 40 80 60 60 100 70 80 120 140 160 ...
Instrumentation Panel dimmer switch (pg. 25) Headlamp control (pg. 25) Instrument cluster (pg. 8) Gearshift lever (pg. 135) CHECK CAP CIRCLE SLOWLY 50 40 80 60 60 100 70 80 120 140 160 ...

Owner Guide 4th Printing
Page 11
... and the engine is off the engine immediately. Illuminates when the oil pressure falls below the normal range. High beams Illuminates when the high beam headlamps are turned on . The light also illuminates when the battery is not charging properly, requiring electrical system service. Check the oil level and add oil...
... and the engine is off the engine immediately. Illuminates when the oil pressure falls below the normal range. High beams Illuminates when the high beam headlamps are turned on . The light also illuminates when the battery is not charging properly, requiring electrical system service. Check the oil level and add oil...
Owner Guide 4th Printing
Page 15
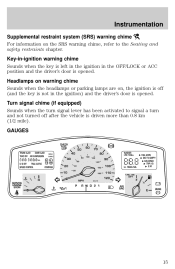
... chime Sounds when the headlamps or parking lamps are on the SRS warning chime, refer to signal a turn and not turned off (and the key is not in the OFF/...
... chime Sounds when the headlamps or parking lamps are on the SRS warning chime, refer to signal a turn and not turned off (and the key is not in the OFF/...

Owner Guide 4th Printing
Page 25
...instrument panel during full daylight, the instrument panel lighting will not dim the instrument panel lighting when the headlamps are on in the daytime. OFF P Your vehicle's headlamp system is adjustable up to brighten. • Push down to rotate the control counterclockwise. • To...PANEL DIM AUTOLAMP CONTROL The autolamp system provides light OFF P sensitive automatic on the headlamps. Even during headlight and parklamp operation. • Push up to approximately three minutes by the headlamp control. The preselected time lapse is equipped with a feature that will still be...
...instrument panel during full daylight, the instrument panel lighting will not dim the instrument panel lighting when the headlamps are on in the daytime. OFF P Your vehicle's headlamp system is adjustable up to brighten. • Push down to rotate the control counterclockwise. • To...PANEL DIM AUTOLAMP CONTROL The autolamp system provides light OFF P sensitive automatic on the headlamps. Even during headlight and parklamp operation. • Push up to approximately three minutes by the headlamp control. The preselected time lapse is equipped with a feature that will still be...

Owner Guide 4th Printing
Page 26
... • Push forward to activate. • Pull toward you to turn on the headlamps using the headlamp control or Autolamp. The Daytime Running Light (DRL) System does not activate your headlamps under these conditions. Since the instrument panel will automatically illuminate the tail lamps and parking ... and generally may result in a collision. Controls and features Daytime running lamps (DRL) (if equipped) The daytime running light system turns the headlamps on, with a reduced light output, when: • the ignition is in RUN, • the transmission is not turned on by another...
... • Push forward to activate. • Pull toward you to turn on the headlamps using the headlamp control or Autolamp. The Daytime Running Light (DRL) System does not activate your headlamps under these conditions. Since the instrument panel will automatically illuminate the tail lamps and parking ... and generally may result in a collision. Controls and features Daytime running lamps (DRL) (if equipped) The daytime running light system turns the headlamps on, with a reduced light output, when: • the ignition is in RUN, • the transmission is not turned on by another...

Owner Guide 4th Printing
Page 41
... FADE CD TAPE EJ RDS DSP MUTE SEEK TUNE SCAN AUTO AM FM REW FF SIDE 1-2 COMP SHUFF 1 2 3 4 5 6 Your audio system is operable when the headlamps are illuminated. During the operation of any selected mode, lighting for the 41
... FADE CD TAPE EJ RDS DSP MUTE SEEK TUNE SCAN AUTO AM FM REW FF SIDE 1-2 COMP SHUFF 1 2 3 4 5 6 Your audio system is operable when the headlamps are illuminated. During the operation of any selected mode, lighting for the 41
Owner Guide 4th Printing
Page 108
...safety belt three times, ending with the safety belt unbuckled. • After step 5 the safety belt warning light will be turned on the parklamps/headlamps, turn off . (Approximately 1-2 minutes) • Steps 3-5 must be completed within 60 seconds or the procedure will not affect the procedure.) ...switch is in the OFF position • all vehicle doors are closed • the driver's safety belt is unbuckled • the parklamps/headlamps are in OFF position (If vehicle is buckled and then unbuckled during Belt Minder warning activation. 4. The Belt Minder feature can be done ...
...safety belt three times, ending with the safety belt unbuckled. • After step 5 the safety belt warning light will be turned on the parklamps/headlamps, turn off . (Approximately 1-2 minutes) • Steps 3-5 must be completed within 60 seconds or the procedure will not affect the procedure.) ...switch is in the OFF position • all vehicle doors are closed • the driver's safety belt is unbuckled • the parklamps/headlamps are in OFF position (If vehicle is buckled and then unbuckled during Belt Minder warning activation. 4. The Belt Minder feature can be done ...

Owner Guide 4th Printing
Page 127
... there is turned when getting in turning the 3 key, firmly rotate the steering wheel 5 left and right until the key turns freely. Make sure the headlamps and vehicle accessories are turned 1 • front wheel is against the curb • steering wheel is difficulty in or out of the vehicle CHECK FUEL...
... there is turned when getting in turning the 3 key, firmly rotate the steering wheel 5 left and right until the key turns freely. Make sure the headlamps and vehicle accessories are turned 1 • front wheel is against the curb • steering wheel is difficulty in or out of the vehicle CHECK FUEL...
Owner Guide 4th Printing
Page 149
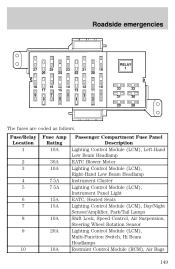
... 15A 10A 20A Passenger Compartment Fuse Panel Description Lighting Control Module (LCM), Left-Hand Low Beam Headlamp EATC Blower Motor Lighting Control Module (LCM), Right-Hand Low Beam Headlamp Instrument Cluster Lighting Control Module (LCM), Instrument Panel Light EATC, Heated Seats Lighting Control Module (LCM...Park/Tail Lamps Shift Lock, Speed Control, Air Suspension, Steering Wheel Rotation Sensor Lighting Control Module (LCM), Multi-Function Switch, Hi Beam Headlamps Restraint Control Module (RCM), Air Bags 149 10 10A Roadside emergencies 27 26 25 24 23 22 21 20 19 RELAY 1 18 17...
... 15A 10A 20A Passenger Compartment Fuse Panel Description Lighting Control Module (LCM), Left-Hand Low Beam Headlamp EATC Blower Motor Lighting Control Module (LCM), Right-Hand Low Beam Headlamp Instrument Cluster Lighting Control Module (LCM), Instrument Panel Light EATC, Heated Seats Lighting Control Module (LCM...Park/Tail Lamps Shift Lock, Speed Control, Air Suspension, Steering Wheel Rotation Sensor Lighting Control Module (LCM), Multi-Function Switch, Hi Beam Headlamps Restraint Control Module (RCM), Air Bags 149 10 10A Roadside emergencies 27 26 25 24 23 22 21 20 19 RELAY 1 18 17...

Owner Guide 4th Printing
Page 199
... normal operating temperature. Open the hood. 199 The engine must warm up to sit for an extended period of the following lamps frequently: • Headlamps • Tail lamps • Brakelamps • High-mount brakelamp • Turn signals • Backup lamps • License plate lamp Do not... remove lamp bulbs unless they will be replaced immediately. Replacing headlamp bulbs To remove the headlamp bulb: 1. Once started, do not turn off the engine until the above driving cycle. Then, start the engine and complete the...
... normal operating temperature. Open the hood. 199 The engine must warm up to sit for an extended period of the following lamps frequently: • Headlamps • Tail lamps • Brakelamps • High-mount brakelamp • Turn signals • Backup lamps • License plate lamp Do not... remove lamp bulbs unless they will be replaced immediately. Replacing headlamp bulbs To remove the headlamp bulb: 1. Once started, do not turn off the engine until the above driving cycle. Then, start the engine and complete the...
Owner Guide 4th Printing
Page 200
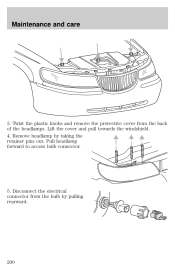
Remove headlamp by pulling rearward. 200 Pull headlamp forward to access bulb connector. 5. Twist the plastic knobs and remove the protective cover from the bulb by taking the retainer pins out. Disconnect the electrical connector from the back of the headlamps. Maintenance and care 3. Lift the cover and pull towards the windshield. 4.
Remove headlamp by pulling rearward. 200 Pull headlamp forward to access bulb connector. 5. Twist the plastic knobs and remove the protective cover from the bulb by taking the retainer pins out. Disconnect the electrical connector from the back of the headlamps. Maintenance and care 3. Lift the cover and pull towards the windshield. 4.

Owner Guide 4th Printing
Page 201
... the plastic base with knobs. 201 Connect the electrical connector into the rear of children's reach. Keep the ring to break the next time the headlamps are inserted into the proper holes and into position. 4. The oil from the rear) to align it from the lamp assembly by gently pulling it... carefully and keep out of the plastic base until the plastic base contacts the rear of the lamp assembly. 2. Turn the headlamps on vehicle locking it into the guides. 6. Grasp the bulb only by rotating it counterclockwise (when viewed from your hand could cause the bulb to ...
... the plastic base with knobs. 201 Connect the electrical connector into the rear of children's reach. Keep the ring to break the next time the headlamps are inserted into the proper holes and into position. 4. The oil from the rear) to align it from the lamp assembly by gently pulling it... carefully and keep out of the plastic base until the plastic base contacts the rear of the lamp assembly. 2. Turn the headlamps on vehicle locking it into the guides. 6. Grasp the bulb only by rotating it counterclockwise (when viewed from your hand could cause the bulb to ...
Owner Guide 4th Printing
Page 202
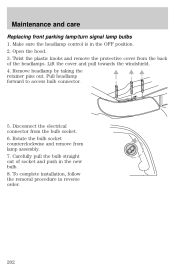
... hood. 3. Lift the cover and pull towards the windshield. 4. To complete installation, follow the removal procedure in the OFF position. 2. Remove headlamp by taking the retainer pins out. Pull headlamp forward to access bulb connector. 5. Maintenance and care Replacing front parking lamp/turn signal lamp bulbs 1. Rotate the bulb socket counterclockwise and...
... hood. 3. Lift the cover and pull towards the windshield. 4. To complete installation, follow the removal procedure in the OFF position. 2. Remove headlamp by taking the retainer pins out. Pull headlamp forward to access bulb connector. 5. Maintenance and care Replacing front parking lamp/turn signal lamp bulbs 1. Rotate the bulb socket counterclockwise and...
Owner Guide 4th Printing
Page 204
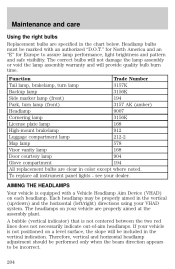
... Number Tail lamp, brakelamp, turn lamp 3157K Backup lamp 3156K Side marker lamp (front) 194 Park, turn lamp (front) 3157 AK (amber) Headlamp 9007 Cornering lamp 3156K License plate lamp 168 High-mount brakelamp 912 Luggage compartment lamp 212-2 Map lamp 578 Visor vanity lamp 168 Door courtesy...bulbs are clear in the chart below. A bubble (vertical indicator) that is equipped with an authorized "D.O.T." To replace all instrument panel lights - Headlamp bulbs must be included in the vertical (up/down) and the horizontal (left/right) directions using your VHAD system. AIMING THE...
... Number Tail lamp, brakelamp, turn lamp 3157K Backup lamp 3156K Side marker lamp (front) 194 Park, turn lamp (front) 3157 AK (amber) Headlamp 9007 Cornering lamp 3156K License plate lamp 168 High-mount brakelamp 912 Luggage compartment lamp 212-2 Map lamp 578 Visor vanity lamp 168 Door courtesy...bulbs are clear in the chart below. A bubble (vertical indicator) that is equipped with an authorized "D.O.T." To replace all instrument panel lights - Headlamp bulbs must be included in the vertical (up/down) and the horizontal (left/right) directions using your VHAD system. AIMING THE...

Owner Guide 4th Printing
Page 205
... shown. 205 Use a 4 mm wrench or socket to make the adjustments. Horizontal aim adjustment 1. If the vehicle has been in the direction of the headlamp assembly. 3. Turning the horizontal adjusting screw in an accident, the vehicle's front structure should be properly aligned before aiming the... headlamps. Maintenance and care You will need one 4 mm wrench or socket to turn the horizontal adjusting screw until the "0" mark on the yellow dial...
... shown. 205 Use a 4 mm wrench or socket to make the adjustments. Horizontal aim adjustment 1. If the vehicle has been in the direction of the headlamp assembly. 3. Turning the horizontal adjusting screw in an accident, the vehicle's front structure should be properly aligned before aiming the... headlamps. Maintenance and care You will need one 4 mm wrench or socket to turn the horizontal adjusting screw until the "0" mark on the yellow dial...

Owner Guide 4th Printing
Page 206
... or socket to the Customer Assistance chapter for best results. Never use a clean sponge, washing glove or similar device and plenty of the headlamp. 3. With the hood open, remove protective cover, then locate the bubble level and the vertical adjustment screw. Maintenance and care Vertical aim ... is still warm, immediately after or during exposure to the "0" mark, the headlamp has been properly aimed. To avoid spots, avoid washing when the hood is particularly dirty, use a quality car wash detergent. Install protective cover. If your vehicle regularly with cold or lukewarm water...
... or socket to the Customer Assistance chapter for best results. Never use a clean sponge, washing glove or similar device and plenty of the headlamp. 3. With the hood open, remove protective cover, then locate the bubble level and the vertical adjustment screw. Maintenance and care Vertical aim ... is still warm, immediately after or during exposure to the "0" mark, the headlamp has been properly aimed. To avoid spots, avoid washing when the hood is particularly dirty, use a quality car wash detergent. Install protective cover. If your vehicle regularly with cold or lukewarm water...
Owner Guide 4th Printing
Page 233
... location ...139 GVWR (Gross Vehicle Weight Rating) ...139 calculating ...139 definition ...139 driving with a heavy load ...139 location ...139 H Hazard flashers ...146 Head restraints ...92 Headlamps ...25-26 233
... location ...139 GVWR (Gross Vehicle Weight Rating) ...139 calculating ...139 definition ...139 driving with a heavy load ...139 location ...139 H Hazard flashers ...146 Head restraints ...92 Headlamps ...25-26 233
Owner Guide 4th Printing
Page 234
... ignition chime ...15 positions of the ignition ...59 L Lamps autolamp system ...25 bulb replacement specifications chart ...204 cargo lamps ...25 daytime running light ...26 headlamps ...25-26 headlamps, flash to pass ...26 instrument panel, dimming ...25 interior lamps ...71, 203 replacing bulbs ...199, 202-203 Lane change indicator (see Turn signal) ...60...
... ignition chime ...15 positions of the ignition ...59 L Lamps autolamp system ...25 bulb replacement specifications chart ...204 cargo lamps ...25 daytime running light ...26 headlamps ...25-26 headlamps, flash to pass ...26 instrument panel, dimming ...25 interior lamps ...71, 203 replacing bulbs ...199, 202-203 Lane change indicator (see Turn signal) ...60...
