Owner Guide 4th Printing
Page 33
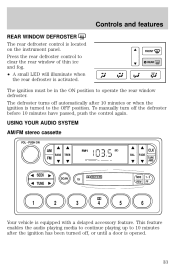
... automatically after 10 minutes or when the ignition is turned to 10 minutes after the ignition has been turned off, or until a door is located on the instrument panel. Controls and features REAR WINDOW DEFROSTER The rear defroster control is opened. 33 This feature enables the audio playing media to continue playing...
... automatically after 10 minutes or when the ignition is turned to 10 minutes after the ignition has been turned off, or until a door is located on the instrument panel. Controls and features REAR WINDOW DEFROSTER The rear defroster control is opened. 33 This feature enables the audio playing media to continue playing...

Owner Guide 4th Printing
Page 53
... to change the equalization to Clock in the trunk. 1. CD changer (if equipped) Your CD changer is RDS displayed. Slide the door to vehicles not equipped with a separate, instrument panel mounted clock. SEL 53 RDS DSP SEL Setting the clock with radio data system (RDS) feature (if equipped) This feature applies to...
... to change the equalization to Clock in the trunk. 1. CD changer (if equipped) Your CD changer is RDS displayed. Slide the door to vehicles not equipped with a separate, instrument panel mounted clock. SEL 53 RDS DSP SEL Setting the clock with radio data system (RDS) feature (if equipped) This feature applies to...
Owner Guide 4th Printing
Page 72
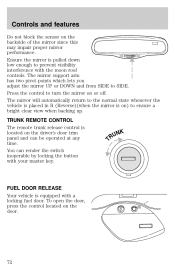
... support arm has two pivot points which lets you adjust the mirror UP or DOWN and from SIDE to turn the mirror on the driver's door trim panel and can render the switch inoperable by locking the button with the moon roof controls. COMP MIRROR TRUNK REMOTE CONTROL The remote trunk release...
... support arm has two pivot points which lets you adjust the mirror UP or DOWN and from SIDE to turn the mirror on the driver's door trim panel and can render the switch inoperable by locking the button with the moon roof controls. COMP MIRROR TRUNK REMOTE CONTROL The remote trunk release...
Owner Guide 4th Printing
Page 80
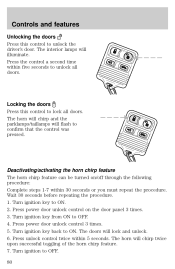
...the control was pressed. Deactivating/activating the horn chirp feature The horn chirp feature can be turned on the door panel 3 times. 3. Turn ignition key to OFF. 4. Press power door unlock control 3 times. 5. Press the control a second time within 30 seconds or you must repeat the... control twice within 5 seconds. Turn ignition to ON. The interior lamps will lock and unlock. 6. Locking the doors Press this control to unlock all doors. Press power door unlock control on /off through the following procedure: Complete steps 1-7 within five seconds to unlock the driver...
...the control was pressed. Deactivating/activating the horn chirp feature The horn chirp feature can be turned on the door panel 3 times. 3. Turn ignition key to OFF. 4. Press power door unlock control 3 times. 5. Press the control a second time within 30 seconds or you must repeat the... control twice within 5 seconds. Turn ignition to ON. The interior lamps will lock and unlock. 6. Locking the doors Press this control to unlock all doors. Press power door unlock control on /off through the following procedure: Complete steps 1-7 within five seconds to unlock the driver...
Owner Guide 4th Printing
Page 84
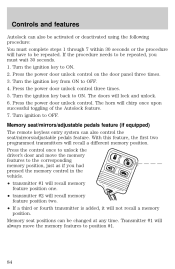
... first two programmed transmitters will chirp once upon successful toggling of the Autolock feature. 7. Press the control once to unlock the driver's door and move the memory features to be repeated. If the procedure needs to the corresponding memory position, just as if you must complete ...steps 1 through 7 within 30 seconds or the procedure will lock and unlock. 6. Press the power door unlock control on the door panel three times. 3. Turn the ignition key back to ON. 2. Transmitter #1 will not recall a memory position. Turn the ignition key to...
... first two programmed transmitters will chirp once upon successful toggling of the Autolock feature. 7. Press the control once to unlock the driver's door and move the memory features to be repeated. If the procedure needs to the corresponding memory position, just as if you must complete ...steps 1 through 7 within 30 seconds or the procedure will lock and unlock. 6. Press the power door unlock control on the door panel three times. 3. Turn the ignition key back to ON. 2. Transmitter #1 will not recall a memory position. Turn the ignition key to...
Owner Guide 4th Printing
Page 94
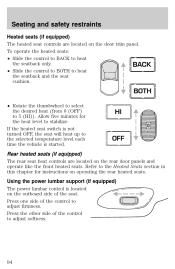
...lumbar control is started. BACK • Slide the control to BOTH to the selected temperature level each time the vehicle is located on the rear door panels and operate like the front heated seats. BOTH • Rotate the thumbwheel to select the desired heat (from 0 (OFF) to the Heated Seats...on operating the rear heated seats. Press one side of the control to heat the seatback only. Allow five minutes for instructions on the door trim panel. Seating and safety restraints Heated seats (if equipped) The heated seat controls are located on the outboard side of the seat. To operate...
...lumbar control is started. BACK • Slide the control to BOTH to the selected temperature level each time the vehicle is located on the rear door panels and operate like the front heated seats. BOTH • Rotate the thumbwheel to select the desired heat (from 0 (OFF) to the Heated Seats...on operating the rear heated seats. Press one side of the control to heat the seatback only. Allow five minutes for instructions on the door trim panel. Seating and safety restraints Heated seats (if equipped) The heated seat controls are located on the outboard side of the seat. To operate...
Owner Guide 4th Printing
Page 116
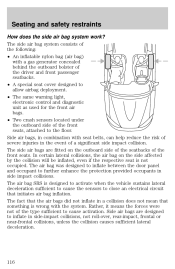
... side affected by the collision will be inflated, even if the respective seat is not occupied. The air bag was designed to inflate between the door panel and occupant to cause activation. The fact that the air bags did not inflate in the event of the front seats, attached to close an...
... side affected by the collision will be inflated, even if the respective seat is not occupied. The air bag was designed to inflate between the door panel and occupant to cause activation. The fact that the air bags did not inflate in the event of the front seats, attached to close an...
Owner Guide 4th Printing
Page 151
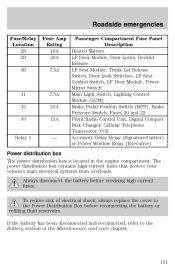
.../Relay Location 28 29 30 Fuse Amp Rating 10A 20A 7.5A Passenger Compartment Fuse Panel Description Heated Mirrors LF Door Module, Door Locks, Decklid Release LF Seat Module, Trunk Lid Release Switch, Door Lock Switches, LF Seat Control Switch, LF Door Module, Power Mirror Switch Main Light Switch, Lighting Control Module (LCM) Brake Pedal Position...
.../Relay Location 28 29 30 Fuse Amp Rating 10A 20A 7.5A Passenger Compartment Fuse Panel Description Heated Mirrors LF Door Module, Door Locks, Decklid Release LF Seat Module, Trunk Lid Release Switch, Door Lock Switches, LF Seat Control Switch, LF Door Module, Power Mirror Switch Main Light Switch, Lighting Control Module (LCM) Brake Pedal Position...
Owner Guide 4th Printing
Page 204
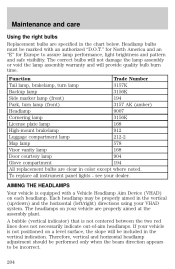
... (amber) Headlamp 9007 Cornering lamp 3156K License plate lamp 168 High-mount brakelamp 912 Luggage compartment lamp 212-2 Map lamp 578 Visor vanity lamp 168 Door courtesy lamp 904 Glove compartment 194 All replacement bulbs are specified in the chart below. AIMING THE HEADLAMPS Your vehicle is not centered between the... plant. Each headlamp may be incorrect. 204 A bubble (vertical indicator) that is equipped with an authorized "D.O.T." The headlamps on each headlamp. To replace all instrument panel lights -
... (amber) Headlamp 9007 Cornering lamp 3156K License plate lamp 168 High-mount brakelamp 912 Luggage compartment lamp 212-2 Map lamp 578 Visor vanity lamp 168 Door courtesy lamp 904 Glove compartment 194 All replacement bulbs are specified in the chart below. AIMING THE HEADLAMPS Your vehicle is not centered between the... plant. Each headlamp may be incorrect. 204 A bubble (vertical indicator) that is equipped with an authorized "D.O.T." The headlamps on each headlamp. To replace all instrument panel lights -

Owner Guide 4th Printing
Page 218
... The engine number (the last eight numbers of the vehicle identification number) is located on the front door latch pillar on the driver's side. The Certification label is stamped on the driver side instrument panel. (Please note that a Certification label be affixed to a vehicle and prescribe where the Certification label may be...
... The engine number (the last eight numbers of the vehicle identification number) is located on the front door latch pillar on the driver's side. The Certification label is stamped on the driver side instrument panel. (Please note that a Certification label be affixed to a vehicle and prescribe where the Certification label may be...

Owner Guide 4th Printing
Page 232
Index engine compartment ...209 exterior ...207 exterior lamps ...208 instrument cluster lens ...210 instrument panel ...210 interior ...210-211 mirrors ...208 plastic parts ...208 safety belts ...211 washing ...206 waxing ...207 wheels ...208 windows...175, 212 specifications ...214-215 Cruise control (see Lamps) ...26 Defrost rear window ...33 Dipstick automatic transmission fluid ...178 engine oil ...167 Doors door ajar warning ...12 lubricant specifications ...214 Driving under special conditions through water ...144 E Emergencies, roadside jump-starting ...158 Emission control system ...197...
Index engine compartment ...209 exterior ...207 exterior lamps ...208 instrument cluster lens ...210 instrument panel ...210 interior ...210-211 mirrors ...208 plastic parts ...208 safety belts ...211 washing ...206 waxing ...207 wheels ...208 windows...175, 212 specifications ...214-215 Cruise control (see Lamps) ...26 Defrost rear window ...33 Dipstick automatic transmission fluid ...178 engine oil ...167 Doors door ajar warning ...12 lubricant specifications ...214 Driving under special conditions through water ...144 E Emergencies, roadside jump-starting ...158 Emission control system ...197...
Owner Guide 4th Printing
Page 234
...system ...25 bulb replacement specifications chart ...204 cargo lamps ...25 daytime running light ...26 headlamps ...25-26 headlamps, flash to pass ...26 instrument panel, dimming ...25 interior lamps ...71, 203 replacing bulbs ...199, 202-203 Lane change indicator (see Turn signal) ...60 Lights, warning and ...indicator ...8 air bag ...9 air suspension ...13 anti-lock brakes (ABS) ...10, 131 brake ...10 charging system ...11 cruise indicator ...14 door ajar ...12 fuel cap light ...10 high beam ...11 liftgate ajar ...12 low coolant ...12 low washer fluid ...14 oil pressure ...11 safety...
...system ...25 bulb replacement specifications chart ...204 cargo lamps ...25 daytime running light ...26 headlamps ...25-26 headlamps, flash to pass ...26 instrument panel, dimming ...25 interior lamps ...71, 203 replacing bulbs ...199, 202-203 Lane change indicator (see Turn signal) ...60 Lights, warning and ...indicator ...8 air bag ...9 air suspension ...13 anti-lock brakes (ABS) ...10, 131 brake ...10 charging system ...11 cruise indicator ...14 door ajar ...12 fuel cap light ...10 high beam ...11 liftgate ajar ...12 low coolant ...12 low washer fluid ...14 oil pressure ...11 safety...

Owner Guide 4th Printing
Page 240
... Premium Gold Engine Coolant. Refer to the Certification Label located on the dipstick's normal operating range. 1 240 The amount of the instrument panel. 15.0L (15.8 quarts) Coolant capacity 1 Power steering fluid capacity Fill to determine the correct service interval. 3 Indicates only approximate dry...Hood release Pull handle under the left side of transmission fluid and fluid level should be set by the indication on the driver's door. DO NOT USE Ford Extended Life Engine Coolant (orange in the Maintenance and Care chapter. 2 Ensure the correct automatic transmission fluid...
... Premium Gold Engine Coolant. Refer to the Certification Label located on the dipstick's normal operating range. 1 240 The amount of the instrument panel. 15.0L (15.8 quarts) Coolant capacity 1 Power steering fluid capacity Fill to determine the correct service interval. 3 Indicates only approximate dry...Hood release Pull handle under the left side of transmission fluid and fluid level should be set by the indication on the driver's door. DO NOT USE Ford Extended Life Engine Coolant (orange in the Maintenance and Care chapter. 2 Ensure the correct automatic transmission fluid...


