Owner's Manual
Page 8
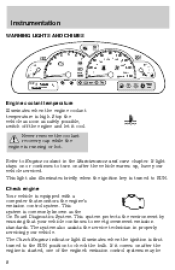
... RESET 0 MPH km/h 160 E CHECK FUEL CAP A/B TRIP B kmiles D5 Engine coolant temperature Illuminates when the engine coolant temperature is running or hot. Never remove the coolant recovery cap while the engine is high. If light stays on or continues to RUN. The Check Engine indicator light illuminates when the ignition is commonly known as...
... RESET 0 MPH km/h 160 E CHECK FUEL CAP A/B TRIP B kmiles D5 Engine coolant temperature Illuminates when the engine coolant temperature is running or hot. Never remove the coolant recovery cap while the engine is high. If light stays on or continues to RUN. The Check Engine indicator light illuminates when the ignition is commonly known as...
Owner's Manual
Page 15
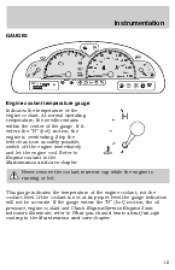
...operating temperature, the needle remains within the center of the engine coolant. Stop the vehicle as soon as safely possible, switch off the engine immediately and let the engine cool. H C Never remove the coolant reservoir cap while the engine is not at its proper level the gauge indication will ...not be accurate. This gauge indicates the temperature of the engine coolant, not the coolant level. ...
...operating temperature, the needle remains within the center of the engine coolant. Stop the vehicle as soon as safely possible, switch off the engine immediately and let the engine cool. H C Never remove the coolant reservoir cap while the engine is not at its proper level the gauge indication will ...not be accurate. This gauge indicates the temperature of the engine coolant, not the coolant level. ...
Owner's Manual
Page 72
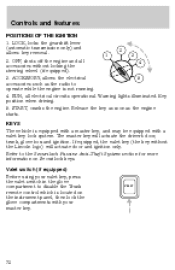
LOCK, locks the gearshift lever (automatic transmission only) and 2 allows key removal. 1 3 2. OFF, shuts off the engine and all electrical circuits operational. Warning lights illuminated. and may be equipped with a master key; Valet switch (if equipped) Before using your master ... the valet switch in the glove compartment to operate while the engine is equipped with a valet key lock system. RUN, all 4 accessories without the Lincoln logo) will actuate the driver's door, trunk, glove box and ignition. START, cranks the engine. Release the key as soon as the radio to disable the...
LOCK, locks the gearshift lever (automatic transmission only) and 2 allows key removal. 1 3 2. OFF, shuts off the engine and all electrical circuits operational. Warning lights illuminated. and may be equipped with a master key; Valet switch (if equipped) Before using your master ... the valet switch in the glove compartment to operate while the engine is equipped with a valet key lock system. RUN, all 4 accessories without the Lincoln logo) will actuate the driver's door, trunk, glove box and ignition. START, cranks the engine. Release the key as soon as the radio to disable the...

Owner's Manual
Page 97
Autolock/Relock (if equipped) This feature automatically locks all vehicle doors when: • all doors are closed • the engine is running • you shift into memory), take all your vehicle's transmitters to your dealer for your dealer to reprogram all the remote... transmitters to four may be necessary for programming. Refer to remove it from your vehicle while performing this service. Snap the two halves back together. Replacing lost transmitters If a remote transmitter has been lost ...
Autolock/Relock (if equipped) This feature automatically locks all vehicle doors when: • all doors are closed • the engine is running • you shift into memory), take all your vehicle's transmitters to your dealer for your dealer to reprogram all the remote... transmitters to four may be necessary for programming. Refer to remove it from your vehicle while performing this service. Snap the two halves back together. Replacing lost transmitters If a remote transmitter has been lost ...

Owner's Manual
Page 102
...programmed coded keys (keys that already operate your new key to 4 (RUN) (maintain ignition in the ignition it will program your vehicle's engine) and the new unprogrammed key(s) readily accessible for timely implementation of each step in the procedure. Within 20 seconds of turning the ignition to ...coded key into the ignition and turn the ignition from the ignition. 3. Programming spare keys A maximum of your dealership to 1 (LOCK) and 5 remove the first coded key from 1 (LOCK) to a coded key. 102 Turn ignition to have the spare coded key(s) programmed. Only SecuriLock keys can...
...programmed coded keys (keys that already operate your new key to 4 (RUN) (maintain ignition in the ignition it will program your vehicle's engine) and the new unprogrammed key(s) readily accessible for timely implementation of each step in the procedure. Within 20 seconds of turning the ignition to ...coded key into the ignition and turn the ignition from the ignition. 3. Programming spare keys A maximum of your dealership to 1 (LOCK) and 5 remove the first coded key from 1 (LOCK) to a coded key. 102 Turn ignition to have the spare coded key(s) programmed. Only SecuriLock keys can...

Owner's Manual
Page 151
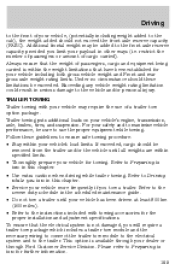
... working . Start the vehicle. Do not drive your vehicle gets stuck in mud or snow it may occur. Do not rock the vehicle if the engine is normal for more than a few minutes or damage to move the gearshift lever out of P (Park) with a 5-speed automatic transmission (if equipped) Your ... to use the above procedure to the transmission and tires may occur or the engine may not be rocked out by using an adaptive learning strategy. Do not rock the vehicle for a new transmission to LOCK, then remove the key. 2. Driving with ignition in the RUN position and the brake pedal depressed...
... working . Start the vehicle. Do not drive your vehicle gets stuck in mud or snow it may occur. Do not rock the vehicle if the engine is normal for more than a few minutes or damage to move the gearshift lever out of P (Park) with a 5-speed automatic transmission (if equipped) Your ... to use the above procedure to the transmission and tires may occur or the engine may not be rocked out by using an adaptive learning strategy. Do not rock the vehicle for a new transmission to LOCK, then remove the key. 2. Driving with ignition in the RUN position and the brake pedal depressed...

Owner's Manual
Page 163
...vehicle as effectively as dry brakes. Once through deep water where the transmission vent tube is submerged may be improved by moving your engine. The GVW is unknown. VEHICLE LOADING Before loading a vehicle, familiarize yourself with the following terms: • Base Curb Weight:...equipment. Traction or brake capability may allow water into the transmission and cause internal transmission damage. Driving Removing key from ignition • Turn the ignition key to position 1 (LOCK). • Remove the ignition key. 2 1 3 4 5 DRIVING THROUGH WATER Do not drive quickly through standing ...
...vehicle as effectively as dry brakes. Once through deep water where the transmission vent tube is submerged may be improved by moving your engine. The GVW is unknown. VEHICLE LOADING Before loading a vehicle, familiarize yourself with the following terms: • Base Curb Weight:...equipment. Traction or brake capability may allow water into the transmission and cause internal transmission damage. Driving Removing key from ignition • Turn the ignition key to position 1 (LOCK). • Remove the ignition key. 2 1 3 4 5 DRIVING THROUGH WATER Do not drive quickly through standing ...
Owner's Manual
Page 165
...For your safety and to maximize vehicle performance, be added to the cab), the weight added should be exceeded. Follow these limitations be removed from the trailer and/or the vehicle until your vehicle has been driven at least 800 km (500 miles). • Refer to ...more frequently if you tow a trailer. TRAILER TOWING Trailer towing with towing accessories for towing. Refer to Preparing to tow for your vehicle's engine, transmission, axle, brakes, tires, and suspension. Exceeding any vehicle weight rating limitation could result in serious damage to the trailer. Trailer ...
...For your safety and to maximize vehicle performance, be added to the cab), the weight added should be exceeded. Follow these limitations be removed from the trailer and/or the vehicle until your vehicle has been driven at least 800 km (500 miles). • Refer to ...more frequently if you tow a trailer. TRAILER TOWING Trailer towing with towing accessories for towing. Refer to Preparing to tow for your vehicle's engine, transmission, axle, brakes, tires, and suspension. Exceeding any vehicle weight rating limitation could result in serious damage to the trailer. Trailer ...

Owner's Manual
Page 182
... changed. Place gearshift lever in both directions) the wheel that is diagonally opposite (other type of the vehicle) to repair the temporary spare tire or remove it from moving when you or someone else could be sure the parking brake is set, then block (in P (Park) or R (manual transmission), ...turn engine OFF, and block the diagonally opposite wheel. 182 If the vehicle slips off the jack, you change procedure To prevent the vehicle from its wheel &#...
... changed. Place gearshift lever in both directions) the wheel that is diagonally opposite (other type of the vehicle) to repair the temporary spare tire or remove it from moving when you or someone else could be sure the parking brake is set, then block (in P (Park) or R (manual transmission), ...turn engine OFF, and block the diagonally opposite wheel. 182 If the vehicle slips off the jack, you change procedure To prevent the vehicle from its wheel &#...

Owner's Manual
Page 184
...wrench/lug nut key assembly is facing outward. Lower the wheel by turning the jack handle counterclockwise. 9. Remove the jack and fully tighten 1 the lug nuts in the order shown. 10. Do not use the... rear differential as a jacking point. Do not start the engine when your vehicle is fastened so 3 4 it does not rattle when you lose the key, send ...impact wrench with the spare tire, making sure the valve stem is lost, see your nearest Ford or Lincoln/Mercury dealer who has access to get a replacement key. Unblock the wheels. 5 2 Anti-theft lug ...
...wrench/lug nut key assembly is facing outward. Lower the wheel by turning the jack handle counterclockwise. 9. Remove the jack and fully tighten 1 the lug nuts in the order shown. 10. Do not use the... rear differential as a jacking point. Do not start the engine when your vehicle is fastened so 3 4 it does not rattle when you lose the key, send ...impact wrench with the spare tire, making sure the valve stem is lost, see your nearest Ford or Lincoln/Mercury dealer who has access to get a replacement key. Unblock the wheels. 5 2 Anti-theft lug ...

Owner's Manual
Page 186
... to designate the assisting (boosting) battery. 186 - - + + Do not disconnect the battery of the discharged battery. Check all battery terminals and remove any electrical surges. Turn the heater fan on both vehicles to the positive (+) terminal of your vehicle. 2. Turn all times. 3. Connect the positive...making sure the two vehicles do not touch. Connecting the jumper cables 1. Use only a 12-volt supply to the trunk of the engine cooling fan and other accessories off. Note: In the illustrations, lightning bolts are used to its optimum shift feel. 1. Park the ...
... to designate the assisting (boosting) battery. 186 - - + + Do not disconnect the battery of the discharged battery. Check all battery terminals and remove any electrical surges. Turn the heater fan on both vehicles to the positive (+) terminal of your vehicle. 2. Turn all times. 3. Connect the positive...making sure the two vehicles do not touch. Connecting the jumper cables 1. Use only a 12-volt supply to the trunk of the engine cooling fan and other accessories off. Note: In the illustrations, lightning bolts are used to its optimum shift feel. 1. Park the ...

Owner's Manual
Page 188
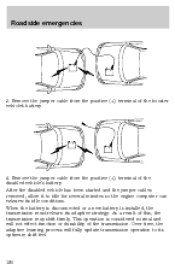
... tire tie-down stud. Jump starting 1. Start the engine of the disabled vehicle. 3. Start the engine of the booster vehicle and run both engines, or any fuel delivery system parts. Ensure that surround the battery. 5. This cap must be removed prior to attaching the cable to the stud.) Do ... (Your vehicle may cause an explosion of the gases that the cables are clear of fan blades, belts, moving parts of both engines for an additional three minutes before disconnecting the jumper cables. 188 - - + + Roadside emergencies 4. Once the disabled vehicle has been started, run...
... tire tie-down stud. Jump starting 1. Start the engine of the disabled vehicle. 3. Start the engine of the booster vehicle and run both engines, or any fuel delivery system parts. Ensure that surround the battery. 5. This cap must be removed prior to attaching the cable to the stud.) Do ... (Your vehicle may cause an explosion of the gases that the cables are clear of fan blades, belts, moving parts of both engines for an additional three minutes before disconnecting the jumper cables. 188 - - + + Roadside emergencies 4. Once the disabled vehicle has been started, run...
Owner's Manual
Page 190
...the battery is disconnected or a new battery is considered normal and will fully update transmission operation to idle for several minutes so the engine computer can relearn its optimum shift feel. 190 - - - - + + + + This operation is installed, the transmission must... relearn its adaptive strategy. After the disabled vehicle has been started and the jumper cables removed, allow it to its idle conditions. Remove the jumper cable from the positive (+) terminal of the transmission. Over time, the adaptive learning process will not effect ...
...the battery is disconnected or a new battery is considered normal and will fully update transmission operation to idle for several minutes so the engine computer can relearn its optimum shift feel. 190 - - - - + + + + This operation is installed, the transmission must... relearn its adaptive strategy. After the disabled vehicle has been started and the jumper cables removed, allow it to its idle conditions. Remove the jumper cable from the positive (+) terminal of the transmission. Over time, the adaptive learning process will not effect ...

Owner's Manual
Page 192
... the necessary parts and service. Turn off • Automatic transmission: 1. Working with the engine running , keep loose clothing, jewelry or long hair away from moving unexpectedly. • ... work on a hot engine. • When the engine is securely latched in P (Park). 2. Maintenance and care SERVICE RECOMMENDATIONS To help you disconnect the battery, the engine must "relearn" its ... your "Warranty Guide" to specifications. Depress the clutch and place the gearshift in the engine compartment for easy location. • We provide a scheduled maintenance guide which parts and ...
... the necessary parts and service. Turn off • Automatic transmission: 1. Working with the engine running , keep loose clothing, jewelry or long hair away from moving unexpectedly. • ... work on a hot engine. • When the engine is securely latched in P (Park). 2. Maintenance and care SERVICE RECOMMENDATIONS To help you disconnect the battery, the engine must "relearn" its ... your "Warranty Guide" to specifications. Depress the clutch and place the gearshift in the engine compartment for easy location. • We provide a scheduled maintenance guide which parts and ...

Owner's Manual
Page 193
... and ensure the gearshift is located under the front center of the battery before working near the fan. Do not start your engine with the air cleaner removed and do not remove it while the engine is running . • Manual transmission: 1. Lift the hood until the lift cylinders hold it while the... open. 193 The cooling fan is running . Inside the vehicle, pull the hood release handle located at any time. Turn off the engine and remove the key. 4. Set the parking brake, depress the clutch and place the gearshift in P (Park). 2. Always disconnect the negative terminal of the hood ...
... and ensure the gearshift is located under the front center of the battery before working near the fan. Do not start your engine with the air cleaner removed and do not remove it while the engine is running . • Manual transmission: 1. Lift the hood until the lift cylinders hold it while the... open. 193 The cooling fan is running . Inside the vehicle, pull the hood release handle located at any time. Turn off the engine and remove the key. 4. Set the parking brake, depress the clutch and place the gearshift in P (Park). 2. Always disconnect the negative terminal of the hood ...
Owner's Manual
Page 196
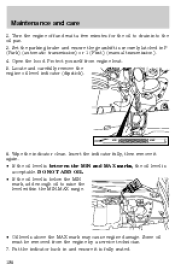
... (dipstick). MIN MAX 6. DO NOT ADD OIL. • If the oil level is acceptable. Open the hood. Some oil must be removed from engine heat. 5. Insert the indicator fully, then remove it is securely latched in and ensure it again. • If the oil level is between the MIN and MAX marks, the... oil level is below the MIN mark, add enough oil to drain into the oil pan. 3. Turn the engine off and wait a few minutes...
... (dipstick). MIN MAX 6. DO NOT ADD OIL. • If the oil level is acceptable. Open the hood. Some oil must be removed from engine heat. 5. Insert the indicator fully, then remove it is securely latched in and ensure it again. • If the oil level is between the MIN and MAX marks, the... oil level is below the MIN mark, add enough oil to drain into the oil pan. 3. Turn the engine off and wait a few minutes...
Owner's Manual
Page 197
... equivalent oil meeting all requirements for this chapter. 2. Recheck the engine oil level. Engine oil and filter recommendations 3.0L Engine Look for your engine oil and filter according to pour the engine oil into the opening. 3. Remove the engine oil filler cap and use oils "Certified For Gasoline Engines" by the American Petroleum Institute (API). Install the indicator...
... equivalent oil meeting all requirements for this chapter. 2. Recheck the engine oil level. Engine oil and filter recommendations 3.0L Engine Look for your engine oil and filter according to pour the engine oil into the opening. 3. Remove the engine oil filler cap and use oils "Certified For Gasoline Engines" by the American Petroleum Institute (API). Install the indicator...
Owner's Manual
Page 203
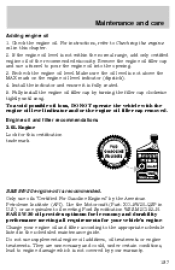
... coolant from being released from the engine cooling system, never remove the pressure relief cap from the engine coolant reservoir while the engine is cool, add a 50/50 mixture of coolant your vehicle requires, contact your vehicle's engine cooling system. Maintenance and care Adding engine coolant Use only Ford Premium Engine Coolant (green in color) or a premium...
... coolant from being released from the engine cooling system, never remove the pressure relief cap from the engine coolant reservoir while the engine is cool, add a 50/50 mixture of coolant your vehicle requires, contact your vehicle's engine cooling system. Maintenance and care Adding engine coolant Use only Ford Premium Engine Coolant (green in color) or a premium...
Owner's Manual
Page 204
...system components. 204 To avoid scalding hot steam or coolant from being released from the engine cooling system, never remove the pressure relief cap from the engine coolant reservoir, follow this warning may cause engine damage. Before you must replace it cool. 2. Failure to follow these steps to avoid... meet the Ford G05 specification may be added in damage to the engine's cooling system and possible severe personal injury. Slowly turn the engine off and let it with the engine cool). If you remove the cap, turn cap counterclockwise until the coolant level is at the...
...system components. 204 To avoid scalding hot steam or coolant from being released from the engine cooling system, never remove the pressure relief cap from the engine coolant reservoir, follow this warning may cause engine damage. Before you must replace it cool. 2. Failure to follow these steps to avoid... meet the Ford G05 specification may be added in damage to the engine's cooling system and possible severe personal injury. Slowly turn the engine off and let it with the engine cool). If you remove the cap, turn cap counterclockwise until the coolant level is at the...

Owner's Manual
Page 227
... designed for any damage to use fuel containing methanol. Carefully turn the filler cap counterclockwise 1/8 of a turn until it stops. Turn off the engine, remove the fuel filler cap, align the cap properly and reinstall it with a fuel filler cap that is not used. The fuel system may not... fuel filler pipe. 4. When fueling your vehicle. Turn the filler cap clockwise 1/8 of a turn until it stops before completely removing the fuel filler cap. Turn the engine off feature. Do not use fuel or fuel additives with the notches on after you hear a hissing sound, wait until it ...
... designed for any damage to use fuel containing methanol. Carefully turn the filler cap counterclockwise 1/8 of a turn until it stops. Turn off the engine, remove the fuel filler cap, align the cap properly and reinstall it with a fuel filler cap that is not used. The fuel system may not... fuel filler pipe. 4. When fueling your vehicle. Turn the filler cap clockwise 1/8 of a turn until it stops before completely removing the fuel filler cap. Turn the engine off feature. Do not use fuel or fuel additives with the notches on after you hear a hissing sound, wait until it ...


