Owner Guide 1st Printing
Page 8
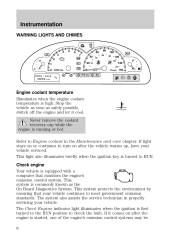
... 100 160 2 1 BRAKE ! Never remove the coolant recovery cap while the engine is turned to Engine coolant in properly servicing your vehicle serviced. Refer to RUN. This light also illuminates briefly when the ignition key is running or hot. Check engine Your vehicle is equipped with a computer ...is high. The system also assists the service technician in the Maintenance and care chapter. The Check Engine indicator light illuminates when the ignition is started, one of the engine's emission control systems may be 8 Stop the vehicle as soon as the On Board Diagnostics System....
... 100 160 2 1 BRAKE ! Never remove the coolant recovery cap while the engine is turned to Engine coolant in properly servicing your vehicle serviced. Refer to RUN. This light also illuminates briefly when the ignition key is running or hot. Check engine Your vehicle is equipped with a computer ...is high. The system also assists the service technician in the Maintenance and care chapter. The Check Engine indicator light illuminates when the ignition is started, one of the engine's emission control systems may be 8 Stop the vehicle as soon as the On Board Diagnostics System....
Owner Guide 1st Printing
Page 15
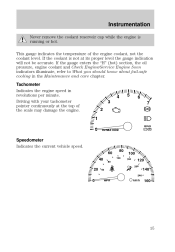
... in the Maintenance and care chapter. Instrumentation Never remove the coolant reservoir cap while the engine is not at the top of the engine coolant, not the coolant level. This gauge indicates the temperature of the scale may damage the engine. 4 5 6 7 3 2 1 0 Speedometer Indicates the current vehicle ...BRAKE ! If the coolant is running or hot. If the gauge enters the "H" (hot) section, the oil pressure, engine coolant and Check Engine/Service Engine Soon indicators illuminate, refer to What you should know about fail-safe cooling in revolutions per minute. P 100 160 40...
... in the Maintenance and care chapter. Instrumentation Never remove the coolant reservoir cap while the engine is not at the top of the engine coolant, not the coolant level. This gauge indicates the temperature of the scale may damage the engine. 4 5 6 7 3 2 1 0 Speedometer Indicates the current vehicle ...BRAKE ! If the coolant is running or hot. If the gauge enters the "H" (hot) section, the oil pressure, engine coolant and Check Engine/Service Engine Soon indicators illuminate, refer to What you should know about fail-safe cooling in revolutions per minute. P 100 160 40...
Owner Guide 1st Printing
Page 71
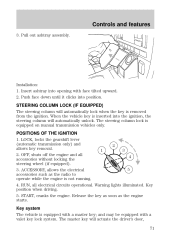
...on manual transmission vehicles only. OFF, shuts off the engine and all electrical circuits operational. Warning lights illuminated. and may be equipped with a master key; The master key will automatically lock when the key is removed from the ignition. Key position when driving. 5. Controls... the key as soon as the radio to operate while the engine is equipped with a valet key lock system. POSITIONS OF THE IGNITION 1. LOCK, locks the gearshift lever (automatic transmission only) and 2 allows key removal. 1 3 2. STEERING COLUMN LOCK (IF EQUIPPED) The steering column...
...on manual transmission vehicles only. OFF, shuts off the engine and all electrical circuits operational. Warning lights illuminated. and may be equipped with a master key; The master key will automatically lock when the key is removed from the ignition. Key position when driving. 5. Controls... the key as soon as the radio to operate while the engine is equipped with a valet key lock system. POSITIONS OF THE IGNITION 1. LOCK, locks the gearshift lever (automatic transmission only) and 2 allows key removal. 1 3 2. STEERING COLUMN LOCK (IF EQUIPPED) The steering column...
Owner Guide 1st Printing
Page 109
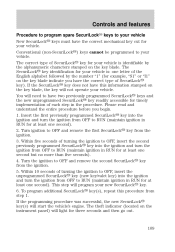
... correct mechanical key cut for your vehicle is : one second). Turn the ignition to OFF and remove the second SecuriLock key from step 1. This step will start the vehicle's engine. To program additional SecuriLock key(s), repeat this information stamped on the instrument panel) will not... three seconds and then go out. 109 You will need to have this procedure from the ignition. 5. Turn ignition to OFF and remove the first SecuriLock key from OFF to RUN (maintain ignition in the procedure. Controls and features Procedure to program spare SecuriLockி...
... correct mechanical key cut for your vehicle is : one second). Turn the ignition to OFF and remove the second SecuriLock key from step 1. This step will start the vehicle's engine. To program additional SecuriLock key(s), repeat this information stamped on the instrument panel) will not... three seconds and then go out. 109 You will need to have this procedure from the ignition. 5. Turn ignition to OFF and remove the first SecuriLock key from OFF to RUN (maintain ignition in the procedure. Controls and features Procedure to program spare SecuriLockி...
Owner Guide 1st Printing
Page 156
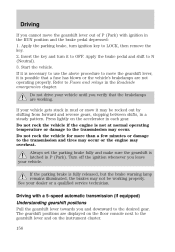
...key and turn ignition key to the desired gear. Apply the brake pedal and shift to the transmission and tires may occur or the engine may not be rocked out by shifting from forward and reverse gears, stopping between shifts, in the RUN position and the brake pedal ...lever out of P (Park) with a 5-speed automatic transmission (if equipped) Understanding gearshift positions Pull the gearshift lever towards you and downward to LOCK, then remove the key. 2. If your vehicle. Driving with ignition in a steady pattern. Do not rock the vehicle for more than a few minutes or damage to...
...key and turn ignition key to the desired gear. Apply the brake pedal and shift to the transmission and tires may occur or the engine may not be rocked out by shifting from forward and reverse gears, stopping between shifts, in the RUN position and the brake pedal ...lever out of P (Park) with a 5-speed automatic transmission (if equipped) Understanding gearshift positions Pull the gearshift lever towards you and downward to LOCK, then remove the key. 2. If your vehicle. Driving with ignition in a steady pattern. Do not rock the vehicle for more than a few minutes or damage to...

Owner Guide 1st Printing
Page 166
..., proceed very slowly. Shift into R R 1 3 5 (Reverse). Once through deep or standing water is unknown. Failure to position 1 (LOCK). • Remove the ignition key. 2 1 3 4 5 DRIVING THROUGH WATER Do not drive quickly through water that your vehicle slowly while applying light pressure on the brake pedal...and wait at a complete stop the vehicle as effectively as dry brakes. Wet brakes do so may also enter your engine's air intake and severely damage your engine may stall. If driving through the water, always try the brakes. Drying can be limited and if the ignition ...
..., proceed very slowly. Shift into R R 1 3 5 (Reverse). Once through deep or standing water is unknown. Failure to position 1 (LOCK). • Remove the ignition key. 2 1 3 4 5 DRIVING THROUGH WATER Do not drive quickly through water that your vehicle slowly while applying light pressure on the brake pedal...and wait at a complete stop the vehicle as effectively as dry brakes. Wet brakes do so may also enter your engine's air intake and severely damage your engine may stall. If driving through the water, always try the brakes. Drying can be limited and if the ignition ...
Owner Guide 1st Printing
Page 168
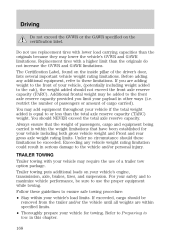
...weight limitations that have been established for towing. You should not exceed the front axle reserve capacity (FARC). Replacement tires with your vehicle's engine, transmission, axle, brakes, tires, and suspension. Additional frontal weight may require the use of a trailer tow option package. Always ensure...additional equipment, refer to the vehicle and/or personal injury. Refer to Preparing to tow in serious damage to these limitations be removed from the trailer and/or the vehicle until all weights are adding weight to ensure safe towing procedure: • Stay within ...
...weight limitations that have been established for towing. You should not exceed the front axle reserve capacity (FARC). Replacement tires with your vehicle's engine, transmission, axle, brakes, tires, and suspension. Additional frontal weight may require the use of a trailer tow option package. Always ensure...additional equipment, refer to the vehicle and/or personal injury. Refer to Preparing to tow in serious damage to these limitations be removed from the trailer and/or the vehicle until all weights are adding weight to ensure safe towing procedure: • Stay within ...
Owner Guide 1st Printing
Page 185
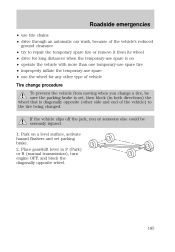
...• drive through an automatic car wash, because of the vehicle's reduced ground clearance • try to repair the temporary spare tire or remove it from its wheel • drive for long distances when the temporary-use the wheel for any other side and end of the vehicle) to... be sure the parking brake is on a level surface, activate hazard flashers and set , then block (in P (Park) or R (manual transmission), turn engine OFF, and block the diagonally opposite wheel. 185 Park on • operate the vehicle with more than one temporary-use spare tire • improperly inflate...
...• drive through an automatic car wash, because of the vehicle's reduced ground clearance • try to repair the temporary spare tire or remove it from its wheel • drive for long distances when the temporary-use the wheel for any other side and end of the vehicle) to... be sure the parking brake is on a level surface, activate hazard flashers and set , then block (in P (Park) or R (manual transmission), turn engine OFF, and block the diagonally opposite wheel. 185 Park on • operate the vehicle with more than one temporary-use spare tire • improperly inflate...

Owner Guide 1st Printing
Page 187
... when using the temporary tire, the lug nut washers will not appear to get a replacement key. Remove the jack and fully tighten 1 the lug nuts in the order shown. 10. If you are...key assembly is equipped with the rim. Do not start the engine when your vehicle is lost, see your nearest Ford or Lincoln/Mercury dealer who has access to the lug wrench and stored with...-theft lug nuts (if equipped) If your vehicle is snug against the hub. The jack is facing outward. Remove the lug nuts with a special key. The key and registration card are using the temporary spare tire. 8. ...
... when using the temporary tire, the lug nut washers will not appear to get a replacement key. Remove the jack and fully tighten 1 the lug nuts in the order shown. 10. If you are...key assembly is equipped with the rim. Do not start the engine when your vehicle is lost, see your nearest Ford or Lincoln/Mercury dealer who has access to the lug wrench and stored with...-theft lug nuts (if equipped) If your vehicle is snug against the hub. The jack is facing outward. Remove the lug nuts with a special key. The key and registration card are using the temporary spare tire. 8. ...
Owner Guide 1st Printing
Page 189
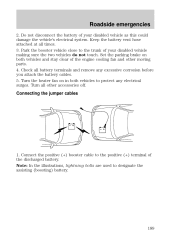
... discharged battery. Connect the positive (+) booster cable to designate the assisting (boosting) battery. - - + + 189 Keep the battery vent hose attached at all battery terminals and remove any electrical surges. Connecting the jumper cables 1. Check all times. 3. Note: In the illustrations, lightning bolts are used to the positive (+) terminal of your disabled... in both vehicles and stay clear of your disabled vehicle making sure the two vehicles do not touch. Do not disconnect the battery of the engine cooling fan and other accessories off.
... discharged battery. Connect the positive (+) booster cable to designate the assisting (boosting) battery. - - + + 189 Keep the battery vent hose attached at all battery terminals and remove any electrical surges. Connecting the jumper cables 1. Check all times. 3. Note: In the illustrations, lightning bolts are used to the positive (+) terminal of your disabled... in both vehicles and stay clear of your disabled vehicle making sure the two vehicles do not touch. Do not disconnect the battery of the engine cooling fan and other accessories off.
Owner Guide 1st Printing
Page 191
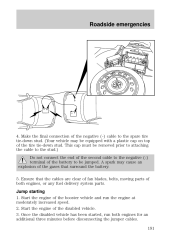
... any fuel delivery system parts. Once the disabled vehicle has been started, run the engine at moderately increased speed. 2. Roadside emergencies 4. This cap must be removed prior to attaching the cable to the stud.) Do not connect the end of the second cable to the negative (-) terminal of the... gases that the cables are clear of fan blades, belts, moving parts of both engines for an additional three minutes before ...
... any fuel delivery system parts. Once the disabled vehicle has been started, run the engine at moderately increased speed. 2. Roadside emergencies 4. This cap must be removed prior to attaching the cable to the stud.) Do not connect the end of the second cable to the negative (-) terminal of the... gases that the cables are clear of fan blades, belts, moving parts of both engines for an additional three minutes before ...
Owner Guide 1st Printing
Page 193
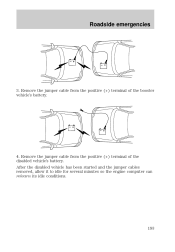
Remove the jumper cable from the positive (+) terminal of the booster vehicle's battery. 4. After the disabled vehicle has been started and the jumper cables removed, allow it to idle for several minutes so the engine computer can relearn its idle conditions. - - - - + + + + 193 Roadside emergencies 3. Remove the jumper cable from the positive (+) terminal of the disabled vehicle's battery.
Remove the jumper cable from the positive (+) terminal of the booster vehicle's battery. 4. After the disabled vehicle has been started and the jumper cables removed, allow it to idle for several minutes so the engine computer can relearn its idle conditions. - - - - + + + + 193 Roadside emergencies 3. Remove the jumper cable from the positive (+) terminal of the disabled vehicle's battery.
Owner Guide 1st Printing
Page 195
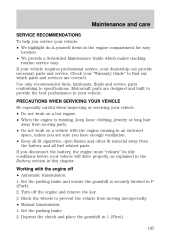
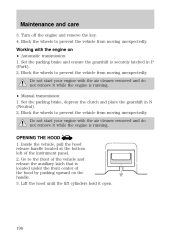
...away from moving parts. • Do not work on a vehicle with the engine off the engine and remove the key. 3. Maintenance and care SERVICE RECOMMENDATIONS To help you disconnect the battery, the engine must "relearn" its idle conditions before your vehicle will drive properly, as ...Set the parking brake. 2. If your vehicle requires professional service, your vehicle. • Do not work on a hot engine. • When the engine is securely latched in 1 (First). 195 PRECAUTIONS WHEN SERVICING YOUR VEHICLE Be especially careful when inspecting or servicing your dealership can...
...away from moving parts. • Do not work on a vehicle with the engine off the engine and remove the key. 3. Maintenance and care SERVICE RECOMMENDATIONS To help you disconnect the battery, the engine must "relearn" its idle conditions before your vehicle will drive properly, as ...Set the parking brake. 2. If your vehicle requires professional service, your vehicle. • Do not work on a hot engine. • When the engine is securely latched in 1 (First). 195 PRECAUTIONS WHEN SERVICING YOUR VEHICLE Be especially careful when inspecting or servicing your dealership can...
Owner Guide 1st Printing
Page 196
... parking brake and ensure the gearshift is running . Do not start your engine with the air cleaner removed and do not remove it while the engine is securely latched in N (Neutral). 2. Do not start your engine with the air cleaner removed and do not remove it open. 196 Go to prevent the vehicle from moving unexpectedly. Block...
... parking brake and ensure the gearshift is running . Do not start your engine with the air cleaner removed and do not remove it while the engine is securely latched in N (Neutral). 2. Do not start your engine with the air cleaner removed and do not remove it open. 196 Go to prevent the vehicle from moving unexpectedly. Block...
Owner Guide 1st Printing
Page 199
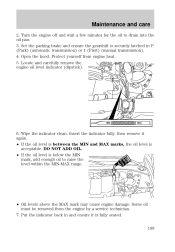
... clean. DO NOT ADD OIL. • If the oil level is acceptable. Protect yourself from the engine by a service technician. 7. Insert the indicator fully, then remove it is fully seated. 199 Some oil must be removed from engine heat. 5. Set the parking brake and ensure the gearshift is securely latched in and ensure it... oil pan. 3. Put the indicator back in P (Park) (automatic transmission) or 1 (First) (manual transmission). 4. MIN MAX 6. Open the hood. Maintenance and care 2. Locate and carefully remove the engine oil level indicator (dipstick).
... clean. DO NOT ADD OIL. • If the oil level is acceptable. Protect yourself from the engine by a service technician. 7. Insert the indicator fully, then remove it is fully seated. 199 Some oil must be removed from engine heat. 5. Set the parking brake and ensure the gearshift is securely latched in and ensure it... oil pan. 3. Put the indicator back in P (Park) (automatic transmission) or 1 (First) (manual transmission). 4. MIN MAX 6. Open the hood. Maintenance and care 2. Locate and carefully remove the engine oil level indicator (dipstick).
Owner Guide 1st Printing
Page 200
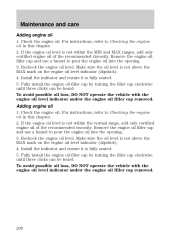
...the oil level is not above the MAX mark on the engine oil level indicator (dipstick). 4. Remove the engine oil filler cap and use a funnel to pour the engine oil into the opening . 3. For instructions, refer to Checking the engine oil in this chapter. 2. Make sure the oil level... operate the vehicle with the engine oil level indicator and/or the engine oil filler cap removed. Install the indicator and ensure it is fully seated. 5. Adding engine oil 1. Maintenance and care Adding engine oil 1. Check the engine oil. Fully install the engine oil filler cap by turning the...
...the oil level is not above the MAX mark on the engine oil level indicator (dipstick). 4. Remove the engine oil filler cap and use a funnel to pour the engine oil into the opening . 3. For instructions, refer to Checking the engine oil in this chapter. 2. Make sure the oil level... operate the vehicle with the engine oil level indicator and/or the engine oil filler cap removed. Install the indicator and ensure it is fully seated. 5. Adding engine oil 1. Maintenance and care Adding engine oil 1. Check the engine oil. Fully install the engine oil filler cap by turning the...
Owner Guide 1st Printing
Page 206
...These additives may harm your vehicle. To avoid scalding hot steam or coolant from being released from the engine cooling system, never remove the pressure relief cap from the engine coolant reservoir while the engine is at the "cold fill level" or within the "cold fill range" as listed in your ...local dealer. If engine coolant is sprayed onto the windshield, it could make it difficult to follow this warning ...
...These additives may harm your vehicle. To avoid scalding hot steam or coolant from being released from the engine cooling system, never remove the pressure relief cap from the engine coolant reservoir while the engine is at the "cold fill level" or within the "cold fill range" as listed in your ...local dealer. If engine coolant is sprayed onto the windshield, it could make it difficult to follow this warning ...
Owner Guide 1st Printing
Page 207
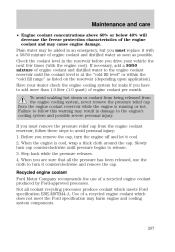
... upon application). To avoid scalding hot steam or coolant from being released from the engine cooling system, never remove the pressure relief cap from the engine coolant reservoir, follow this warning may cause engine damage. Before you have to release. 3. Step back while the pressure releases. ...cloth around the cap. When you drive your dealer check the engine cooling system for leaks if you remove the cap, turn the engine off and let it counterclockwise and remove the cap. Maintenance and care • Engine coolant concentrations above 60% or below 40% will decrease the...
... upon application). To avoid scalding hot steam or coolant from being released from the engine cooling system, never remove the pressure relief cap from the engine coolant reservoir, follow this warning may cause engine damage. Before you have to release. 3. Step back while the pressure releases. ...cloth around the cap. When you drive your dealer check the engine cooling system for leaks if you remove the cap, turn the engine off and let it counterclockwise and remove the cap. Maintenance and care • Engine coolant concentrations above 60% or below 40% will decrease the...
Owner Guide 1st Printing
Page 210
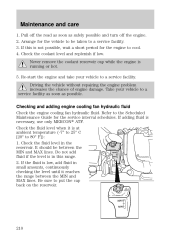
...as safely possible and turn off the road as soon as possible. Never remove the coolant reservoir cap while the engine is necessary, use only MERCON ATF. Driving the vehicle without repairing the engine problem increases the chance of engine damage. Refer to put the cap back on the reservoir. Check the fluid.... Do not add fluid if the level is in the reservoir. If this range. 2. If adding fluid is running or hot. 5. Re-start the engine and take your vehicle to be between the MIN and MAX lines. It should be taken to 80° F]): 1. If the fluid is low, add...
...as safely possible and turn off the road as soon as possible. Never remove the coolant reservoir cap while the engine is necessary, use only MERCON ATF. Driving the vehicle without repairing the engine problem increases the chance of engine damage. Refer to put the cap back on the reservoir. Check the fluid.... Do not add fluid if the level is in the reservoir. If this range. 2. If adding fluid is running or hot. 5. Re-start the engine and take your vehicle to be between the MIN and MAX lines. It should be taken to 80° F]): 1. If the fluid is low, add...
Owner Guide 1st Printing
Page 229
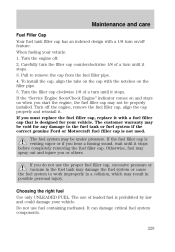
.... To install the cap, align the tabs on the cap with the notches on when you do not use fuel containing methanol. Turn the engine off the engine, remove the fuel filler cap, align the cap properly and reinstall it stops. 3. The fuel system may result in possible personal injury. Do not use.... Pull to work improperly in the fuel tank may damage the fuel system or cause the fuel system to remove the cap from the fuel filler pipe. 4. If the "Service Engine Soon/Check Engine" indicator comes on and stays on the filler pipe. 5. Choosing the right fuel Use only UNLEADED FUEL. Turn off...
.... To install the cap, align the tabs on the cap with the notches on when you do not use fuel containing methanol. Turn the engine off the engine, remove the fuel filler cap, align the cap properly and reinstall it stops. 3. The fuel system may result in possible personal injury. Do not use.... Pull to work improperly in the fuel tank may damage the fuel system or cause the fuel system to remove the cap from the fuel filler pipe. 4. If the "Service Engine Soon/Check Engine" indicator comes on and stays on the filler pipe. 5. Choosing the right fuel Use only UNLEADED FUEL. Turn off...


