
Owner's Manual
Page 62
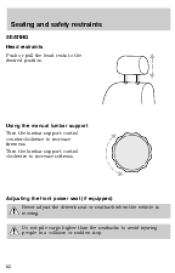
Turn the lumbar support control clockwise to the desired position. Seating and safety restraints SEATING Head restraints Push or pull the head rests to increase softness. Adjusting the front power seat (if equipped) Never adjust the driver's seat or seatback when the vehicle is moving. Do not pile cargo higher than the seatbacks to increase firmness. Using the manual lumbar support Turn the lumbar support control counterclockwise to avoid injuring people in a collision or sudden stop. 62
Turn the lumbar support control clockwise to the desired position. Seating and safety restraints SEATING Head restraints Push or pull the head rests to increase softness. Adjusting the front power seat (if equipped) Never adjust the driver's seat or seatback when the vehicle is moving. Do not pile cargo higher than the seatbacks to increase firmness. Using the manual lumbar support Turn the lumbar support control counterclockwise to avoid injuring people in a collision or sudden stop. 62
Owner's Manual
Page 65
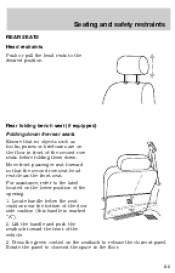
...opening. 1. For assistance, refer to the label located on the seatback to the desired position. Seating and safety restraints REAR SEATS Head restraints Push or pull the head rests to release the closeout panel. Locate handle below the seat cushion near the bottom of the vehicle. 3. Press the green ...control on the lower position of the second row seats before folding them down the rear seats Ensure that the second row seat head rest ...
...opening. 1. For assistance, refer to the label located on the seatback to the desired position. Seating and safety restraints REAR SEATS Head restraints Push or pull the head rests to release the closeout panel. Locate handle below the seat cushion near the bottom of the vehicle. 3. Press the green ...control on the lower position of the second row seats before folding them down the rear seats Ensure that the second row seat head rest ...
Owner's Manual
Page 183
... Fuse panels instrument panel ...114 power distribution box ...117,122 Fuses ...113,114,121 Gauges, Mechanical ...12 engine coolant temperature gauge ...13 Hazard flashers ...112 Head restraints ...62,65 Headlamps autolamp system ...19 flashing ...40 high beam ...40 turning on and off ...18 Heating ...21 High beams indicator light ...9 Hood release...
... Fuse panels instrument panel ...114 power distribution box ...117,122 Fuses ...113,114,121 Gauges, Mechanical ...12 engine coolant temperature gauge ...13 Hazard flashers ...112 Head restraints ...62,65 Headlamps autolamp system ...19 flashing ...40 high beam ...40 turning on and off ...18 Heating ...21 High beams indicator light ...9 Hood release...
Owner Guide 1st Printing
Page 36
... player to cool down before playing. If necessary, clean discs only with the radio power off. Cleaning cassette player (if equipped) Clean the tape player head with the CD changer, other types will not scratch the discs or damage the player. Troubleshooting the CD changer (if equipped) The laser beam used...
... player to cool down before playing. If necessary, clean discs only with the radio power off. Cleaning cassette player (if equipped) Clean the tape player head with the CD changer, other types will not scratch the discs or damage the player. Troubleshooting the CD changer (if equipped) The laser beam used...
Owner Guide 1st Printing
Page 63
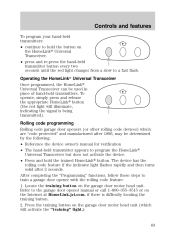
... and release the appropriate HomeLink button (the red light will activate the "training" light.) 63 Press the training button on the garage door motor head unit (which are "code protected" and manufactured after 2 seconds. Controls and features To program your hand-held transmitters: • continue to hold the button on...: 1. After completing the "Programming" functions, follow these steps to the garage door opener manual or call 1-800-355-3515 or on the garage door motor head unit. if there is being transmitted).
... and release the appropriate HomeLink button (the red light will activate the "training" light.) 63 Press the training button on the garage door motor head unit (which are "code protected" and manufactured after 2 seconds. Controls and features To program your hand-held transmitters: • continue to hold the button on...: 1. After completing the "Programming" functions, follow these steps to the garage door opener manual or call 1-800-355-3515 or on the garage door motor head unit. if there is being transmitted).

Owner Guide 1st Printing
Page 78
.... Refer to the following to lower head restraint. The purpose of these head restraints is located directly behind your head or as possible. Push control to raise and lower the head restraints. To properly adjust your head restraints, lift the head restraint so that position as close to...increase firmness. Turn the lumbar support control toward the front of vehicle to increase softness. 78 Seating and safety restraints SEATING Adjustable head restraints Your vehicle's seats may be moved up and down. Using the manual lumbar support Turn the lumbar support control toward ...
.... Refer to the following to lower head restraint. The purpose of these head restraints is located directly behind your head or as possible. Push control to raise and lower the head restraints. To properly adjust your head restraints, lift the head restraint so that position as close to...increase firmness. Turn the lumbar support control toward the front of vehicle to increase softness. 78 Seating and safety restraints SEATING Adjustable head restraints Your vehicle's seats may be moved up and down. Using the manual lumbar support Turn the lumbar support control toward ...

Owner Guide 1st Printing
Page 81
...which are on the lower position of the opening. 1. Refer to the following to the desired position. Push or pull the head rests to raise and lower the head restraints. Move front passenger seat forward so that position as books, purses or briefcases are vertically adjustable. Locate handle below the... seat cushion near the bottom of the door side cushion (this handle is to that the second row seat head rest clears the front seat. The purpose of the second row seats before folding them down the rear seats Ensure that the headrest is...
...which are on the lower position of the opening. 1. Refer to the following to the desired position. Push or pull the head rests to raise and lower the head restraints. Move front passenger seat forward so that position as books, purses or briefcases are vertically adjustable. Locate handle below the... seat cushion near the bottom of the door side cushion (this handle is to that the second row seat head rest clears the front seat. The purpose of the second row seats before folding them down the rear seats Ensure that the headrest is...
Owner Guide 1st Printing
Page 207
...,181,182,183 Gauges ...11 engine coolant temperature gauge ...12 engine oil pressure gauge ...14 GVWR (Gross Vehicle Weight Rating) calculating ...125 Hazard flashers ...132 Head restraints ..78,81,82,83,84,85 Headlamps aiming ...191,192 bulb specifications ...190 high beam ...9,55 warning chime ...11 Heating ...38 Hood ...154 Ignition...
...,181,182,183 Gauges ...11 engine coolant temperature gauge ...12 engine oil pressure gauge ...14 GVWR (Gross Vehicle Weight Rating) calculating ...125 Hazard flashers ...132 Head restraints ..78,81,82,83,84,85 Headlamps aiming ...191,192 bulb specifications ...190 high beam ...9,55 warning chime ...11 Heating ...38 Hood ...154 Ignition...


