

Owner's Manual
Page 1
Contents Before driving Introduction Instrumentation Controls and features Seating and safety restraints Starting and driving Starting Driving Roadside emergencies Servicing Maintenance and care Capacities and specifications Reporting safety defects Index 133 174 181 182 ...
Contents Before driving Introduction Instrumentation Controls and features Seating and safety restraints Starting and driving Starting Driving Roadside emergencies Servicing Maintenance and care Capacities and specifications Reporting safety defects Index 133 174 181 182 ...

Owner's Manual
Page 8
... releasing the parking brake indicates low brake fluid level. Anti-lock brake system (ABS) Momentarily illuminates when the ignition is turned on . Refer to the Seating and safety restraints chapter. BRAKE ! For more information, refer to Exterior bulbs in the Maintenance and care chapter. Brake system warning Momentarily illuminates when the...
... releasing the parking brake indicates low brake fluid level. Anti-lock brake system (ABS) Momentarily illuminates when the ignition is turned on . Refer to the Seating and safety restraints chapter. BRAKE ! For more information, refer to Exterior bulbs in the Maintenance and care chapter. Brake system warning Momentarily illuminates when the...

Owner's Manual
Page 11
... when the ignition key is turned to Fuel pump shut-off switch has been triggered. For information on the SRS warning chime, refer to the Seating and safety restraints chapter. Supplemental restraint system (SRS) warning chime For information on the safety belt warning chime, refer to the...
... when the ignition key is turned to Fuel pump shut-off switch has been triggered. For information on the SRS warning chime, refer to the Seating and safety restraints chapter. Supplemental restraint system (SRS) warning chime For information on the safety belt warning chime, refer to the...

Owner's Manual
Page 26
... , then the outside temperature will return to the window along with the override selection. Higher readings may not agree with the airflow to the back seats. 26 After a few minutes, select any desired position. • To prevent humidity buildup inside the vehicle, don't drive with the climate control...that will interfere with temperatures given on the radio due to differences in the OFF position. • Don't put objects under the front seat that you get may be obtained when the vehicle is changed , then the outside temperature reading is most accurate when the vehicle is pressed ...
... , then the outside temperature will return to the window along with the override selection. Higher readings may not agree with the airflow to the back seats. 26 After a few minutes, select any desired position. • To prevent humidity buildup inside the vehicle, don't drive with the climate control...that will interfere with temperatures given on the radio due to differences in the OFF position. • Don't put objects under the front seat that you get may be obtained when the vehicle is changed , then the outside temperature reading is most accurate when the vehicle is pressed ...

Owner's Manual
Page 29
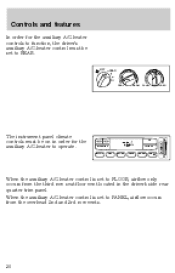
Besides the driver's overhead control panel for air to quickly heat or cool the vehicle. Controls and features Select for the front seat occupants, the second row auxiliary A/C-heater controls allow the rear passengers to control the temperature in the rear of the vehicle through these vents: - VOLUME + BAND SEEK MEMORY Auxiliary A/C-heater controls (if equipped) The auxiliary A/C-heater feature provides increased capacity to flow through a second control panel above the second row. 29
Besides the driver's overhead control panel for air to quickly heat or cool the vehicle. Controls and features Select for the front seat occupants, the second row auxiliary A/C-heater controls allow the rear passengers to control the temperature in the rear of the vehicle through these vents: - VOLUME + BAND SEEK MEMORY Auxiliary A/C-heater controls (if equipped) The auxiliary A/C-heater feature provides increased capacity to flow through a second control panel above the second row. 29
Owner's Manual
Page 30
... A/C VENT PNL • FLR FLOOR FLR • DEF DEF LO When the auxiliary A/C-heater control is set to PANEL, airflow occurs from the third row seat floor vent located in order for the auxiliary A/C-heater controls to function, the driver's auxiliary A/C-heater control must be set to FLOOR, airflow only occurs...
... A/C VENT PNL • FLR FLOOR FLR • DEF DEF LO When the auxiliary A/C-heater control is set to PANEL, airflow occurs from the third row seat floor vent located in order for the auxiliary A/C-heater controls to function, the driver's auxiliary A/C-heater control must be set to FLOOR, airflow only occurs...
Owner's Manual
Page 57
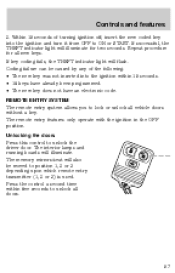
... caused by any of turning ignition off, insert the new coded key into the ignition within five seconds to ON or START. The memory mirrors/seat will illuminate for all new keys. Repeat procedure for two seconds. If key coding fails, the THEFT indicator light will illuminate. The remote entry features...
... caused by any of turning ignition off, insert the new coded key into the ignition within five seconds to ON or START. The memory mirrors/seat will illuminate for all new keys. Repeat procedure for two seconds. If key coding fails, the THEFT indicator light will illuminate. The remote entry features...
Owner's Manual
Page 60
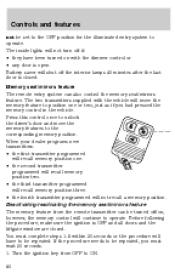
... procedure will move the memory features to operate. however, the memory control will not recall a memory position. Deactivating/reactivating the memory seat/mirrors feature The memory feature from OFF to be repeated. Battery saver will not turn off the interior lamps 40 minutes after the ... repeated, you had pressed the memory control in the vehicle. Turn the ignition key from the remote transmitter can also control the memory seat/mirrors feature. The inside lights will shut off if: • they have to operate. The two transmitters supplied with the dimmer control...
... procedure will move the memory features to operate. however, the memory control will not recall a memory position. Deactivating/reactivating the memory seat/mirrors feature The memory feature from OFF to be repeated. Battery saver will not turn off the interior lamps 40 minutes after the ... repeated, you had pressed the memory control in the vehicle. Turn the ignition key from the remote transmitter can also control the memory seat/mirrors feature. The inside lights will shut off if: • they have to operate. The two transmitters supplied with the dimmer control...
Owner's Manual
Page 62
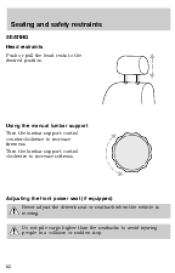
Adjusting the front power seat (if equipped) Never adjust the driver's seat or seatback when the vehicle is moving. Do not pile cargo higher than the seatbacks to the desired position. Seating and safety restraints SEATING Head restraints Push or pull the head rests to avoid injuring people in a collision or sudden stop. 62 Using the manual lumbar support Turn the lumbar support control counterclockwise to increase softness. Turn the lumbar support control clockwise to increase firmness.
Adjusting the front power seat (if equipped) Never adjust the driver's seat or seatback when the vehicle is moving. Do not pile cargo higher than the seatbacks to the desired position. Seating and safety restraints SEATING Head restraints Push or pull the head rests to avoid injuring people in a collision or sudden stop. 62 Using the manual lumbar support Turn the lumbar support control counterclockwise to increase softness. Turn the lumbar support control clockwise to increase firmness.

Owner's Manual
Page 63
Press the control to raise or lower the front portion of the seat cushion. Press to raise or lower the rear portion of the seat cushion. Press to move the seat forward, backward, up or down. 63 Seating and safety restraints Always drive and ride with your seatback upright and the lap belt snug and low across the hips.
Press the control to raise or lower the front portion of the seat cushion. Press to raise or lower the rear portion of the seat cushion. Press to move the seat forward, backward, up or down. 63 Seating and safety restraints Always drive and ride with your seatback upright and the lap belt snug and low across the hips.

Owner's Manual
Page 64
... may be set or recalled when the transmission gearshift is in the Controls and features chapter. 64 To program the memory seat to remote entry transmitter, refer to Remote entry system in Park or Neutral. While the light is located on the driver door.... entry transmitter UNLOCK control. The SET control indicator light will briefly illuminate. Press the SET control. Seating and safety restraints Memory seats (if equipped) This system allows automatic positioning of the driver seat and outside rearview mirrors to the desired position using control 2. • To program position three, ...
... may be set or recalled when the transmission gearshift is in the Controls and features chapter. 64 To program the memory seat to remote entry transmitter, refer to Remote entry system in Park or Neutral. While the light is located on the driver door.... entry transmitter UNLOCK control. The SET control indicator light will briefly illuminate. Press the SET control. Seating and safety restraints Memory seats (if equipped) This system allows automatic positioning of the driver seat and outside rearview mirrors to the desired position using control 2. • To program position three, ...
Owner's Manual
Page 65
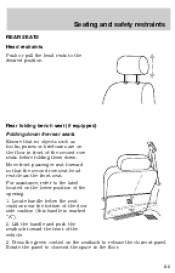
... the floor in the floor. 65 Press the green control on the lower position of the door side cushion (this handle is marked "A"). 2. Seating and safety restraints REAR SEATS Head restraints Push or pull the head rests to release the closeout panel. Rotate the panel to the label located on the seatback... to the desired position. For assistance, refer to closeout the space in front of the vehicle. 3. Locate handle below the seat cushion near the bottom of the opening. 1. Lift the handle and push the seatback toward the front of the second row...
... the floor in the floor. 65 Press the green control on the lower position of the door side cushion (this handle is marked "A"). 2. Seating and safety restraints REAR SEATS Head restraints Push or pull the head rests to release the closeout panel. Rotate the panel to the label located on the seatback... to the desired position. For assistance, refer to closeout the space in front of the vehicle. 3. Locate handle below the seat cushion near the bottom of the opening. 1. Lift the handle and push the seatback toward the front of the second row...

Owner's Manual
Page 66
... and press the black control (adjacent to the green control) to lift the seat into the upright position. Pull on the seatback while lifting the handle to lock. 2. If not latched, the seat may be readjusted. Reclining the seatback Locate the lever at the bottom of the... seatback marked "1". Seating and safety restraints 4. Returning the seat to upright Always latch the vehicle seat to recline the seatback. 66 Locate and lift the handle marked...
... and press the black control (adjacent to the green control) to lift the seat into the upright position. Pull on the seatback while lifting the handle to lock. 2. If not latched, the seat may be readjusted. Reclining the seatback Locate the lever at the bottom of the... seatback marked "1". Seating and safety restraints 4. Returning the seat to upright Always latch the vehicle seat to recline the seatback. 66 Locate and lift the handle marked...
Owner's Manual
Page 67
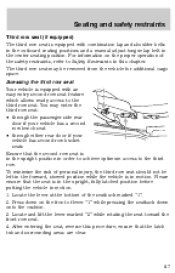
... to the third row. You may be left in the forward, stowed position while the vehicle is in motion. 1. ensure that the second row seat is in the upright, fully latched position before putting the vehicle in motion. Press down onto the cushion. 3. Locate and lift the lever marked ..."2" while rotating the seat toward the front row seat. 4. The third row seat may enter the third row seat: • through the passenger side rear door if your vehicle has a second row bench seat • through either rear door if your vehicle has second row ...
... to the third row. You may be left in the forward, stowed position while the vehicle is in motion. 1. ensure that the second row seat is in the upright, fully latched position before putting the vehicle in motion. Press down onto the cushion. 3. Locate and lift the lever marked ..."2" while rotating the seat toward the front row seat. 4. The third row seat may enter the third row seat: • through the passenger side rear door if your vehicle has a second row bench seat • through either rear door if your vehicle has second row ...

Owner's Manual
Page 68
Then, press the release button to separate the detachable anchor from the floor by inserting a key or small screwdriver through the hole in the boot of the vehicle, with the liftgate open: 1. Seating and safety restraints Removing the third row seat From the rear of the detachable anchor. Before removing the seat, be sure that the detachable anchor tongue is stowed flat into the vehicle floor. 68 Disengage the lap/shoulder belt from the anchor tongue. 2.
Then, press the release button to separate the detachable anchor from the floor by inserting a key or small screwdriver through the hole in the boot of the vehicle, with the liftgate open: 1. Seating and safety restraints Removing the third row seat From the rear of the detachable anchor. Before removing the seat, be sure that the detachable anchor tongue is stowed flat into the vehicle floor. 68 Disengage the lap/shoulder belt from the anchor tongue. 2.

Owner's Manual
Page 69
...bar located at the center of the seatback while pushing the seatback down into the seat cushion. • The seatback will latch onto the cushion. 4. While pulling up and out of the vehicle. If not latched, the seat may cause injury during a sudden stop. 69 Use the black plastic clip (...to stow the loose seat belt. • Pull the seat release lever located on the release bar, lift the seat up on the lower right side of the seat near the floor to the floor, whether the seat is occupied or empty. Installing the third row seat Always latch the vehicle seat to release the floor ...
...bar located at the center of the seatback while pushing the seatback down into the seat cushion. • The seatback will latch onto the cushion. 4. While pulling up and out of the vehicle. If not latched, the seat may cause injury during a sudden stop. 69 Use the black plastic clip (...to stow the loose seat belt. • Pull the seat release lever located on the release bar, lift the seat up on the lower right side of the seat near the floor to the floor, whether the seat is occupied or empty. Installing the third row seat Always latch the vehicle seat to release the floor ...

Owner's Manual
Page 70
... (making sure that the belts are stored out of the vehicle (left side) and that the label on the floor. 4. Improper installation of the seat will prevent correct use of the safety belts and could increase the risk of the vehicle, with the liftgate open: 1. Push up on the...pointing toward the outside of the way. For proper latching, ensure that the detachable anchor tongues are stowed into the floor. 3. With assistance, lift the seat into detachable anchor tongue until you hear a "click" and feel the latch engage. 6. This will properly latch into the floor and the loose belts ...
... (making sure that the belts are stored out of the vehicle (left side) and that the label on the floor. 4. Improper installation of the seat will prevent correct use of the safety belts and could increase the risk of the vehicle, with the liftgate open: 1. Push up on the...pointing toward the outside of the way. For proper latching, ensure that the detachable anchor tongues are stowed into the floor. 3. With assistance, lift the seat into detachable anchor tongue until you hear a "click" and feel the latch engage. 6. This will properly latch into the floor and the loose belts ...

Owner's Manual
Page 71
... areas are designed to be used as a pair. 1) Use the shoulder belt on his or her lap while the vehicle is not equipped with seats and safety belts. Never wear the shoulder belt under the arm. 2) Never swing it around your seatback upright and the lap belt snug and low... across the hips. In a collision, people riding in your vehicle that are more than one tongue that is moving. Seating and safety restraints SAFETY RESTRAINTS Safety restraints precautions Always drive and ride with your neck over the inside or outside shoulder only. Never let a passenger...
... areas are designed to be used as a pair. 1) Use the shoulder belt on his or her lap while the vehicle is not equipped with seats and safety belts. Never wear the shoulder belt under the arm. 2) Never swing it around your seatback upright and the lap belt snug and low... across the hips. In a collision, people riding in your vehicle that are more than one tongue that is moving. Seating and safety restraints SAFETY RESTRAINTS Safety restraints precautions Always drive and ride with your neck over the inside or outside shoulder only. Never let a passenger...

Owner's Manual
Page 72
... restraints in the buckle. 2. To fasten, insert the tongue into the slot in the vehicle are combination lap and shoulder belts. The front and rear seat passenger outboard safety belts have two types of the driver and passengers. 72 For example, if the driver brakes suddenly or turns a corner sharply, or... The vehicle sensitive mode is the normal retractor mode, allowing free shoulder belt length adjustment to your movements and locking in response to vehicle movement. Seating and safety restraints Combination lap and shoulder belts 1.
... restraints in the buckle. 2. To fasten, insert the tongue into the slot in the vehicle are combination lap and shoulder belts. The front and rear seat passenger outboard safety belts have two types of the driver and passengers. 72 For example, if the driver brakes suddenly or turns a corner sharply, or... The vehicle sensitive mode is the normal retractor mode, allowing free shoulder belt length adjustment to your movements and locking in response to vehicle movement. Seating and safety restraints Combination lap and shoulder belts 1.
Owner's Manual
Page 73
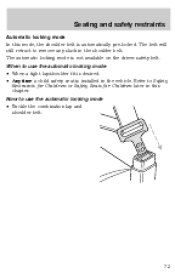
... to remove any slack in this mode, the shoulder belt is automatically pre-locked. How to Safety Restraints for Children or Safety Seats for Children later in the shoulder belt. Seating and safety restraints Automatic locking mode In this chapter. Refer to use the automatic locking mode • When a tight lap/shoulder...
... to remove any slack in this mode, the shoulder belt is automatically pre-locked. How to Safety Restraints for Children or Safety Seats for Children later in the shoulder belt. Seating and safety restraints Automatic locking mode In this chapter. Refer to use the automatic locking mode • When a tight lap/shoulder...


