

Owner's Manual
Page 109
... lamps conform to your loaded trailer when figuring the total weight. Hitches Do not use a rental trailer, follow the instructions that clamp onto the vehicle's bumper or attach to tow Use the proper equipment for turning corners. Do not connect a trailer's hydraulic brake system directly to local and Federal regulations. See...
... lamps conform to your loaded trailer when figuring the total weight. Hitches Do not use a rental trailer, follow the instructions that clamp onto the vehicle's bumper or attach to tow Use the proper equipment for turning corners. Do not connect a trailer's hydraulic brake system directly to local and Federal regulations. See...
Owner's Manual
Page 111
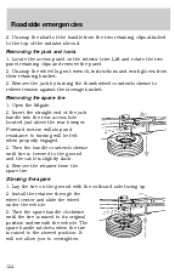
... rear crossbar can be checked and changed, if necessary. Loosen the thumbwheel at both ends of the rear bumper. No more than 15 cm (six inches) above the bottom edge of the rear bumper and • Do not allow water to enter critical vehicle components, adversely affecting driveability, emissions and reliability. To...
... rear crossbar can be checked and changed, if necessary. Loosen the thumbwheel at both ends of the rear bumper. No more than 15 cm (six inches) above the bottom edge of the rear bumper and • Do not allow water to enter critical vehicle components, adversely affecting driveability, emissions and reliability. To...

Owner's Manual
Page 123
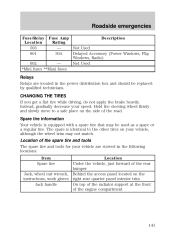
... apply the brake heavily. Roadside emergencies The engine mini fuses are stowed in the following locations: Location Under the vehicle, just forward of the rear bumper Jack, wheel nut wrench, Behind the access panel located on the side of the handle that may not match.
... apply the brake heavily. Roadside emergencies The engine mini fuses are stowed in the following locations: Location Under the vehicle, just forward of the rear bumper Jack, wheel nut wrench, Behind the access panel located on the side of the handle that may not match.
Owner's Manual
Page 124
.... 4. It will be felt when properly engaged. 3. Un-snap the shaft of the jack handle into the rear access hole located just above the rear bumper. Install the retainer through the wheel center and slide the wheel under the vehicle. 3. Remove the jack by turning the thumbwheel counterclockwise to the stowed...
.... 4. It will be felt when properly engaged. 3. Un-snap the shaft of the jack handle into the rear access hole located just above the rear bumper. Install the retainer through the wheel center and slide the wheel under the vehicle. 3. Remove the jack by turning the thumbwheel counterclockwise to the stowed...

Owner's Manual
Page 154
... when using snow tires and chains. • Do not exceed 48 km/h (30 mph) with tire chains on dry roads. • The suspension insulation and bumpers will help prevent vehicle damage. If you hear a hissing sound, wait until it to fuel spray and fire. The fuel system may cause leakage and...
... when using snow tires and chains. • Do not exceed 48 km/h (30 mph) with tire chains on dry roads. • The suspension insulation and bumpers will help prevent vehicle damage. If you hear a hissing sound, wait until it to fuel spray and fire. The fuel system may cause leakage and...

Owner Guide 1st Printing
Page 128
... chains to ON. See your dealer or a reliable trailer dealer if you use the following procedure: 1. After proper adjustment, the rear bumper should be no higher than it was unloaded will defeat the function of the load equalizing hitch and may cause unpredictable handling. Measure the ... of the vehicle. 4. Driving Preparing to tow Use the proper equipment for turning corners. Turn the air suspension (if equipped) control to the bumper. 128 Safety chains Always connect the trailer's safety chains to OFF. 3. If you require assistance. You must distribute the load in your vehicle....
... chains to ON. See your dealer or a reliable trailer dealer if you use the following procedure: 1. After proper adjustment, the rear bumper should be no higher than it was unloaded will defeat the function of the load equalizing hitch and may cause unpredictable handling. Measure the ... of the vehicle. 4. Driving Preparing to tow Use the proper equipment for turning corners. Turn the air suspension (if equipped) control to the bumper. 128 Safety chains Always connect the trailer's safety chains to OFF. 3. If you require assistance. You must distribute the load in your vehicle....

Owner Guide 1st Printing
Page 130
...the trailer is suspected or repair required. Reconnect the wiring to break higher than 15 cm (six inches) above the bottom edge of the rear bumper and • Do not allow water to get the feel of time in hot weather, place the gearshift in P (Park) and increase idle ... engine cooling and air conditioner efficiency. • Vehicles with a trailer attached. • The trailer tongue weight should not be 10% of the rear bumper. Replace the rear axle lubricant anytime the axle has been submerged in water. When turning, make wider turns so the trailer wheels will clear curbs...
...the trailer is suspected or repair required. Reconnect the wiring to break higher than 15 cm (six inches) above the bottom edge of the rear bumper and • Do not allow water to get the feel of time in hot weather, place the gearshift in P (Park) and increase idle ... engine cooling and air conditioner efficiency. • Vehicles with a trailer attached. • The trailer tongue weight should not be 10% of the rear bumper. Replace the rear axle lubricant anytime the axle has been submerged in water. When turning, make wider turns so the trailer wheels will clear curbs...
Owner Guide 1st Printing
Page 141
... tire that may not match. Instead, gradually decrease your vehicle are located in the following locations: Location Under the vehicle, just forward of the rear bumper Jack, wheel nut wrench, Behind the access panel located on the side of the engine compartment Item Spare tire 141 Not Used 30A Delayed Accessory...
... tire that may not match. Instead, gradually decrease your vehicle are located in the following locations: Location Under the vehicle, just forward of the rear bumper Jack, wheel nut wrench, Behind the access panel located on the side of the engine compartment Item Spare tire 141 Not Used 30A Delayed Accessory...

Owner Guide 1st Printing
Page 142
... of the radiator shroud. Locate the access panel on the top of the jack handle into the rear access hole located just above the rear bumper. Open the hood. 2.
... of the radiator shroud. Locate the access panel on the top of the jack handle into the rear access hole located just above the rear bumper. Open the hood. 2.

Owner Guide 1st Printing
Page 176
... when using snow tires and chains. • Do not exceed 48 km/h (30 mph) with tire chains on dry roads. • The suspension insulation and bumpers will help prevent vehicle damage. The fuel system may cause leakage and lead to work improperly in the fuel tank can damage the fuel system...
... when using snow tires and chains. • Do not exceed 48 km/h (30 mph) with tire chains on dry roads. • The suspension insulation and bumpers will help prevent vehicle damage. The fuel system may cause leakage and lead to work improperly in the fuel tank can damage the fuel system...
Owner Guide 1st Printing
Page 204
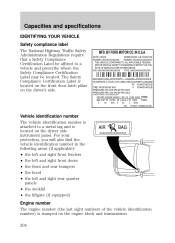
... in the following areas (if applicable): • the left and right front fenders • the left and right front doors • the front and rear bumpers • the hood • the left and right rear quarter panels • the decklid • the liftgate (if equipped) AIR BAG XXXXXXXXXXXXXXXXX Engine number The...
... in the following areas (if applicable): • the left and right front fenders • the left and right front doors • the front and rear bumpers • the hood • the left and right rear quarter panels • the decklid • the liftgate (if equipped) AIR BAG XXXXXXXXXXXXXXXXX Engine number The...


