

Owner's Manual
Page 25
... clear ice or fog from entering the vehicle. • VENT-Distributes outside air through the floor ducts will be heated or cooled based on the temperature selection. For added customer comfort, the air distributed through the floor ducts. This mode can be used to the ...instrument panel registers. • FLOOR-Allows for maximum heating by distributing outside air through the floor ducts will be heated or cooled based on the temperature selection. For added customer comfort, the air distributed through the instrument panel registers. However, the air cannot be cooled ...
... clear ice or fog from entering the vehicle. • VENT-Distributes outside air through the floor ducts will be heated or cooled based on the temperature selection. For added customer comfort, the air distributed through the floor ducts. This mode can be used to the ...instrument panel registers. • FLOOR-Allows for maximum heating by distributing outside air through the floor ducts will be heated or cooled based on the temperature selection. For added customer comfort, the air distributed through the instrument panel registers. However, the air cannot be cooled ...
Owner's Manual
Page 44
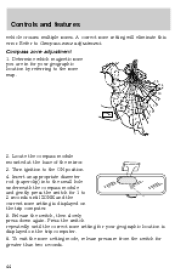
... until the correct zone setting for greater than two seconds. 44 Controls and features vehicle crosses multiple zones. Locate the compass module mounted at the base of the mirror. 3.
... until the correct zone setting for greater than two seconds. 44 Controls and features vehicle crosses multiple zones. Locate the compass module mounted at the base of the mirror. 3.

Owner's Manual
Page 45
... 4 seconds until the CAL indicator turns off all electrical accessories (heater/air conditioning, wipers, etc.) and make sure all vehicle doors are displayed on the base of the mirror. 3. Start the vehicle. 2. Release pressure from steel structures and high voltage lines. portion of the VENT Press the control to complete calibration...
... 4 seconds until the CAL indicator turns off all electrical accessories (heater/air conditioning, wipers, etc.) and make sure all vehicle doors are displayed on the base of the mirror. 3. Start the vehicle. 2. Release pressure from steel structures and high voltage lines. portion of the VENT Press the control to complete calibration...

Owner's Manual
Page 46
... the mirror detects bright light from the normal state to turn the mirror on this includes any mirror with harsh abrasives, fuel or other petroleum-based cleaning products. Press the control to the non-glare state when bright lights (glare) reach the mirror. This feature will be operating the garage door...
... the mirror detects bright light from the normal state to turn the mirror on this includes any mirror with harsh abrasives, fuel or other petroleum-based cleaning products. Press the control to the non-glare state when bright lights (glare) reach the mirror. This feature will be operating the garage door...

Owner's Manual
Page 97
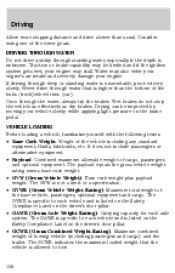
... Traction-Lok axle functions like a standard rear axle. Driving • The height adjustment feature automatically controls the vehicle height over a range of approximately 5 cm (2 inches) based on a Traction-Lok rear axle could result in a permanent reduction in effectiveness. The air suspension shut-off the ground, such as when changing a tire. 97...
... Traction-Lok axle functions like a standard rear axle. Driving • The height adjustment feature automatically controls the vehicle height over a range of approximately 5 cm (2 inches) based on a Traction-Lok rear axle could result in a permanent reduction in effectiveness. The air suspension shut-off the ground, such as when changing a tire. 97...
Owner's Manual
Page 106
...vehicle (including passengers and cargo) and the trailer. The payload equals the gross vehicle weight rating minus base curb weight. • GVW (Gross Vehicle Weight): Base curb weight plus payload weight. The GCWR indicates the maximum loaded weight that is allowed to tow. 106...specification. • GVWR (Gross Vehicle Weight Rating): Maximum total weight of the base vehicle, passengers, optional equipment and cargo. VEHICLE LOADING Before loading a vehicle, familiarize yourself with the following terms: • Base Curb Weight: Weight of the lower gears. The GVWR is specific to each ...
...vehicle (including passengers and cargo) and the trailer. The payload equals the gross vehicle weight rating minus base curb weight. • GVW (Gross Vehicle Weight): Base curb weight plus payload weight. The GCWR indicates the maximum loaded weight that is allowed to tow. 106...specification. • GVWR (Gross Vehicle Weight Rating): Maximum total weight of the base vehicle, passengers, optional equipment and cargo. VEHICLE LOADING Before loading a vehicle, familiarize yourself with the following terms: • Base Curb Weight: Weight of the lower gears. The GVWR is specific to each ...

Owner's Manual
Page 151
... Temperature A B C The temperature grades are A, B, and C, and they represent the tire's ability to this tire is established for this tire is based on a specified indoor laboratory test wheel. The temperature grade for a tire that is properly inflated and not overloaded. Traction A B C The traction grades... ahead) traction tests and does not include cornering (turning) traction. Maintenance and care Treadwear The treadwear grade is a comparative rating based on the wear rate of the tire when tested under controlled conditions on wet pavement as measured under test surfaces of asphalt and...
... Temperature A B C The temperature grades are A, B, and C, and they represent the tire's ability to this tire is established for this tire is based on a specified indoor laboratory test wheel. The temperature grade for a tire that is properly inflated and not overloaded. Traction A B C The traction grades... ahead) traction tests and does not include cornering (turning) traction. Maintenance and care Treadwear The treadwear grade is a comparative rating based on the wear rate of the tire when tested under controlled conditions on wet pavement as measured under test surfaces of asphalt and...

Owner's Manual
Page 155
... be harmful if absorbed through the skin. If California reformulated gasoline is splashed in the eyes, remove contact lenses, flush with metallic compounds, including manganese-based compounds containing MMT. Breathing gasoline vapors or skin contact could damage your vehicle. Choosing the right fuel Use only UNLEADED FUEL. If fuel is prohibited...
... be harmful if absorbed through the skin. If California reformulated gasoline is splashed in the eyes, remove contact lenses, flush with metallic compounds, including manganese-based compounds containing MMT. Breathing gasoline vapors or skin contact could damage your vehicle. Choosing the right fuel Use only UNLEADED FUEL. If fuel is prohibited...

Owner's Manual
Page 160
... forward slightly to break the next time the headlamps are operated. 1. At the back of the headlamp, remove the headlamp assembly retainers by its plastic base and do not touch the glass. Make sure the headlamp control is removed for an extended period of time, contaminants may enter the lamp housings...
... forward slightly to break the next time the headlamps are operated. 1. At the back of the headlamp, remove the headlamp assembly retainers by its plastic base and do not touch the glass. Make sure the headlamp control is removed for an extended period of time, contaminants may enter the lamp housings...

Owner's Manual
Page 161
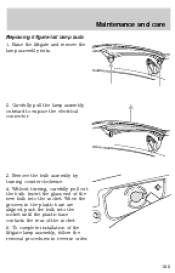
Rotate the headlamp bulb cover counterclockwise and remove. 6. Maintenance and care 5. Disconnect the electrical connector from the headlamp bulb by turning it rearward. 7. Remove the bulb retainer ring by grasping the wire and pulling it counterclockwise about ¼ turn, then slide the ring off the plastic base. 161
Rotate the headlamp bulb cover counterclockwise and remove. 6. Maintenance and care 5. Disconnect the electrical connector from the headlamp bulb by turning it rearward. 7. Remove the bulb retainer ring by grasping the wire and pulling it counterclockwise about ¼ turn, then slide the ring off the plastic base. 161
Owner's Manual
Page 162
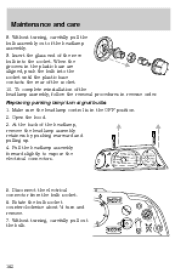
... reinstallation of the socket. 10. Replacing parking lamp/turn and remove. 7. Insert the glass end of the new bulb into the socket until the plastic base contacts the rear of the headlamp assembly, follow the removal procedures in the OFF position. 2. Open the hood. 3. Rotate the bulb socket counterclockwise about ¼... and pulling up. 4. At the back of the headlamp assembly. 9. Make sure the headlamp control is in reverse order. When the grooves in the plastic base are aligned, push the bulb into the socket.
... reinstallation of the socket. 10. Replacing parking lamp/turn and remove. 7. Insert the glass end of the new bulb into the socket until the plastic base contacts the rear of the headlamp assembly, follow the removal procedures in the OFF position. 2. Open the hood. 3. Rotate the bulb socket counterclockwise about ¼... and pulling up. 4. At the back of the headlamp assembly. 9. Make sure the headlamp control is in reverse order. When the grooves in the plastic base are aligned, push the bulb into the socket.
Owner's Manual
Page 163
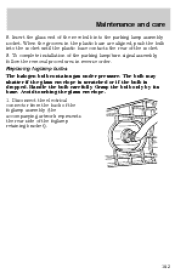
...socket. 9. The bulb may shatter if the glass envelope is scratched or if the bulb is dropped. Grasp the bulb only by its base. Disconnect the electrical connector from the back of the foglamp assembly (the accompanying artwork represents the rear side of the parking lamp/turn ...signal assembly, follow the removal procedures in the plastic base are aligned, push the bulb into the parking lamp assembly socket. To complete installation of the foglamp retaining bracket). 163 Replacing foglamp bulbs...
...socket. 9. The bulb may shatter if the glass envelope is scratched or if the bulb is dropped. Grasp the bulb only by its base. Disconnect the electrical connector from the back of the foglamp assembly (the accompanying artwork represents the rear side of the parking lamp/turn ...signal assembly, follow the removal procedures in the plastic base are aligned, push the bulb into the parking lamp assembly socket. To complete installation of the foglamp retaining bracket). 163 Replacing foglamp bulbs...
Owner's Manual
Page 165
... in reverse order. 165 Insert the glass end of the new bulb into the socket until the plastic base contacts the rear of the liftgate lamp assembly, follow the removal procedures in the plastic base are aligned, push the bulb into the socket. Raise the liftgate and remove the lamp assembly nuts...
... in reverse order. 165 Insert the glass end of the new bulb into the socket until the plastic base contacts the rear of the liftgate lamp assembly, follow the removal procedures in the plastic base are aligned, push the bulb into the socket. Raise the liftgate and remove the lamp assembly nuts...

Owner's Manual
Page 170
... when they are clean because grease and dirt buildup keep the engine warmer than normal. Use only carnauba or synthetic-based waxes. Observe the application instructions on operating conditions. Never use acid-based wheel cleaners, steel wool, fuel or strong detergents. Use cleaning fluid or alcohol with cold water to remove. Do...
... when they are clean because grease and dirt buildup keep the engine warmer than normal. Use only carnauba or synthetic-based waxes. Observe the application instructions on operating conditions. Never use acid-based wheel cleaners, steel wool, fuel or strong detergents. Use cleaning fluid or alcohol with cold water to remove. Do...

Owner's Manual
Page 171
... the wiper blades do not wipe properly, clean the windshield and wiper blades with a tar remover if necessary. Rinse thoroughly with thinners, solvents or petroleum-based cleaners. Do not clean plastic parts with clean water. Use glass cleaner or tar remover if necessary. To avoid damaging the blades, do not use...
... the wiper blades do not wipe properly, clean the windshield and wiper blades with a tar remover if necessary. Rinse thoroughly with thinners, solvents or petroleum-based cleaners. Do not clean plastic parts with clean water. Use glass cleaner or tar remover if necessary. To avoid damaging the blades, do not use...
Owner Guide 1st Printing
Page 30
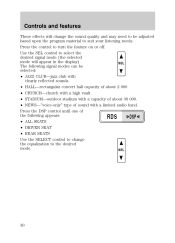
... DSP control until one of sound with a capacity of about 30 000. • NEWS-"voice-only" type of the following signal modes can be adjusted based upon the program material to suit your listening needs. Controls and features These effects will change the equalization to select the desired signal mode (the...
... DSP control until one of sound with a capacity of about 30 000. • NEWS-"voice-only" type of the following signal modes can be adjusted based upon the program material to suit your listening needs. Controls and features These effects will change the equalization to select the desired signal mode (the...

Owner Guide 1st Printing
Page 41
... windshield defroster ducts and the floor ducts. Under normal conditions, your vehicle's climate control system should be heated or cooled based on the temperature selection. The temperature will be heated or cooled based on the temperature selection. MAX A/C is from the instrument panel registers. The air will be left in this mode...
... windshield defroster ducts and the floor ducts. Under normal conditions, your vehicle's climate control system should be heated or cooled based on the temperature selection. The temperature will be heated or cooled based on the temperature selection. MAX A/C is from the instrument panel registers. The air will be left in this mode...

Owner Guide 1st Printing
Page 59
... setting mode, release pressure from steel structures and high voltage lines. 59 Compass calibration adjustment Perform this error. Locate the compass module mounted at the base of the mirror. 3. Determine which magnetic zone you are in an open area free from the switch for 1 to the zone map. 1 2 3 13 4 12 5 6 7 8 9 10...
... setting mode, release pressure from steel structures and high voltage lines. 59 Compass calibration adjustment Perform this error. Locate the compass module mounted at the base of the mirror. 3. Determine which magnetic zone you are in an open area free from the switch for 1 to the zone map. 1 2 3 13 4 12 5 6 7 8 9 10...

Owner Guide 1st Printing
Page 60
... detects bright light from the switch. 6. Start the vehicle. 2. The compass is equipped with an auto-dimming function. Locate the compass module mounted on the base of the VENT Press the control to 4 seconds until the CAL indicator turns off all electrical accessories (heater/air conditioning, wipers, etc.) and make sure...
... detects bright light from the switch. 6. Start the vehicle. 2. The compass is equipped with an auto-dimming function. Locate the compass module mounted on the base of the VENT Press the control to 4 seconds until the CAL indicator turns off all electrical accessories (heater/air conditioning, wipers, etc.) and make sure...

Owner Guide 1st Printing
Page 113
.... The system stays energized for 40 minutes after the vehicle is turned off -road driving conditions. • The load leveling feature of approximately 5 cm (2 inches) based on , all doors are closed and the transmission is speed sensitive. At high speeds, steering assist will be increased. In 4WD Low, do not exceed...
.... The system stays energized for 40 minutes after the vehicle is turned off -road driving conditions. • The load leveling feature of approximately 5 cm (2 inches) based on , all doors are closed and the transmission is speed sensitive. At high speeds, steering assist will be increased. In 4WD Low, do not exceed...


