

Owner's Manual
Page 20
... ignition is activated. A4WD 4H 4L 2H AUXILIARY POWER POINT The auxiliary power point is located on the instrument panel. Do not plug optional electrical accessories into the cigarette lighter. Controls and features REAR WINDOW DEFROSTER The rear defroster control is located on the instrument panel. Press the defroster control to...
... ignition is activated. A4WD 4H 4L 2H AUXILIARY POWER POINT The auxiliary power point is located on the instrument panel. Do not plug optional electrical accessories into the cigarette lighter. Controls and features REAR WINDOW DEFROSTER The rear defroster control is located on the instrument panel. Press the defroster control to...

Owner's Manual
Page 32
Key position when driving. 5. START, cranks the engine. ON, all accessories without locking the steering wheel. 4. OFF, shuts off the engine and all electrical circuits operational. LOCK, locks the steering wheel, 2 automatic transmission gearshift ... as soon as the radio to vary airflow between PANEL and FLOOR to 3 operate while the engine is not 5 running. 2. Warning lights illuminated. ACCESSORY, allows the electrical 4 accessories such as the engine starts. 32 Controls and features • Anywhere between the outlets. PANEL FLOOR POSITIONS OF THE IGNITION 1.
Key position when driving. 5. START, cranks the engine. ON, all accessories without locking the steering wheel. 4. OFF, shuts off the engine and all electrical circuits operational. LOCK, locks the steering wheel, 2 automatic transmission gearshift ... as soon as the radio to vary airflow between PANEL and FLOOR to 3 operate while the engine is not 5 running. 2. Warning lights illuminated. ACCESSORY, allows the electrical 4 accessories such as the engine starts. 32 Controls and features • Anywhere between the outlets. PANEL FLOOR POSITIONS OF THE IGNITION 1.

Owner's Manual
Page 45
... ignition OFF.) 5. Power quarter rear windows (if equipped) portion of the VENT Press the control to 4 seconds until the CAL indicator turns off all electrical accessories (heater/air conditioning, wipers, etc.) and make sure all vehicle doors are displayed on the base of the VENT Press the control to complete calibration...
... ignition OFF.) 5. Power quarter rear windows (if equipped) portion of the VENT Press the control to 4 seconds until the CAL indicator turns off all electrical accessories (heater/air conditioning, wipers, etc.) and make sure all vehicle doors are displayed on the base of the VENT Press the control to complete calibration...

Owner's Manual
Page 46
... return to the normal state whenever the vehicle is on or off. Do not use the HomeLink Universal Transmitter with any mirror with the available accessory package). The mirror will learn the radio frequency codes of any garage door opener that people and objects are out to the way to prevent...
... return to the normal state whenever the vehicle is on or off. Do not use the HomeLink Universal Transmitter with any mirror with the available accessory package). The mirror will learn the radio frequency codes of any garage door opener that people and objects are out to the way to prevent...

Owner's Manual
Page 51
... the ignition switch is opened. 51 Depress again to the OFF position or until any door is turned to stop window operation. WINDOW LOCK Accessory delay With accessory delay, the window switches may be used for the driver's press the right side of the control. Press the left side to operate the...
... the ignition switch is opened. 51 Depress again to the OFF position or until any door is turned to stop window operation. WINDOW LOCK Accessory delay With accessory delay, the window switches may be used for the driver's press the right side of the control. Press the left side to operate the...

Owner's Manual
Page 55
... the eyelet is over the pointed end of the accelerator or the brake pedal. For information on the instrument panel. Do not plug optional electrical accessories into the cigarette lighter. Controls and features Use only soft cups in a collision. POSITIVE RETENTION FLOOR MAT Position the floor mat so that the mat...
... the eyelet is over the pointed end of the accelerator or the brake pedal. For information on the instrument panel. Do not plug optional electrical accessories into the cigarette lighter. Controls and features Use only soft cups in a collision. POSITIVE RETENTION FLOOR MAT Position the floor mat so that the mat...

Owner's Manual
Page 87
... a tether strap that goes over the seatback and attach it to an anchoring point. Other manufacturers offer the tether strap as an accessory. Contact the manufacturer of the front passenger seat cushion frame. Try to pull the belt out of the vehicle seat and attaches to... the front seat. Tether anchorage hardware kits (part number 613D74) including instructions, may be obtained at no charge from any Ford or Lincoln-Mercury dealer. Seating and safety restraints 10. An anchor bracket can be installed using the instructions provided with tether straps Some manufacturers make...
... a tether strap that goes over the seatback and attach it to an anchoring point. Other manufacturers offer the tether strap as an accessory. Contact the manufacturer of the front passenger seat cushion frame. Try to pull the belt out of the vehicle seat and attaches to... the front seat. Tether anchorage hardware kits (part number 613D74) including instructions, may be obtained at no charge from any Ford or Lincoln-Mercury dealer. Seating and safety restraints 10. An anchor bracket can be installed using the instructions provided with tether straps Some manufacturers make...
Owner's Manual
Page 89
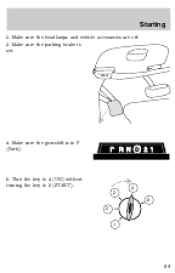
Make sure the gearshift is set. Turn the key to 4 (ON) without turning the key to 5 (START). 4 3 5 2 1 89 Make sure the headlamps and vehicle accessories are off. 3. Make sure the parking brake is in P (Park). 5. Starting 2. HOOD BRAKE 4.
Make sure the gearshift is set. Turn the key to 4 (ON) without turning the key to 5 (START). 4 3 5 2 1 89 Make sure the headlamps and vehicle accessories are off. 3. Make sure the parking brake is in P (Park). 5. Starting 2. HOOD BRAKE 4.

Owner's Manual
Page 108
... to the trailer for installing a customer-supplied electric brake controller. Another electrical connector is 5.6 square meters (60 square feet) 108 The kit included with towing accessories for trailer towing. TRAILER TOWING Trailer towing table GCWR (Gross Combined Weight Rating)/Trailer weights Trailer weight range Engine Rear axle ratio (0-maximum) 4x2 5.4L...
... to the trailer for installing a customer-supplied electric brake controller. Another electrical connector is 5.6 square meters (60 square feet) 108 The kit included with towing accessories for trailer towing. TRAILER TOWING Trailer towing table GCWR (Gross Combined Weight Rating)/Trailer weights Trailer weight range Engine Rear axle ratio (0-maximum) 4x2 5.4L...

Owner's Manual
Page 130
... (-) terminal of the vehicle with the discharged battery. 3. Roadside emergencies 5. Switch off any electrical surges. Start the engine of 2 the booster battery (3) and the other accessories off the engine.
... (-) terminal of the vehicle with the discharged battery. 3. Roadside emergencies 5. Switch off any electrical surges. Start the engine of 2 the booster battery (3) and the other accessories off the engine.
Owner's Manual
Page 148
... installed, the clock and the preset radio stations must be reset once the battery is running. 148 Put the gearshift in P (Park), turn off all accessories and start your local recycling center to the "Service Guide" for the appropriate intervals for disposal. Let the engine idle for at least one minute. 3.
... installed, the clock and the preset radio stations must be reset once the battery is running. 148 Put the gearshift in P (Park), turn off all accessories and start your local recycling center to the "Service Guide" for the appropriate intervals for disposal. Let the engine idle for at least one minute. 3.
Owner's Manual
Page 153
... tires you may need to follow these guidelines when using snow tires and chains: • Use only cable type chains offered by Ford as an accessory or equivalent. SAE class "S" or other conventional link type chains may contact and cause damage to the vehicle's wheel house and/or body. • Install...
... tires you may need to follow these guidelines when using snow tires and chains: • Use only cable type chains offered by Ford as an accessory or equivalent. SAE class "S" or other conventional link type chains may contact and cause damage to the vehicle's wheel house and/or body. • Install...

Owner's Manual
Page 169
... use strong detergents or soap. Use a 4 mm wrench or socket to the "Customer Assistance Guide" for a list of water for best results. Remove any exterior accessories, such as antennas, before entering a car wash. If your vehicle regularly with cold or lukewarm water. After washing, apply the brakes several times to wash...
... use strong detergents or soap. Use a 4 mm wrench or socket to the "Customer Assistance Guide" for a list of water for best results. Remove any exterior accessories, such as antennas, before entering a car wash. If your vehicle regularly with cold or lukewarm water. After washing, apply the brakes several times to wash...

Owner's Manual
Page 170
... be repaired with cold water to remove any bugs and tar before waxing vehicle. Repairing paint chips Minor scratches or paint damage from the Ford accessory line. Maintenance and care Waxing your vehicle. Use tar remover to avoid cracking the engine block or other engine components. 170 Observe the application instructions...
... be repaired with cold water to remove any bugs and tar before waxing vehicle. Repairing paint chips Minor scratches or paint damage from the Ford accessory line. Maintenance and care Waxing your vehicle. Use tar remover to avoid cracking the engine block or other engine components. 170 Observe the application instructions...

Owner's Manual
Page 185
Index Vehicle headlamp aiming device (VHAD) ...167 Vehicle Identification Number (VIN) ...180 Vehicle loading ...106 Ventilating your vehicle ...92 Warning chimes ...6 Washer fluid rear window reservoir ...140 warning light ...11 Windows accessory delay ...51 power windows, operating ...45,50 Windshield washer fluid and wipers checking and adding fluid ...140 checking and replacing wiper blades ...149 operation ...39 Wrecker towing ...132 185
Index Vehicle headlamp aiming device (VHAD) ...167 Vehicle Identification Number (VIN) ...180 Vehicle loading ...106 Ventilating your vehicle ...92 Warning chimes ...6 Washer fluid rear window reservoir ...140 warning light ...11 Windows accessory delay ...51 power windows, operating ...45,50 Windshield washer fluid and wipers checking and adding fluid ...140 checking and replacing wiper blades ...149 operation ...39 Wrecker towing ...132 185
Scheduled Maintenance Guide 3rd Printing
Page 14
... joints Inspect tires for wear and rotate Replace engine air filter Replace fuel filter* Replace cabin air filter, if equipped Replace spark plugs (Villager) Inspect accessory drive belt(s) (Villager) Perform automatic transmission/transaxle services on all recommended maintenance services be performed at the indicated intervals and the maintenance be recorded. 14...
... joints Inspect tires for wear and rotate Replace engine air filter Replace fuel filter* Replace cabin air filter, if equipped Replace spark plugs (Villager) Inspect accessory drive belt(s) (Villager) Perform automatic transmission/transaxle services on all recommended maintenance services be performed at the indicated intervals and the maintenance be recorded. 14...
Scheduled Maintenance Guide 3rd Printing
Page 25
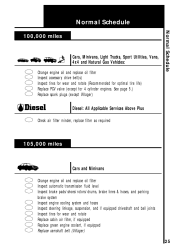
... Normal Schedule 100,000 miles Cars, Minivans, Light Trucks, Sport Utilities, Vans, 4x4 and Natural Gas Vehicles: Change engine oil and replace oil filter Inspect accessory drive belt(s) Inspect tires for wear and rotate (Recommended for optimal tire life) Replace PCV valve (except for wear and rotate Replace cabin air filter...
... Normal Schedule 100,000 miles Cars, Minivans, Light Trucks, Sport Utilities, Vans, 4x4 and Natural Gas Vehicles: Change engine oil and replace oil filter Inspect accessory drive belt(s) Inspect tires for wear and rotate (Recommended for optimal tire life) Replace PCV valve (except for wear and rotate Replace cabin air filter...

Owner Guide 1st Printing
Page 18
... while the vehicle is moving. The ignition must be in the ON position to the Driving chapter for more information. Do not plug optional electrical accessories into the cigarette lighter. Controls and features Never adjust the accelerator and brake pedal with feet on the instrument panel.
... while the vehicle is moving. The ignition must be in the ON position to the Driving chapter for more information. Do not plug optional electrical accessories into the cigarette lighter. Controls and features Never adjust the accelerator and brake pedal with feet on the instrument panel.

Owner Guide 1st Printing
Page 21
... equipped with vehicle speed to raise or lower volume. Speed sensitive volume (if equipped) With this feature, radio volume changes automatically and slightly with a delayed accessory feature. VOL PUSH ON Turn the control to compensate for five seconds, then press: VOL PUSH ON 21 Level 0 turns the speed sensitive volume off...
... equipped with vehicle speed to raise or lower volume. Speed sensitive volume (if equipped) With this feature, radio volume changes automatically and slightly with a delayed accessory feature. VOL PUSH ON Turn the control to compensate for five seconds, then press: VOL PUSH ON 21 Level 0 turns the speed sensitive volume off...

Owner Guide 1st Printing
Page 47
Release the key as soon as the radio to activate the right turn signal. 47 ACCESSORY, allows the electrical 4 accessories such as the engine starts. LOCK, locks the steering wheel, 2 automatic transmission gearshift lever and allows key removal. 1 3. Warning lights illuminated. Key position when driving. 5. ... while the engine is not 5 running. 2. OFF, shuts off the engine and all electrical circuits operational. Controls and features POSITIONS OF THE IGNITION 1. ON, all accessories without locking the steering wheel. 4. START, cranks the engine.
Release the key as soon as the radio to activate the right turn signal. 47 ACCESSORY, allows the electrical 4 accessories such as the engine starts. LOCK, locks the steering wheel, 2 automatic transmission gearshift lever and allows key removal. 1 3. Warning lights illuminated. Key position when driving. 5. ... while the engine is not 5 running. 2. OFF, shuts off the engine and all electrical circuits operational. Controls and features POSITIONS OF THE IGNITION 1. ON, all accessories without locking the steering wheel. 4. START, cranks the engine.