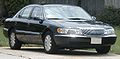

Owner's Manual
Page 19
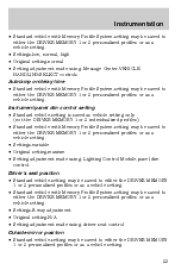
... 2 personalized profiles or as a vehicle setting. • Settings: 8-way adjustment. • Original setting: N/A. • Setting adjustment is made using the driver seat control. Instrument panel dim control setting • Standard vehicle: setting is saved as vehicle setting only (not the Driver 1 or 2 individualized profiles). • Standard vehicle with Memory Profile System... the Driver 1 or 2 personalized profiles or as a vehicle setting. • Settings: variable. • Original setting: maximum. • Setting adjustment is made using the lighting control module-panel dim...
... 2 personalized profiles or as a vehicle setting. • Settings: 8-way adjustment. • Original setting: N/A. • Setting adjustment is made using the driver seat control. Instrument panel dim control setting • Standard vehicle: setting is saved as vehicle setting only (not the Driver 1 or 2 individualized profiles). • Standard vehicle with Memory Profile System... the Driver 1 or 2 personalized profiles or as a vehicle setting. • Settings: variable. • Original setting: maximum. • Setting adjustment is made using the lighting control module-panel dim...
Owner's Manual
Page 23
... profiles or as a vehicle setting. • Settings-variable • Original setting-maxium • Setting adjustment made using : Lighting Control Module-panel dim control. Instrumentation • Standard vehicle with Memory Profile System-setting may be saved to either the DRIVER MEMORY 1 or 2 personalized ...8226; Settings-low, normal, high • Original setting-normal • Setting adjustment made using : Message Center-VEHICLE HANDLING/SELECT controls Autolamp on/delay time • Standard vehicle with Memory Profile System-setting may be saved to either the DRIVER MEMORY 1 or...
... profiles or as a vehicle setting. • Settings-variable • Original setting-maxium • Setting adjustment made using : Lighting Control Module-panel dim control. Instrumentation • Standard vehicle with Memory Profile System-setting may be saved to either the DRIVER MEMORY 1 or 2 personalized ...8226; Settings-low, normal, high • Original setting-normal • Setting adjustment made using : Message Center-VEHICLE HANDLING/SELECT controls Autolamp on/delay time • Standard vehicle with Memory Profile System-setting may be saved to either the DRIVER MEMORY 1 or...

Owner's Manual
Page 35
...equipped). • Press VOL up to activate the right turn . Controls and features TURN SIGNAL CONTROL • Push down to adjust the volume. NEXT MODE 35 The flash rate of the turn signal will speed up considerably if the Lighting Control Module detects a left or right turn lamp bulb (front or rear) ...is used when the headlamps are on, the cornering lamps will light either the right or left turn signal. • Push up or down ...
...equipped). • Press VOL up to activate the right turn . Controls and features TURN SIGNAL CONTROL • Push down to adjust the volume. NEXT MODE 35 The flash rate of the turn signal will speed up considerably if the Lighting Control Module detects a left or right turn lamp bulb (front or rear) ...is used when the headlamps are on, the cornering lamps will light either the right or left turn signal. • Push up or down ...

Owner's Manual
Page 57
... corner of mirror. 3. Compass calibration adjustment Perform this adjustment in a circle (less than two seconds. When the mirror detects bright light from front or behind, it down again. Press the switch repeatedly until the CAL indicator turns off. To exit the zone setting mode...vehicle doors are displayed on the base of the mirror. 6. For optimum calibration, turn the ignition to minimize glare. 57 Controls and features 5. Locate the compass module mounted on the upper right corner of the mirror. (To exit CAL before performing a compass adjustment, turn off the display...
... corner of mirror. 3. Compass calibration adjustment Perform this adjustment in a circle (less than two seconds. When the mirror detects bright light from front or behind, it down again. Press the switch repeatedly until the CAL indicator turns off. To exit the zone setting mode...vehicle doors are displayed on the base of the mirror. 6. For optimum calibration, turn the ignition to minimize glare. 57 Controls and features 5. Locate the compass module mounted on the upper right corner of the mirror. (To exit CAL before performing a compass adjustment, turn off the display...
Owner's Manual
Page 68
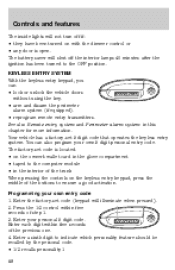
.... 4. The factory-set code is located: • on the owner's wallet card in the glove compartment • taped to the computer module • in this chapter for more information. See also Remote entry system and Perimeter alarm system in the interior of the buttons to ensure ... operates the keyless entry system. Enter a sixth digit to the OFF position. Enter your own 5 digit personal entry code. Controls and features The inside lights will not turn off the interior lamps 40 minutes after the ignition has been turned to indicate which personality feature should be recalled...
.... 4. The factory-set code is located: • on the owner's wallet card in the glove compartment • taped to the computer module • in this chapter for more information. See also Remote entry system and Perimeter alarm system in the interior of the buttons to ensure ... operates the keyless entry system. Enter a sixth digit to the OFF position. Enter your own 5 digit personal entry code. Controls and features The inside lights will not turn off the interior lamps 40 minutes after the ignition has been turned to indicate which personality feature should be recalled...
Owner's Manual
Page 112
... coded as follows: Fuse/Relay Location Fuse Amp Rating 1 10A Description Lighting Control Module: Anti-Theft Indicator Lamp, PWM Dimming Output, Illumination Lamps for Microphone, RR and LR Door Ashtrays, Heated Seat Switches, Rear Defrost Control Switch, EATC Control Panel, Message Center Switches, Speed Control Switches, Cigar Lighter, Console and Ashtray Data Link Connector (DLC), Powertrain...
... coded as follows: Fuse/Relay Location Fuse Amp Rating 1 10A Description Lighting Control Module: Anti-Theft Indicator Lamp, PWM Dimming Output, Illumination Lamps for Microphone, RR and LR Door Ashtrays, Heated Seat Switches, Rear Defrost Control Switch, EATC Control Panel, Message Center Switches, Speed Control Switches, Cigar Lighter, Console and Ashtray Data Link Connector (DLC), Powertrain...
Owner's Manual
Page 113
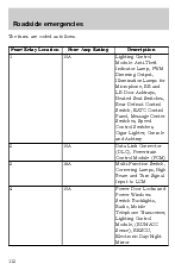
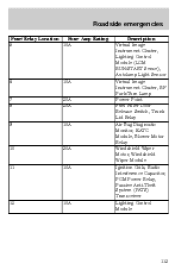
Roadside emergencies Fuse/Relay Location Fuse Amp Rating 5 10A Description Virtual Image Instrument Cluster, Lighting Control Module (LCM RUN/START Sense), Autolamp Light Sensor Virtual Image Instrument Cluster, RF Park/Turn Lamp Power Point Fuel Filler Door Release Switch, Trunk Lid Relay Air Bag Diagnostic Monitor, EATC Module, Blower Motor Relay Windshield Wiper Motor, Windshield Wiper Module Ignition Coils, Radio Interference Capacitor, PCM Power Relay, Passive Anti-Theft System (PATS) Transceiver Lighting Control Module 6 10A 7 8 20A 20A 9 10A 10 30A 11 10A 12 10A 113
Roadside emergencies Fuse/Relay Location Fuse Amp Rating 5 10A Description Virtual Image Instrument Cluster, Lighting Control Module (LCM RUN/START Sense), Autolamp Light Sensor Virtual Image Instrument Cluster, RF Park/Turn Lamp Power Point Fuel Filler Door Release Switch, Trunk Lid Relay Air Bag Diagnostic Monitor, EATC Module, Blower Motor Relay Windshield Wiper Motor, Windshield Wiper Module Ignition Coils, Radio Interference Capacitor, PCM Power Relay, Passive Anti-Theft System (PATS) Transceiver Lighting Control Module 6 10A 7 8 20A 20A 9 10A 10 30A 11 10A 12 10A 113

Owner's Manual
Page 114
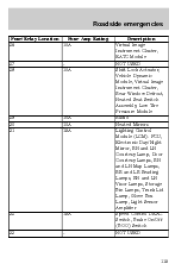
... Marker Lamps, Tail Lamps, License Lamps, LR Stop/Turn Lamps, Clock Illumination Cigar Lighter ABS Evac and Fill Connector Moonroof Switch NOT USED Lighting Control Module Lighting Control Module (LCM): Left Headlamp, DRL Multi-Function Switch: Flash to Pass, and Hazard Warning Input to LCM NOT USED NOT USED Digital Transmission Range... Sensor Virtual Image Cluster-LF Turn Indicator, LF Turn Signal Lighting Control Module (LCM): Right Headlamp 14 15 16 17 18 19 20A 10A 30A 10A 10A 20 15A 21 22 23 24 10A 10A 25...
... Marker Lamps, Tail Lamps, License Lamps, LR Stop/Turn Lamps, Clock Illumination Cigar Lighter ABS Evac and Fill Connector Moonroof Switch NOT USED Lighting Control Module Lighting Control Module (LCM): Left Headlamp, DRL Multi-Function Switch: Flash to Pass, and Hazard Warning Input to LCM NOT USED NOT USED Digital Transmission Range... Sensor Virtual Image Cluster-LF Turn Indicator, LF Turn Signal Lighting Control Module (LCM): Right Headlamp 14 15 16 17 18 19 20A 10A 30A 10A 10A 20 15A 21 22 23 24 10A 10A 25...
Owner's Manual
Page 115
.../Relay Location Fuse Amp Rating 26 10A Description Virtual Image Instrument Cluster, EATC Module NOT USED Shift Lock Actuator, Vehicle Dynamic Module, Virtual Image Instrument Cluster, Rear Window Defrost, Heated Seat Switch Assembly, Low Tire Pressure Module Radio Heated Mirrors Lighting Control Module (LCM): FCU, Electronic Day/Night Mirror, RH and LH Courtesy Lamp, Door Courtesy...
.../Relay Location Fuse Amp Rating 26 10A Description Virtual Image Instrument Cluster, EATC Module NOT USED Shift Lock Actuator, Vehicle Dynamic Module, Virtual Image Instrument Cluster, Rear Window Defrost, Heated Seat Switch Assembly, Low Tire Pressure Module Radio Heated Mirrors Lighting Control Module (LCM): FCU, Electronic Day/Night Mirror, RH and LH Courtesy Lamp, Door Courtesy...
Warranty Guide 2nd Printing
Page 18
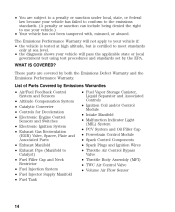
...; Fuel Vapor Storage Canister, Liquid Separator and Associated Controls • Ignition Coil and/or Control Module • Intake Manifold • Malfunction Indicator Light (MIL) System • PCV System and Oil Filler Cap • Powertrain Control Module • Spark Control Components • Spark Plugs and Ignition Wires • Throttle Air Control Bypass Valve • Throttle Body Assembly (MFI) •...
...; Fuel Vapor Storage Canister, Liquid Separator and Associated Controls • Ignition Coil and/or Control Module • Intake Manifold • Malfunction Indicator Light (MIL) System • PCV System and Oil Filler Cap • Powertrain Control Module • Spark Control Components • Spark Plugs and Ignition Wires • Throttle Air Control Bypass Valve • Throttle Body Assembly (MFI) •...


