

Owner's Manual
Page 20
... than one second) over more than one gear selection (for Headlamps On This chime sounds if the driver or any passenger door is in. The chime sounds until you close the door, turn off the lamps or turn the ignition to turn on the floor console next to the gearshift lever. These...
... than one second) over more than one gear selection (for Headlamps On This chime sounds if the driver or any passenger door is in. The chime sounds until you close the door, turn off the lamps or turn the ignition to turn on the floor console next to the gearshift lever. These...

Owner's Manual
Page 28
... are tilted down automatically. A press of the control will not establish a new Personalized Oil Reset Percentage. u AUTO LOCKS - automatically locks all doors u HORN CHIRP - sounds an audible "chirp" when all doors are closed and the vehicle speed is u EXPRESS WINDOWS - a short tap of any control besides RESET or VEHICLE SETTINGS will abort...
... are tilted down automatically. A press of the control will not establish a new Personalized Oil Reset Percentage. u AUTO LOCKS - automatically locks all doors u HORN CHIRP - sounds an audible "chirp" when all doors are closed and the vehicle speed is u EXPRESS WINDOWS - a short tap of any control besides RESET or VEHICLE SETTINGS will abort...

Owner's Manual
Page 33
... of the monitored u Engine Oil Life Status u Engine Oil Life Left u Engine Oil Level u Voltage Level u Engine Coolant Temperature u Engine Coolant Level u Washer Fluid Level u Doors Closed (Driver and Rightside) u Trunk Closed u Exterior Lamps (Head, Front Turn, Brake and Tail) u Air Ride System 28 To reset the elapsed time counter, hold...
... of the monitored u Engine Oil Life Status u Engine Oil Life Left u Engine Oil Level u Voltage Level u Engine Coolant Temperature u Engine Coolant Level u Washer Fluid Level u Doors Closed (Driver and Rightside) u Trunk Closed u Exterior Lamps (Head, Front Turn, Brake and Tail) u Air Ride System 28 To reset the elapsed time counter, hold...
Owner's Manual
Page 36
... to use the full functionality of the monitored systems. When a warning occurs, the warning message is displayed, the warning message may be repeatedly reset. The DOOR AJAR warning cannot be removed from the reset or they will reappear after you acknowledge the warning by displaying each warning message for 4 seconds. System...
... to use the full functionality of the monitored systems. When a warning occurs, the warning message is displayed, the warning message may be repeatedly reset. The DOOR AJAR warning cannot be removed from the reset or they will reappear after you acknowledge the warning by displaying each warning message for 4 seconds. System...
Owner's Manual
Page 38
... this warning stays on or continues to come on level ground, turn off the engine and let it cool. DRIVER'S DOOR AJAR - This warning message is displayed when the driver's door is not completely closed and the ignition switch is either ON or in ACC mode. If you start your dealer for... the oil is off, so that the oil can cause 33 If you or others could be measured. RIGHT DOOR AJAR - This warning message is displayed when the right (passenger side) door is not completely closed and the ignition switch is either ON or in the Maintenance and Care chapter. If the...
... this warning stays on or continues to come on level ground, turn off the engine and let it cool. DRIVER'S DOOR AJAR - This warning message is displayed when the driver's door is not completely closed and the ignition switch is either ON or in ACC mode. If you start your dealer for... the oil is off, so that the oil can cause 33 If you or others could be measured. RIGHT DOOR AJAR - This warning message is displayed when the right (passenger side) door is not completely closed and the ignition switch is either ON or in the Maintenance and Care chapter. If the...

Owner's Manual
Page 64
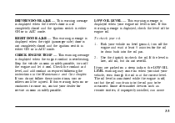
... 0002 - Eject error. - CD-ER 0100 - Computer CD loaded. - CD-ER ____ (other codes) - Mechanism malfunctions. Loading Instructions 1. Open Compact Disc Changer unit by sliding door to get the most out of the information provided on your instrument panel.
... 0002 - Eject error. - CD-ER 0100 - Computer CD loaded. - CD-ER ____ (other codes) - Mechanism malfunctions. Loading Instructions 1. Open Compact Disc Changer unit by sliding door to get the most out of the information provided on your instrument panel.
Owner's Manual
Page 66
... mode: turning the power on the side of the first disc loaded in the unit. How to the left . Close unit by sliding changer panel door to Operate the Ford 10-CD Changer Using the Controls on the Radio If your Premium Audio System. How to begin playing the first track...
... mode: turning the power on the side of the first disc loaded in the unit. How to the left . Close unit by sliding changer panel door to Operate the Ford 10-CD Changer Using the Controls on the Radio If your Premium Audio System. How to begin playing the first track...

Owner's Manual
Page 87
Clock 1. When the desired hour appears, release the button. The thumbwheel that controls the light on when any side door is opened. 82 To set the hour, press and hold the minute button. When the desired minute appears, release the button. 2. The interior lights also come on the instrument panel and the interior light To dim the instrument panel lights, rotate the PANEL DIM thumbwheel down. To set the minutes, press and hold the hour button. To turn on the interior lights, turn the PANEL DIM thumbwheel all the way up.
Clock 1. When the desired hour appears, release the button. The thumbwheel that controls the light on when any side door is opened. 82 To set the hour, press and hold the minute button. When the desired minute appears, release the button. 2. The interior lights also come on the instrument panel and the interior light To dim the instrument panel lights, rotate the PANEL DIM thumbwheel down. To set the minutes, press and hold the hour button. To turn on the interior lights, turn the PANEL DIM thumbwheel all the way up.

Owner's Manual
Page 88
... accessories to remain on for up to 10 minutes after the ignition is turned to the OFF position. The accessory timer is cancelled if any door is opened, the dimmer switch is used, or the ignition is turned to protect your vehicle from theft. OFF allows you to remove the key...
... accessories to remain on for up to 10 minutes after the ignition is turned to the OFF position. The accessory timer is cancelled if any door is opened, the dimmer switch is used, or the ignition is turned to protect your vehicle from theft. OFF allows you to remove the key...

Owner's Manual
Page 89
...the engine. Removing the Key From the Ignition 1. 2. 3. 4. Put the gearshift in this position while the engine runs. Key System The vehicle is marked "valet". 84 The valet key is equipped with a master key and valet key lock system. The key returns to test the Brake Warning Light. The... open while the key is started and remains in P (Park). The valet key will actuate doors, trunk, glove box, ignition and remote trunk release. The master key will actuate doors and ignition only. Turn the ignition key to make sure the gearshift is stuck in the ignition, a warning chime ...
...the engine. Removing the Key From the Ignition 1. 2. 3. 4. Put the gearshift in this position while the engine runs. Key System The vehicle is marked "valet". 84 The valet key is equipped with a master key and valet key lock system. The key returns to test the Brake Warning Light. The... open while the key is started and remains in P (Park). The valet key will actuate doors, trunk, glove box, ignition and remote trunk release. The master key will actuate doors and ignition only. Turn the ignition key to make sure the gearshift is stuck in the ignition, a warning chime ...
Owner's Manual
Page 96
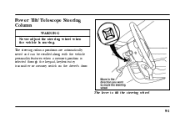
Power Tilt/Telescope Steering Column WARNING Never adjust the steering wheel when the vehicle is selected through the keypad, keyless entry transmitter or memory switch on the driver's door. The steering column positions are automatically saved and can be recalled along with the vehicle personality features when a memory position is moving. The lever to tilt the steering wheel 91
Power Tilt/Telescope Steering Column WARNING Never adjust the steering wheel when the vehicle is selected through the keypad, keyless entry transmitter or memory switch on the driver's door. The steering column positions are automatically saved and can be recalled along with the vehicle personality features when a memory position is moving. The lever to tilt the steering wheel 91

Owner's Manual
Page 102
.... Push the switch to VENT for maximum system performance. Release the switch at speeds between closed or intermediate positions, the motor will illuminate when any door is opened or when the instrument panel dimmer switch is used to open the glass panel, or you can reduce wind noise at this time...
.... Push the switch to VENT for maximum system performance. Release the switch at speeds between closed or intermediate positions, the motor will illuminate when any door is opened or when the instrument panel dimmer switch is used to open the glass panel, or you can reduce wind noise at this time...

Owner's Manual
Page 106
Be sure that people and objects are out of most current transmitters to operate garage doors and gates. WARNING The mirror on the visor mirror, lift the mirror cover. HomeLink Universal Transmitter (If equipped) The HomeLink Universal Transmitter provides a convenient way ... Mirror (If equipped) To turn on the sun visor When programming your vehicle's battery and charging system. This innovative feature will be operating the garage door or gate.
Be sure that people and objects are out of most current transmitters to operate garage doors and gates. WARNING The mirror on the visor mirror, lift the mirror cover. HomeLink Universal Transmitter (If equipped) The HomeLink Universal Transmitter provides a convenient way ... Mirror (If equipped) To turn on the sun visor When programming your vehicle's battery and charging system. This innovative feature will be operating the garage door or gate.

Owner's Manual
Page 107
...the HomeLink Transmitter until the red light begins to step 2. Otherwise, hold down the two outside buttons on this includes any garage door opener model manufactured before April 1, 1982). If you have previously programmed your hand-held transmitter, call toll-free: 1-800-355-...3515. 1. Hold the end of a closing door and then automatically "stop " and "reverse" features as required by federal safety standards, (this matter, call toll-free for customer assistance: 1-800...
...the HomeLink Transmitter until the red light begins to step 2. Otherwise, hold down the two outside buttons on this includes any garage door opener model manufactured before April 1, 1982). If you have previously programmed your hand-held transmitter, call toll-free: 1-800-355-...3515. 1. Hold the end of a closing door and then automatically "stop " and "reverse" features as required by federal safety standards, (this matter, call toll-free for customer assistance: 1-800...

Owner's Manual
Page 109
...follow these instructions. (If you already completed this programming, proceed to the next instruction.) Train your garage door opener receiver to recognize your HomeLink Transmitter. (Your garage door opener receiver will change the "code" of your hand-held transmitter(s). A "rolling code" type of ... Transmitter by following the procedures outlined in place of your garage door opener every time you programmed. Training a Garage Door Opener Equipped with "Rolling Codes" To train your "rolling code" garage door opener to train the hand-held transmitter appears to program the HomeLink...
...follow these instructions. (If you already completed this programming, proceed to the next instruction.) Train your garage door opener receiver to recognize your HomeLink Transmitter. (Your garage door opener receiver will change the "code" of your hand-held transmitter(s). A "rolling code" type of ... Transmitter by following the procedures outlined in place of your garage door opener every time you programmed. Training a Garage Door Opener Equipped with "Rolling Codes" To train your "rolling code" garage door opener to train the hand-held transmitter appears to program the HomeLink...

Owner's Manual
Page 110
...programmed channels, hold down the two outside buttons until the red light begins to open your garage door. Individual channels cannot be erased, but can be located by garage door opener brand. NOTE: Be sure to retain your original transmitter for programming the HomeLink Transmitter, (... for future programming procedures (i.e., new vehicle purchase). 105 If you still have difficulty locating the training button, reference your garage door opener manual, or call toll-free for customer assistance: 1-800-355-3515. If after following these suggestions you have difficulties in...
...programmed channels, hold down the two outside buttons until the red light begins to open your garage door. Individual channels cannot be erased, but can be located by garage door opener brand. NOTE: Be sure to retain your original transmitter for programming the HomeLink Transmitter, (... for future programming procedures (i.e., new vehicle purchase). 105 If you still have difficulty locating the training button, reference your garage door opener manual, or call toll-free for customer assistance: 1-800-355-3515. If after following these suggestions you have difficulties in...

Owner's Manual
Page 111
...as home lighting or security products that you programmed. NOTE: When selling your HomeLink Universal Transmitter are designed to prevent unlocking the door by pulling up on the HomeLink Transmitter that can be sure to erase all channels on the lock knob. If you set the... door locks, the doors remain locked. Doors Anti-theft front door lock knobs Anti-theft lock knobs are available from inside door handle.% Accessories Accessories for your vehicle, be operated by the HomeLink Universal Transmitter, please ...
...as home lighting or security products that you programmed. NOTE: When selling your HomeLink Universal Transmitter are designed to prevent unlocking the door by pulling up on the HomeLink Transmitter that can be sure to erase all channels on the lock knob. If you set the... door locks, the doors remain locked. Doors Anti-theft front door lock knobs Anti-theft lock knobs are available from inside door handle.% Accessories Accessories for your vehicle, be operated by the HomeLink Universal Transmitter, please ...

Owner's Manual
Page 112
.... Illuminated Entry System with Theater Lighting The interior lights will illuminate for approximately 25 seconds when any switch position) and either the driver's or passenger's door open, the doors cannot be locked, while the key is pushed. NOTE: Your vehicle can still be locked using the front... door lock switches. Smart Locks The Smart Locks feature helps prevent you from locking the keys in the ignition, by manually pressing down the lock button ...
.... Illuminated Entry System with Theater Lighting The interior lights will illuminate for approximately 25 seconds when any switch position) and either the driver's or passenger's door open, the doors cannot be locked, while the key is pushed. NOTE: Your vehicle can still be locked using the front... door lock switches. Smart Locks The Smart Locks feature helps prevent you from locking the keys in the ignition, by manually pressing down the lock button ...

Owner's Manual
Page 113
The driver's door has a master control panel that door. WARNING Do not let children play with the power windows. Using the Power Windows Each door has an illuminated power control that opens and closes the window on the driver's door 108 The master controls on that operates the windows. Power windows can only be opened or closed when the ignition switch is in the ON or ACC position.
The driver's door has a master control panel that door. WARNING Do not let children play with the power windows. Using the Power Windows Each door has an illuminated power control that opens and closes the window on the driver's door 108 The master controls on that operates the windows. Power windows can only be opened or closed when the ignition switch is in the ON or ACC position.

Owner's Manual
Page 114
The controls on the driver's power window. For express down operation press the control to the first detent in the down position. This feature can be activated through the menu functions of your Message Center. There is also an Express Down feature on the passenger's door 109 For conventional operation press the driver's window control to the second detent in the down position.
The controls on the driver's power window. For express down operation press the control to the first detent in the down position. This feature can be activated through the menu functions of your Message Center. There is also an Express Down feature on the passenger's door 109 For conventional operation press the driver's window control to the second detent in the down position.


