

User Guide
Page 1
... your vehicle, performing do-it-yourself maintenance, and maintenance information. 5 When trouble arises What to do if the vehicle needs to be towed, gets a flat tire, or is involved in this manual. 1
... your vehicle, performing do-it-yourself maintenance, and maintenance information. 5 When trouble arises What to do if the vehicle needs to be towed, gets a flat tire, or is involved in this manual. 1
User Guide
Page 3
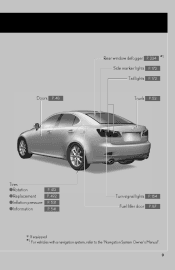
Rear window defogger P. 224 Side marker lights P. 172 Tail lights P. 172 *1 Doors P. 48 Trunk P. 52 Tires P. 412 ●Rotation P. 492 ●Replacement ●Inflation pressure P. 531 P. 541 ●Information Turn signal lights P. 154 Fuel filler door P. 87 ∗: If equipped *1: For vehicles with a navigation system, refer to the "Navigation System Owner's Manual". 9
Rear window defogger P. 224 Side marker lights P. 172 Tail lights P. 172 *1 Doors P. 48 Trunk P. 52 Tires P. 412 ●Rotation P. 492 ●Replacement ●Inflation pressure P. 531 P. 541 ●Information Turn signal lights P. 154 Fuel filler door P. 87 ∗: If equipped *1: For vehicles with a navigation system, refer to the "Navigation System Owner's Manual". 9
User Guide
Page 128
...km/h) may cause electric/electronic components to short circuit, damage the engine or cause other serious damage to determine whether the tires on your vehicle has high-speed capability tires. This is not a AWD vehicle designed for real off -road. Even if the legal speed limit permits it becomes ...passengers' arms, heads or other bodies of the speed limit. This may result in tire failure, loss of their bodies are high-speed capability tires or not before driving at such speeds. Be sure to consult a tire dealer to the vehicle. ● Do not drive in death or serious injury. &#...
...km/h) may cause electric/electronic components to short circuit, damage the engine or cause other serious damage to determine whether the tires on your vehicle has high-speed capability tires. This is not a AWD vehicle designed for real off -road. Even if the legal speed limit permits it becomes ...passengers' arms, heads or other bodies of the speed limit. This may result in tire failure, loss of their bodies are high-speed capability tires or not before driving at such speeds. Be sure to consult a tire dealer to the vehicle. ● Do not drive in death or serious injury. &#...

User Guide
Page 379
4-2. Vehicle exterior Items Door/trunk Engine hood Fluid leaks Check points • Operates smoothly? • The lock system works properly? • Is there any leakage after parking? • Inflation pressure is correct? • Tire surfaces not worn or damaged? • Tires rotated according to the maintenance schedule? • Wheel nuts are not loose? Maintenance Items Steering wheel Check points • Moves smoothly? • Has correct free play? • No strange noises? Tire 4 Maintenance and care CAUTION
4-2. Vehicle exterior Items Door/trunk Engine hood Fluid leaks Check points • Operates smoothly? • The lock system works properly? • Is there any leakage after parking? • Inflation pressure is correct? • Tire surfaces not worn or damaged? • Tires rotated according to the maintenance schedule? • Wheel nuts are not loose? Maintenance Items Steering wheel Check points • Moves smoothly? • Has correct free play? • No strange noises? Tire 4 Maintenance and care CAUTION
User Guide
Page 382
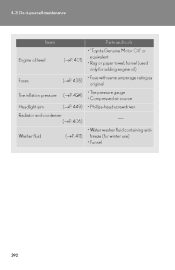
... paper towel, funnel (used only for adding engine oil) • Fuse with same amperage rating as original • Tire pressure gauge • Compressed air source • Phillips-head screwdriver Engine oil level Fuses Tire inflation pressure Headlight aim Radiator and condenser (→P. 435) (→P. 424) (→P. 449) (→P. 406) ⎯ • Water...
... paper towel, funnel (used only for adding engine oil) • Fuse with same amperage rating as original • Tire pressure gauge • Compressed air source • Phillips-head screwdriver Engine oil level Fuses Tire inflation pressure Headlight aim Radiator and condenser (→P. 435) (→P. 424) (→P. 449) (→P. 406) ⎯ • Water...

User Guide
Page 402
4-3. Do-it-yourself maintenance Tires Replace or rotate tires in accordance with maintenance schedules and treadwear.
4-3. Do-it-yourself maintenance Tires Replace or rotate tires in accordance with maintenance schedules and treadwear.

User Guide
Page 403
Do-it-yourself maintenance 2WD models with directional 17-inch tires or 18-inch tires Tires cannot be rotated. 4-3.
Do-it-yourself maintenance 2WD models with directional 17-inch tires or 18-inch tires Tires cannot be rotated. 4-3.

User Guide
Page 404
4-3. Do-it-yourself maintenance Installing tire pressure warning valves and transmitters When replacing tires or wheels, tire pressure warning valves and transmitters must be installed. Have tire pressure warning valve and transmitter ID codes registered by your Lexus dealer. (→P. 416) Initializing the tire pressure warning system When new tire pressure warning valves and transmitters are installed, new tire pressure warning valve and transmitter ID codes must be registered in the tire pressure warning computer and tire pressure warning system must also be initialized.
4-3. Do-it-yourself maintenance Installing tire pressure warning valves and transmitters When replacing tires or wheels, tire pressure warning valves and transmitters must be installed. Have tire pressure warning valve and transmitter ID codes registered by your Lexus dealer. (→P. 416) Initializing the tire pressure warning system When new tire pressure warning valves and transmitters are installed, new tire pressure warning valve and transmitter ID codes must be registered in the tire pressure warning computer and tire pressure warning system must also be initialized.

User Guide
Page 406
Do-it-yourself maintenance Registering and selecting ID codes To select tire pressure warning valve and transmitter ID codes, use the satellite switch. (→P. 339) 4-3.
Do-it-yourself maintenance Registering and selecting ID codes To select tire pressure warning valve and transmitter ID codes, use the satellite switch. (→P. 339) 4-3.

User Guide
Page 414
4-3. Do-it-yourself maintenance Tire inflation pressure
4-3. Do-it-yourself maintenance Tire inflation pressure

User Guide
Page 418
Otherwise, the tire may separate from the wheel or cause loss of handling control. 4-3. Do-it-yourself maintenance Wheels If a wheel is bent, cracked or heavily corroded, it should be replaced.
Otherwise, the tire may separate from the wheel or cause loss of handling control. 4-3. Do-it-yourself maintenance Wheels If a wheel is bent, cracked or heavily corroded, it should be replaced.

User Guide
Page 463
... the specified level. The light will turn off after blinking for 1 minute: Have the system checked by your Lexus dealer. Tire pressure warning light Adjust the tire inflation pressure to take in the tire presyour Lexus dealer. Warns the front passenger to fasten his/her seat belt. In case the light does not turn off...
... the specified level. The light will turn off after blinking for 1 minute: Have the system checked by your Lexus dealer. Tire pressure warning light Adjust the tire inflation pressure to take in the tire presyour Lexus dealer. Warns the front passenger to fasten his/her seat belt. In case the light does not turn off...

User Guide
Page 481
Steps to take in an emergency If you have a flat tire Remove the flat tire and replace it with the spare provided. 5-2.
Steps to take in an emergency If you have a flat tire Remove the flat tire and replace it with the spare provided. 5-2.

User Guide
Page 482
5-2. STEP 3 Loosen the center fastener that secures the spare tire. 5 When trouble arises 493 STEP 2 Secure the panel using the hook provided. Steps to take in an emergency Taking out the spare tire STEP 1 Lift up the hook of the panel on the trunk floor.
5-2. STEP 3 Loosen the center fastener that secures the spare tire. 5 When trouble arises 493 STEP 2 Secure the panel using the hook provided. Steps to take in an emergency Taking out the spare tire STEP 1 Lift up the hook of the panel on the trunk floor.

User Guide
Page 483
Steps to take in contact with the jack point. 494 STEP 3 Turn the tire jack portion "A" by hand until the notch of the front lefthand side tire STEP 2 Slightly loosen the wheel nuts (one turn). 5-2. Flat tire Left-hand side Front Righthand side Left-hand side Rear Righthand side Wheel chock positions Behind the rear righthand side tire Behind the rear lefthand side tire In front of the front righthand side tire In front of the jack is in an emergency Replacing a flat tire STEP 1 Chock the tires.
Steps to take in contact with the jack point. 494 STEP 3 Turn the tire jack portion "A" by hand until the notch of the front lefthand side tire STEP 2 Slightly loosen the wheel nuts (one turn). 5-2. Flat tire Left-hand side Front Righthand side Left-hand side Rear Righthand side Wheel chock positions Behind the rear righthand side tire Behind the rear lefthand side tire In front of the front righthand side tire In front of the jack is in an emergency Replacing a flat tire STEP 1 Chock the tires.

User Guide
Page 484
5-2. Steps to avoid scratching the wheel surface. When resting the tire on the wheel contact surface, the wheel nuts may come off the ground. Installing the spare tire STEP 1 Remove any dirt or foreign matter from the wheel contact surface. If foreign matter is on the ground, place the tire so that the wheel design faces up to take in motion, and the tire may loosen while the vehicle is in an emergency STEP 4 Raise the vehicle until the tire is slightly raised off the vehicle. 5 When trouble arises 495 STEP 5 Remove all the wheel nuts and the tire.
5-2. Steps to avoid scratching the wheel surface. When resting the tire on the wheel contact surface, the wheel nuts may come off the ground. Installing the spare tire STEP 1 Remove any dirt or foreign matter from the wheel contact surface. If foreign matter is on the ground, place the tire so that the wheel design faces up to take in motion, and the tire may loosen while the vehicle is in an emergency STEP 4 Raise the vehicle until the tire is slightly raised off the vehicle. 5 When trouble arises 495 STEP 5 Remove all the wheel nuts and the tire.

User Guide
Page 485
Tighten the wheel nuts until the tapered portion comes into loose contact with the disc wheel seat. Disc wheel seat STEP 3 Lower the vehicle. STEP 4 Firmly tighten each nut by hand to approximately the same amount. Tightening torque: 76 ft•lbf (103 N•m, 10.5 kgf•m) STEP 5 Stow the flat tire, tire jack and all tools. 5-2. Steps to take in an emergency STEP 2 Tapered portion Install the spare tire and loosely tighten each nut two or three times in the order shown in the illustration.
Tighten the wheel nuts until the tapered portion comes into loose contact with the disc wheel seat. Disc wheel seat STEP 3 Lower the vehicle. STEP 4 Firmly tighten each nut by hand to approximately the same amount. Tightening torque: 76 ft•lbf (103 N•m, 10.5 kgf•m) STEP 5 Stow the flat tire, tire jack and all tools. 5-2. Steps to take in an emergency STEP 2 Tapered portion Install the spare tire and loosely tighten each nut two or three times in the order shown in the illustration.

User Guide
Page 505
Turn off TRAC and VSC if these functions are hampering your attempts to help provide traction under the tires. STEP 1 STEP 2 STEP 3 STEP 4 STEP 5 Stop the engine. Shift the shift lever to the D or R position (vehicles with an automatic transmission) or 1 or R position (vehicles ... the parking brake and carefully apply the accelerator to take in an emergency If the vehicle becomes stuck Carry out the following procedures if the tires spin or the vehicle becomes stuck in mud, dirt, or snow. 5-2. Remove the mud, snow, or sand from around the stuck...
Turn off TRAC and VSC if these functions are hampering your attempts to help provide traction under the tires. STEP 1 STEP 2 STEP 3 STEP 4 STEP 5 Stop the engine. Shift the shift lever to the D or R position (vehicles with an automatic transmission) or 1 or R position (vehicles ... the parking brake and carefully apply the accelerator to take in an emergency If the vehicle becomes stuck Carry out the following procedures if the tires spin or the vehicle becomes stuck in mud, dirt, or snow. 5-2. Remove the mud, snow, or sand from around the stuck...
User Guide
Page 508
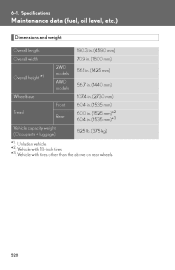
6-1. Specifications Maintenance data (fuel, oil level, etc.) Dimensions and weight Overall length Overall width 2WD models AWD models 180.3 in. (4580 mm) 70.9 in. (1800 mm) 56.1 in. (1425 mm) 56.7 in. (1440 mm) 107.4 in. (2730 mm) Front Tread Vehicle capacity weight (Occupants + luggage) Rear 60.4 in. (1535 mm) 60.0 in. (1525 mm)*2 60.4 in. (1535 mm)*3 825 lb. (375 kg) Overall height * 1 Wheelbase *1: Unladen vehicle *2: Vehicle with 18-inch tires *3: Vehicle with tires other than the above on rear wheels 520
6-1. Specifications Maintenance data (fuel, oil level, etc.) Dimensions and weight Overall length Overall width 2WD models AWD models 180.3 in. (4580 mm) 70.9 in. (1800 mm) 56.1 in. (1425 mm) 56.7 in. (1440 mm) 107.4 in. (2730 mm) Front Tread Vehicle capacity weight (Occupants + luggage) Rear 60.4 in. (1535 mm) 60.0 in. (1525 mm)*2 60.4 in. (1535 mm)*3 825 lb. (375 kg) Overall height * 1 Wheelbase *1: Unladen vehicle *2: Vehicle with 18-inch tires *3: Vehicle with tires other than the above on rear wheels 520

User Guide
Page 519
6-1. Specifications Steering Free play Less than 1.2 in. (30 mm) Tires and wheels
6-1. Specifications Steering Free play Less than 1.2 in. (30 mm) Tires and wheels


