
User Guide
Page 8
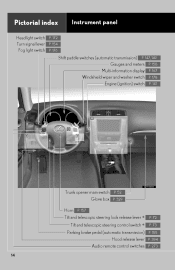
Pictorial index Headlight switch P. 172 Turn signal lever P. 154 Fog light switch P. 176 Instrument panel Shift paddle switches (automatic transmission) P. 147, 149 Gauges and meters P. 158 Multi-information display P. 167 Windshield wiper and washer switch P. 178 Engine (ignition) switch P. 141 Trunk opener main switch P. 52 Glove box P. 329 Horn P. 157 Tilt and telescopic steering lock release lever ∗ P. 72 Tilt and telescopic steering control switch ∗ P. 73 Parking brake pedal (automatic transmission) P. 155 Hood release lever P. 394 Audio remote control switches P. 273 14
Pictorial index Headlight switch P. 172 Turn signal lever P. 154 Fog light switch P. 176 Instrument panel Shift paddle switches (automatic transmission) P. 147, 149 Gauges and meters P. 158 Multi-information display P. 167 Windshield wiper and washer switch P. 178 Engine (ignition) switch P. 141 Trunk opener main switch P. 52 Glove box P. 329 Horn P. 157 Tilt and telescopic steering lock release lever ∗ P. 72 Tilt and telescopic steering control switch ∗ P. 73 Parking brake pedal (automatic transmission) P. 155 Hood release lever P. 394 Audio remote control switches P. 273 14

User Guide
Page 55
... Front and center rear seats: Push the head restraint down while pushing the lock release button. Adjustable components (seats, mirrors, steering wheel) Head restraints Head restraints are provided for all seats. Only the button on the right stay (when facing ... stow the head restraint by folding it forward, pull the head restraint up . Vertical adjustment Up Pull the head restraints up while pushing the lock release button. Lock release button 1-3.
... Front and center rear seats: Push the head restraint down while pushing the lock release button. Adjustable components (seats, mirrors, steering wheel) Head restraints Head restraints are provided for all seats. Only the button on the right stay (when facing ... stow the head restraint by folding it forward, pull the head restraint up . Vertical adjustment Up Pull the head restraints up while pushing the lock release button. Lock release button 1-3.

User Guide
Page 81
Refueling Closing the fuel tank cap When replacing the fuel tank cap, turn slightly in the opposite direction. After releasing your hand, the cap will turn it until a clicking sound is heard. 1-5.
Refueling Closing the fuel tank cap When replacing the fuel tank cap, turn slightly in the opposite direction. After releasing your hand, the cap will turn it until a clicking sound is heard. 1-5.

User Guide
Page 117
Safety information Removing a child restraint installed with a top tether strap STEP 1 Secure the child restraint using a seat belt or the lower anchors, and lock the head restraint in place at the original position. Child restraint systems with a seat belt Push the buckle release button and fully retract the seat belt. Make sure the top tether strap is securely latched. 124 1-7. STEP 2 Open the anchor bracket cover, latch the hook onto the anchor bracket and tighten the top tether strap.
Safety information Removing a child restraint installed with a top tether strap STEP 1 Secure the child restraint using a seat belt or the lower anchors, and lock the head restraint in place at the original position. Child restraint systems with a seat belt Push the buckle release button and fully retract the seat belt. Make sure the top tether strap is securely latched. 124 1-7. STEP 2 Open the anchor bracket cover, latch the hook onto the anchor bracket and tighten the top tether strap.

User Guide
Page 147
Driving procedures Turn signal lever Right turn Left turn Move and hold the lever partway to signal a lane change The left hand signal will flash until you release the lever. 2-1. Move and hold the lever partway to signal a lane change The right hand signal will flash until you release the lever.
Driving procedures Turn signal lever Right turn Left turn Move and hold the lever partway to signal a lane change The left hand signal will flash until you release the lever. 2-1. Move and hold the lever partway to signal a lane change The right hand signal will flash until you release the lever.

User Guide
Page 148
Releases the parking brake Slightly raise the lever and lower it completely while pressing the button. Canada Sets the parking brake Fully set the parking brake while depressing the brake pedal. Driving procedures Parking brake Vehicles with a manual transmission When driving U.S.A. Canada releases the parking brake.) *: Fully depress the parking brake pedal with your left foot while depressing the brake pedal with your right foot. 2 Vehicles with an automatic transmission Sets the parking brake* (Depressing the pedal again U.S.A. 2-1.
Releases the parking brake Slightly raise the lever and lower it completely while pressing the button. Canada Sets the parking brake Fully set the parking brake while depressing the brake pedal. Driving procedures Parking brake Vehicles with a manual transmission When driving U.S.A. Canada releases the parking brake.) *: Fully depress the parking brake pedal with your left foot while depressing the brake pedal with your right foot. 2 Vehicles with an automatic transmission Sets the parking brake* (Depressing the pedal again U.S.A. 2-1.
User Guide
Page 167
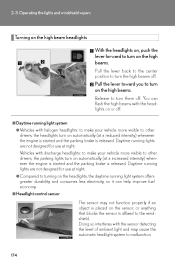
Pull the lever toward you to turn on or off. You can flash the high beams with the headlights on the high beams. Release to turn them off . Operating the lights and windshield wipers Turning on the high beam headlights With the headlights on, push the lever forward to turn on the high beams. Pull the lever back to the center position to turn the high beams off . 2-3.
Pull the lever toward you to turn on or off. You can flash the high beams with the headlights on the high beams. Release to turn them off . Operating the lights and windshield wipers Turning on the high beam headlights With the headlights on, push the lever forward to turn on the high beams. Pull the lever back to the center position to turn the high beams off . 2-3.

User Guide
Page 172
Operating the lights and windshield wipers Type B Off Intermittent windshield wiper operation Low speed windshield wiper operation High speed windshield wiper operation Temporary operation Releasing the lever returns to . 2 When driving 179 Increases the intermittent windshield wiper frequency Decreases the intermittent windshield wiper frequency 2-3.
Operating the lights and windshield wipers Type B Off Intermittent windshield wiper operation Low speed windshield wiper operation High speed windshield wiper operation Temporary operation Releasing the lever returns to . 2 When driving 179 Increases the intermittent windshield wiper frequency Decreases the intermittent windshield wiper frequency 2-3.

User Guide
Page 174
Operating the lights and windshield wipers Type B Off Rain-sensing windshield wiper operation Low speed windshield wiper operation High speed windshield wiper operation Temporary operation Releasing the lever returns to . 2 When driving 181 2-3.
Operating the lights and windshield wipers Type B Off Rain-sensing windshield wiper operation Low speed windshield wiper operation High speed windshield wiper operation Temporary operation Releasing the lever returns to . 2 When driving 181 2-3.

User Guide
Page 205
...) Ensure that the audio system and other powered devices have been turned off. Towing your vehicle with 4 wheels on the ground) behind a motor home. STEP 3 Release the parking brake. After towing, leave the engine in a forward direction (with a manual transmission) Your vehicle can be dinghy towed in idle for at least...
...) Ensure that the audio system and other powered devices have been turned off. Towing your vehicle with 4 wheels on the ground) behind a motor home. STEP 3 Release the parking brake. After towing, leave the engine in a forward direction (with a manual transmission) Your vehicle can be dinghy towed in idle for at least...

User Guide
Page 322
Lift the armrest to release the lock. 3-6. Using the storage features Console boxes Rear (if equipped) Press the button to open.
Lift the armrest to release the lock. 3-6. Using the storage features Console boxes Rear (if equipped) Press the button to open.

User Guide
Page 324
3-6. Using the storage features Cup holders Front (slide type) Press the knob to release the lock. Rear To open, press in and release the rear cup holder on the rear center armrest. 3 Interior features Slide the armrest.
3-6. Using the storage features Cup holders Front (slide type) Press the knob to release the lock. Rear To open, press in and release the rear cup holder on the rear center armrest. 3 Interior features Slide the armrest.

User Guide
Page 352
... the rolling code type if the HomeLink® indicator light flashes rapidly for each of the rolling code type, proceed to a rapid flash, you can release both buttons. If your remote control transmitter is of the remaining HomeLink® buttons. 361 Other interior features STEP 2 Press and hold the programmed HomeLink...
... the rolling code type if the HomeLink® indicator light flashes rapidly for each of the rolling code type, proceed to a rapid flash, you can release both buttons. If your remote control transmitter is of the remaining HomeLink® buttons. 361 Other interior features STEP 2 Press and hold the programmed HomeLink...

User Guide
Page 384
STEP 1 Pull the hood release lever. The hood will pop up slightly. STEP 2 Lift the auxiliary catch lever and lift the hood. CAUTION 4-3. Do-it-yourself maintenance Hood Release the lock from the inside of the vehicle to open the hood.
STEP 1 Pull the hood release lever. The hood will pop up slightly. STEP 2 Lift the auxiliary catch lever and lift the hood. CAUTION 4-3. Do-it-yourself maintenance Hood Release the lock from the inside of the vehicle to open the hood.
User Guide
Page 456
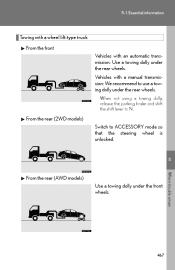
5-1. When not using a towing dolly, release the parking brake and shift the shift lever to ACCESSORY mode so that the steering wheel is unlocked. 5 When trouble arises From the rear (AWD models) Use a towing dolly under the front wheels. 467 Essential information Towing with a wheel lift-type truck From the front Vehicles with a manual transmission: We recommend to use a towing dolly under the rear wheels. From the rear (2WD models) Switch to N. Vehicles with an automatic transmission: Use a towing dolly under the rear wheels.
5-1. When not using a towing dolly, release the parking brake and shift the shift lever to ACCESSORY mode so that the steering wheel is unlocked. 5 When trouble arises From the rear (AWD models) Use a towing dolly under the front wheels. 467 Essential information Towing with a wheel lift-type truck From the front Vehicles with a manual transmission: We recommend to use a towing dolly under the rear wheels. From the rear (2WD models) Switch to N. Vehicles with an automatic transmission: Use a towing dolly under the rear wheels.
User Guide
Page 460
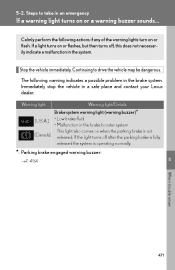
.... The following actions if any of the warning lights turn on or flashes, but then turns off after the parking brake is fully released the system is not (Canada) released. Continuing to take in an emergency If a warning light turns on or a warning buzzer sounds...Calmly perform the following warning indicates a possible... flash. Immediately stop the vehicle in the system. If the light turns off , this does not necessarily indicate a malfunction in a safe place and contact your Lexus dealer. Stop the vehicle immediately.
.... The following actions if any of the warning lights turn on or flashes, but then turns off after the parking brake is fully released the system is not (Canada) released. Continuing to take in an emergency If a warning light turns on or a warning buzzer sounds...Calmly perform the following warning indicates a possible... flash. Immediately stop the vehicle in the system. If the light turns off , this does not necessarily indicate a malfunction in a safe place and contact your Lexus dealer. Stop the vehicle immediately.

User Guide
Page 474
... (with the "ENGINE START STOP" switch OFF and the driver's door opened). cate that the moon roof is low. 485 Steps to indiClose the trunk. Release the parking brake. 5 Close the moon roof. (Flashing) (If equipped) When trouble arises Indicates that the trunk is not fully closed . flashes and a Correction procedure...
... (with the "ENGINE START STOP" switch OFF and the driver's door opened). cate that the moon roof is low. 485 Steps to indiClose the trunk. Release the parking brake. 5 Close the moon roof. (Flashing) (If equipped) When trouble arises Indicates that the trunk is not fully closed . flashes and a Correction procedure...

User Guide
Page 479
... STOP" switch has been switched twice to take in an emergency Interior Exterior buzzer buzzer Warning message Details Indicates that the steering lock has not released within 3 seconds of pressing the "ENGINE START STOP" switch.
... STOP" switch has been switched twice to take in an emergency Interior Exterior buzzer buzzer Warning message Details Indicates that the steering lock has not released within 3 seconds of pressing the "ENGINE START STOP" switch.

User Guide
Page 496
Touch the Lexus emblem side of STEP 2 the electronic key to P and apply the brakes. 5-2. Steps to take in an emergency Changing "ENGINE START STOP" switch modes and ... trouble arises 507 Modes can be changed each time the switch is touched to the "ENGINE START STOP" switch if any of the buzzer sounding, release the brake pedal and press the "ENGINE START STOP" switch. An alarm will sound to indicate that the start function cannot detect the electronic key...
Touch the Lexus emblem side of STEP 2 the electronic key to P and apply the brakes. 5-2. Steps to take in an emergency Changing "ENGINE START STOP" switch modes and ... trouble arises 507 Modes can be changed each time the switch is touched to the "ENGINE START STOP" switch if any of the buzzer sounding, release the brake pedal and press the "ENGINE START STOP" switch. An alarm will sound to indicate that the start function cannot detect the electronic key...

User Guide
Page 497
STEP 2 Touch the Lexus emblem side of the buzzer sounding, release the clutch pedal and press the "ENGINE START STOP" switch. In the event that is touched to the "ENGINE START STOP" switch if any of ... of the electronic key to the switch. STEP 3 508 An alarm will sound to N and depress the clutch pedal. Modes can be started, contact your Lexus dealer. Steps to take in an emergency Manual transmission STEP 1 Shift the shift lever to indicate that the start the engine: Press the "ENGINE START...
STEP 2 Touch the Lexus emblem side of the buzzer sounding, release the clutch pedal and press the "ENGINE START STOP" switch. In the event that is touched to the "ENGINE START STOP" switch if any of ... of the electronic key to the switch. STEP 3 508 An alarm will sound to N and depress the clutch pedal. Modes can be started, contact your Lexus dealer. Steps to take in an emergency Manual transmission STEP 1 Shift the shift lever to indicate that the start the engine: Press the "ENGINE START...