

Owners Manual
Page 81
...Sports and Stocks is available for purchase. The following navigation-based Lexus Enform features are enrolled, you have signed the Telematics Subscription Service Agreement and are available without a subscription: l Lexus Insider Lexus Insider is an optional service that can begin receiving services. Patent No. 7,508,298...available with an active XM® satellite radio subscription. *3: Available via the navigation system. Potential Lexus Insider subjects might include, for further subscription details. XM NavTraffic® and XM NavWeather™ require separate XM® ...
...Sports and Stocks is available for purchase. The following navigation-based Lexus Enform features are enrolled, you have signed the Telematics Subscription Service Agreement and are available without a subscription: l Lexus Insider Lexus Insider is an optional service that can begin receiving services. Patent No. 7,508,298...available with an active XM® satellite radio subscription. *3: Available via the navigation system. Potential Lexus Insider subjects might include, for further subscription details. XM NavTraffic® and XM NavWeather™ require separate XM® ...

Owners Manual
Page 126
... As the installation of a mobile two-way radio system in this manual applies to all models and explains all equipment, including options. For your information Main Owner's Manual Please note that Toyota does not warrant these products and is the sound of continual product...coming from your vehicle in the illustration may even violate governmental regulations. Depending on , your Lexus A wide variety of printing. You should not be modified with non-genuine Lexus products could affect electronic systems such as the multiport fuel injection system/sequential multiport fuel injection ...
... As the installation of a mobile two-way radio system in this manual applies to all models and explains all equipment, including options. For your information Main Owner's Manual Please note that Toyota does not warrant these products and is the sound of continual product...coming from your vehicle in the illustration may even violate governmental regulations. Depending on , your Lexus A wide variety of printing. You should not be modified with non-genuine Lexus products could affect electronic systems such as the multiport fuel injection system/sequential multiport fuel injection ...

Owners Manual
Page 319
... increases/ decreases in the D position and any of the ranges 1 through 3 is 2 selected using the "-" paddle shift switch. l When the shift lever is detected. Distance options Long Medium Short n Radar sensor and grille cover Vehicle-to-vehicle distance Approximately 160 ft. (50 m) Approximately 130 ft. (40 m) Approximately 100 ft. (30 m) Always...
... increases/ decreases in the D position and any of the ranges 1 through 3 is 2 selected using the "-" paddle shift switch. l When the shift lever is detected. Distance options Long Medium Short n Radar sensor and grille cover Vehicle-to-vehicle distance Approximately 160 ft. (50 m) Approximately 130 ft. (40 m) Approximately 100 ft. (30 m) Always...

Owners Manual
Page 489
Type A (DVD player with changer, and AM/FM radio Press "AUDIO" to the "Navigation System Owner's Manual". Owners of models equipped with a navigation system should refer to display the audio control screen. Using the audio system Audio system type (touch screen without navigation system) CD and (optional) DVD player with changer, and AM/FM radio) 396 3-3.
Type A (DVD player with changer, and AM/FM radio Press "AUDIO" to the "Navigation System Owner's Manual". Owners of models equipped with a navigation system should refer to display the audio control screen. Using the audio system Audio system type (touch screen without navigation system) CD and (optional) DVD player with changer, and AM/FM radio) 396 3-3.

Owners Manual
Page 514
...". n Selecting a menu number (DVD audio mode) STEP 1 Touch "Select Number" on the "Settings" screen. n Playing a bonus group (DVD audio mode, if the DVD has bonus options) STEP 1 Touch "Search" on the "Settings" screen. Using the audio system Searching a desired screen n Searching by group (DVD audio mode) STEP 1 Touch "Search" on the...
...". n Selecting a menu number (DVD audio mode) STEP 1 Touch "Select Number" on the "Settings" screen. n Playing a bonus group (DVD audio mode, if the DVD has bonus options) STEP 1 Touch "Search" on the "Settings" screen. Using the audio system Searching a desired screen n Searching by group (DVD audio mode) STEP 1 Touch "Search" on the...

Owners Manual
Page 515
Each time you touch "Change", the next available audio format is selected. Each time you touch "Change", the next available language is selected. Changing the audio format (DVD audio mode) STEP 1 STEP 2 Touch "Audio" on the "Settings" screen. Using the audio system Changing the audio language (DVD video mode) STEP 1 STEP 2 Touch "Audio" on the "Settings" screen. Changing the angle (If the angle option is selected. 422 3-3. Each time you touch "Change", the next available angle is available) STEP 1 STEP 2 Touch "Angle" on the "Settings" screen.
Each time you touch "Change", the next available audio format is selected. Each time you touch "Change", the next available language is selected. Changing the audio format (DVD audio mode) STEP 1 STEP 2 Touch "Audio" on the "Settings" screen. Using the audio system Changing the audio language (DVD video mode) STEP 1 STEP 2 Touch "Audio" on the "Settings" screen. Changing the angle (If the angle option is selected. 422 3-3. Each time you touch "Change", the next available angle is available) STEP 1 STEP 2 Touch "Angle" on the "Settings" screen.

Owners Manual
Page 518
...". 3-3. If you cannot find the desired language, touch "Other" and input the desired language code. (→P. 426) n Setting angle mark If the DVD has angle options, you set to reset the personal code. Touch "Auto Start" on or off. STEP 2 Select the desired language.
...". 3-3. If you cannot find the desired language, touch "Other" and input the desired language code. (→P. 426) n Setting angle mark If the DVD has angle options, you set to reset the personal code. Touch "Auto Start" on or off. STEP 2 Select the desired language.

Owners Manual
Page 530
... more chapters. 437 Level 1: DVD video discs for children and G-rated movies can play linear PCM, Dolby Digital and MPEG audio format DVDs. l Multi-angle option You can be played at all, or violent scenes are divided into parts by title and chapter. Title: The largest unit of the video and... video discs are skipped or replaced with the level of restrictions of DVD video discs can enjoy the same scene from different angles. l Multi-language option You can be played. 3-3.
... more chapters. 437 Level 1: DVD video discs for children and G-rated movies can play linear PCM, Dolby Digital and MPEG audio format DVDs. l Multi-angle option You can be played at all, or violent scenes are divided into parts by title and chapter. Title: The largest unit of the video and... video discs are skipped or replaced with the level of restrictions of DVD video discs can enjoy the same scene from different angles. l Multi-language option You can be played. 3-3.

Owners Manual
Page 590
... 497 Video is played slowly Searching a desired screen n Searching by pressing and holding "ENT". n Playing a bonus group (DVD audio mode, if the DVD has bonus options) STEP 1 Select "Search" on the settings screen. Video is being pressed. . n Searching by chapter/track Press or to select the desired chapter/track. STEP 2 Input...
... 497 Video is played slowly Searching a desired screen n Searching by pressing and holding "ENT". n Playing a bonus group (DVD audio mode, if the DVD has bonus options) STEP 1 Select "Search" on the settings screen. Video is being pressed. . n Searching by chapter/track Press or to select the desired chapter/track. STEP 2 Input...

Owners Manual
Page 592
Each time you press "ENT", the next available angle is selected. Changing the angle (If the angle option is selected. Select "Angle". Each time you press "ENT", the next available audio format is available) STEP 1 STEP 2 3 Select "Angle" on the settings screen. Select "Audio". Page" or "Next Page" on the control icon screen. Using the rear seat entertainment system Changing the audio format (DVD audio mode) STEP 1 STEP 2 Select "Audio" on the settings screen to change the page. 499 Interior features Changing the page (DVD audio mode) Select "Prev. 3-4.
Each time you press "ENT", the next available angle is selected. Changing the angle (If the angle option is selected. Select "Angle". Each time you press "ENT", the next available audio format is available) STEP 1 STEP 2 3 Select "Angle" on the settings screen. Select "Audio". Page" or "Next Page" on the control icon screen. Using the rear seat entertainment system Changing the audio format (DVD audio mode) STEP 1 STEP 2 Select "Audio" on the settings screen to change the page. 499 Interior features Changing the page (DVD audio mode) Select "Prev. 3-4.

Owners Manual
Page 594
.... If you cannot find the desired language, select "Other" and input the desired language code. (→P. 501) n Setting angle mark If the DVD has angle options, you can be adjusted. STEP 2 Select the desired language. Select "Sound Dynamic Range" on or off. n Setting parental lock (DVD video mode) STEP 1 Select "Parental...
.... If you cannot find the desired language, select "Other" and input the desired language code. (→P. 501) n Setting angle mark If the DVD has angle options, you can be adjusted. STEP 2 Select the desired language. Select "Sound Dynamic Range" on or off. n Setting parental lock (DVD video mode) STEP 1 Select "Parental...

Owners Manual
Page 629
... a Bluetooth®phone You can see the information of the Bluetooth® phone on the "Phone Settings" screen. The Bluetooth® mark is complete. Touch "Options" on the "Phone Settings" screen. 3-5. STEP 1 STEP 2 STEP 3 Display the "Phone Settings" screen. (→P. 533) Touch "Manage Phone" on the "Connect Phone" screen...
... a Bluetooth®phone You can see the information of the Bluetooth® phone on the "Phone Settings" screen. The Bluetooth® mark is complete. Touch "Options" on the "Phone Settings" screen. 3-5. STEP 1 STEP 2 STEP 3 Display the "Phone Settings" screen. (→P. 533) Touch "Manage Phone" on the "Connect Phone" screen...

Owners Manual
Page 631
STEP 4 Touch "Remove Phones" on the "Connect Phone" screen. STEP 3 Touch "Options" on the "Phones" screen. Using the hands-free system (for "Registering a Bluetooth® phone" from "STEP4". (→P. 535) 538 STEP 4 Touch "New Phone" on the "...". A confirmation message will be displayed. Select the desired phone. If everything is correct, touch "Yes". STEP 5 Touch "(empty)" on the "Connect Phone" screen. 3-5. STEP 3 Touch "Options" on the "Phone Position" screen.
STEP 4 Touch "Remove Phones" on the "Connect Phone" screen. STEP 3 Touch "Options" on the "Phones" screen. Using the hands-free system (for "Registering a Bluetooth® phone" from "STEP4". (→P. 535) 538 STEP 4 Touch "New Phone" on the "...". A confirmation message will be displayed. Select the desired phone. If everything is correct, touch "Yes". STEP 5 Touch "(empty)" on the "Connect Phone" screen. 3-5. STEP 3 Touch "Options" on the "Phone Position" screen.

Owners Manual
Page 638
... in a different way (To display the "Contacts" screen) STEP 1 Display the "Phone" screen. (→P. 519) STEP 2 Touch "Contacts" on the "Contacts" screen. 545 STEP 3 Touch "Options" on the "Contacts" screen. 3-5. Choose the data to delete. If everything is connecting, you cannot read the registered data. A confirmation message will be displayed. When...
... in a different way (To display the "Contacts" screen) STEP 1 Display the "Phone" screen. (→P. 519) STEP 2 Touch "Contacts" on the "Contacts" screen. 545 STEP 3 Touch "Options" on the "Contacts" screen. 3-5. Choose the data to delete. If everything is connecting, you cannot read the registered data. A confirmation message will be displayed. When...

Owners Manual
Page 639
... not be displayed. n Transferring the phone number while Bluetooth® audio is running. It will be reconnected depending on the "Contact Data" screen. STEP 4 Touch "Options" on the "Phone" screen. 3-5. l If your phone. You can transfer the phonebook data without operating your cellular phone does not support OPP service, you want...
... not be displayed. n Transferring the phone number while Bluetooth® audio is running. It will be reconnected depending on the "Contact Data" screen. STEP 4 Touch "Options" on the "Phone" screen. 3-5. l If your phone. You can transfer the phonebook data without operating your cellular phone does not support OPP service, you want...

Owners Manual
Page 640
.... If everything is correct, touch 3 Interior features "Yes". 547 STEP 3 Choose the desired data from the list. STEP 6 A confirmation message will be displayed. STEP 4 Touch "Options" on the "Contact Data" screen. STEP 5 Touch "Delete Contact" on the "Contact Data" screen. STEP 4 Touch "Add Contact" or "Update Contact". STEP 3 Choose the desired...
.... If everything is correct, touch 3 Interior features "Yes". 547 STEP 3 Choose the desired data from the list. STEP 6 A confirmation message will be displayed. STEP 4 Touch "Options" on the "Contact Data" screen. STEP 5 Touch "Delete Contact" on the "Contact Data" screen. STEP 4 Touch "Add Contact" or "Update Contact". STEP 3 Choose the desired...

Owners Manual
Page 645
STEP 6 Touch the desired phone number. STEP 3 Touch "Options" on the "Speed Dial" screen. STEP 4 Touch "Yes" to set new speed dial. STEP 7 Follow the steps "Registering the speed dial" from the list. STEP 7 ... way (To display the "Speed Dial" screen) STEP 1 Display the "Phone" screen. (→P. 519) STEP 2 Touch "Speed Dials" on the "Contact Data" screen. STEP 4 Touch "Options" on the "Phone" screen. STEP 6 Touch the desired phone number. 3-5. STEP 3 Choose the desired data from "STEP6". (→P. 548) n Registering the speed dial in a different...
STEP 6 Touch the desired phone number. STEP 3 Touch "Options" on the "Speed Dial" screen. STEP 4 Touch "Yes" to set new speed dial. STEP 7 Follow the steps "Registering the speed dial" from the list. STEP 7 ... way (To display the "Speed Dial" screen) STEP 1 Display the "Phone" screen. (→P. 519) STEP 2 Touch "Speed Dials" on the "Contact Data" screen. STEP 4 Touch "Options" on the "Phone" screen. STEP 6 Touch the desired phone number. 3-5. STEP 3 Choose the desired data from "STEP6". (→P. 548) n Registering the speed dial in a different...

Owners Manual
Page 649
...". n Setting the voice tag in a different way STEP 1 Display the "Phone" screen. (→P. 519) STEP 2 Touch "Contacts" on the "Phone" screen. STEP 3 Touch "Options" on the "Contacts" screen. STEP 4 Touch "Manage Voice Tags" on the "Contacts" screen. n When recording a voice tag Do so in a quiet environment. STEP 5 Touch "... them at the same time. Using the hands-free system (for cellular phone) STEP 4 Choose the data to delete. STEP 4 Touch "Options" on the "Contact Data" screen. 3-5. STEP 6 Follow the steps "Registering the voice tag" from "STEP5". (→P. 554) 556
...". n Setting the voice tag in a different way STEP 1 Display the "Phone" screen. (→P. 519) STEP 2 Touch "Contacts" on the "Phone" screen. STEP 3 Touch "Options" on the "Contacts" screen. STEP 4 Touch "Manage Voice Tags" on the "Contacts" screen. n When recording a voice tag Do so in a quiet environment. STEP 5 Touch "... them at the same time. Using the hands-free system (for cellular phone) STEP 4 Choose the data to delete. STEP 4 Touch "Options" on the "Contact Data" screen. 3-5. STEP 6 Follow the steps "Registering the voice tag" from "STEP5". (→P. 554) 556

Owners Manual
Page 858
Typical DOT and tire identification number (TIN) DOT symbol* Tire Identification Number (TIN) Tire manufacturer's identification mark Tire size code Manufacturer's optional tire type code (3 or 4 letters) Manufacturing week Manufacturing year *: The DOT symbol certifies that the tire conforms to applicable Federal Motor Vehicle Safety Standards. 768 A tire not marked "M+S" is a summer tire. 6-1. Specifications Summer tire or all season tire (→P. 668) An all season tire has "M+S" on the sidewall.
Typical DOT and tire identification number (TIN) DOT symbol* Tire Identification Number (TIN) Tire manufacturer's identification mark Tire size code Manufacturer's optional tire type code (3 or 4 letters) Manufacturing week Manufacturing year *: The DOT symbol certifies that the tire conforms to applicable Federal Motor Vehicle Safety Standards. 768 A tire not marked "M+S" is a summer tire. 6-1. Specifications Summer tire or all season tire (→P. 668) An all season tire has "M+S" on the sidewall.
Owners Manual
Page 862
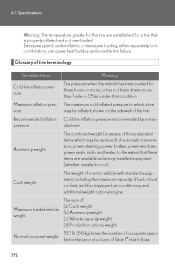
... equipment, including the maximum capacity of fuel, oil and coolant, and if so equipped, air conditioning and additional weight optional engine The sum of: (a) Curb weight (b) Accessory weight (c) Vehicle capacity weight (d) Production options weight 150 lb. (68 kg) times the number of Table 1* that is properly inflated and not overloaded. Specifications Warning...
... equipment, including the maximum capacity of fuel, oil and coolant, and if so equipped, air conditioning and additional weight optional engine The sum of: (a) Curb weight (b) Accessory weight (c) Vehicle capacity weight (d) Production options weight 150 lb. (68 kg) times the number of Table 1* that is properly inflated and not overloaded. Specifications Warning...