User Guide
Page 49
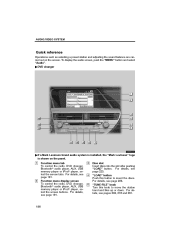
... will be displayed. Before Driving When Driving n Basic operation 1 Sound quality modes 2 Audio sources AMFM: AM radio/FM radio SAT: Satellite radio* DISC: DVD player (if equipped) CD: CD player (if equipped) AUX•USB: Auxiliary audio device/USB memory player/iPod® player 3 Power/Volume Rain and Night...
... will be displayed. Before Driving When Driving n Basic operation 1 Sound quality modes 2 Audio sources AMFM: AM radio/FM radio SAT: Satellite radio* DISC: DVD player (if equipped) CD: CD player (if equipped) AUX•USB: Auxiliary audio device/USB memory player/iPod® player 3 Power/Volume Rain and Night...
User Guide
Page 50
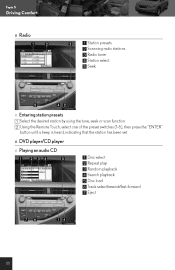
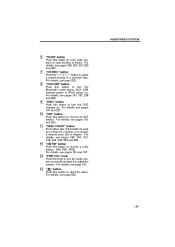
Topic 5 Driving Comfort n Radio 1 2 3 4 5 Station presets Scanning radio stations Radio tuner Station select Seek n Entering station presets Select the desired station by using the tune, seek or scan function. n DVD player/CD player n Playing an audio CD 1 2 3 4 5 6 7 Disc select Repeat play Random playback Search playback Disc load Track select/rewind/fast-forward Eject 55 Using the Remote Touch, select one of the preset switches (1-6), then press the "ENTER" button until a beep is heard, indicating that the station has been set.
Topic 5 Driving Comfort n Radio 1 2 3 4 5 Station presets Scanning radio stations Radio tuner Station select Seek n Entering station presets Select the desired station by using the tune, seek or scan function. n DVD player/CD player n Playing an audio CD 1 2 3 4 5 6 7 Disc select Repeat play Random playback Search playback Disc load Track select/rewind/fast-forward Eject 55 Using the Remote Touch, select one of the preset switches (1-6), then press the "ENTER" button until a beep is heard, indicating that the station has been set.
User Guide
Page 51
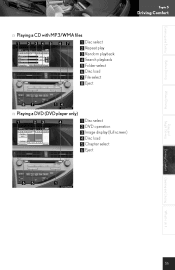
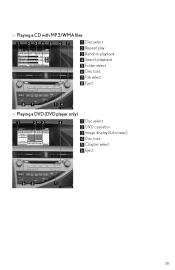
Topic 5 Driving Comfort Entering and Exiting n Playing a CD with MP3/WMA files 1 2 3 4 5 6 7 8 Disc select Repeat play Random playback Search playback Folder select Disc load File select Eject Before Driving When Driving n Playing a DVD (DVD player only) 1 2 3 4 5 6 Disc select DVD operation Image display (full screen) Disc load Chapter select Eject Rain and Night Driving Driving Comfort Opening and Closing What to do if ...56
Topic 5 Driving Comfort Entering and Exiting n Playing a CD with MP3/WMA files 1 2 3 4 5 6 7 8 Disc select Repeat play Random playback Search playback Folder select Disc load File select Eject Before Driving When Driving n Playing a DVD (DVD player only) 1 2 3 4 5 6 Disc select DVD operation Image display (full screen) Disc load Chapter select Eject Rain and Night Driving Driving Comfort Opening and Closing What to do if ...56

User Guide
Page 52
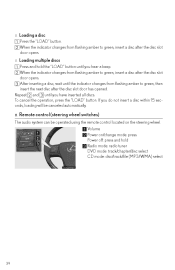
... after the disc slot door opens. Topic 5 Driving Comfort n Loading a disc Press the "LOAD" button. n Loading multiple discs Press and hold 3 Radio mode: radio tuner DVD mode: track/chapter/disc select CD mode: disc/track/file (MP3/WMA) select 57 To cancel the operation, press the "LOAD" button.
... after the disc slot door opens. Topic 5 Driving Comfort n Loading a disc Press the "LOAD" button. n Loading multiple discs Press and hold 3 Radio mode: radio tuner DVD mode: track/chapter/disc select CD mode: disc/track/file (MP3/WMA) select 57 To cancel the operation, press the "LOAD" button.
User Guide
Page 68
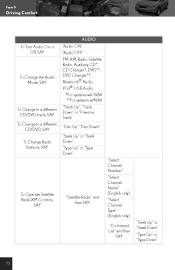
...**, Bluetooth® Audio, iPod®, USB Audio *For systems w/o NAV **For systems w/NAV To Change to a different CD/DVD track, SAY: To Change to a different CD/DVD, SAY: To Change Radio Stations, SAY: "Track Up", "Track Down" or "Previous Track" "Disc Up" "Disc Down" "Seek Up" or "Seek Down" "Type Up" or...
...**, Bluetooth® Audio, iPod®, USB Audio *For systems w/o NAV **For systems w/NAV To Change to a different CD/DVD track, SAY: To Change to a different CD/DVD, SAY: To Change Radio Stations, SAY: "Track Up", "Track Down" or "Previous Track" "Disc Up" "Disc Down" "Seek Up" or "Seek Down" "Type Up" or...
User Guide
Page 74
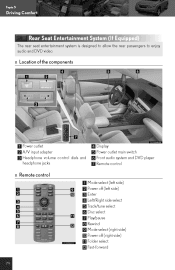
n Location of the components 1 Power outlet 2 A/V input adapter 3 Headphone volume control dials and headphone jacks 4 5 6 7 Display Power outlet main switch Front audio system and DVD player Remote control n Remote control 1 Mode select (left side) 2 Power off (left side) 3 Enter 4 Left/Right side select 5 Track/tune select 6 Disc select 7 Play/pause 8 ... Topic 5 Driving Comfort Rear Seat Entertainment System (If Equipped) The rear seat entertainment system is designed to allow the rear passengers to enjoy audio and DVD video.
n Location of the components 1 Power outlet 2 A/V input adapter 3 Headphone volume control dials and headphone jacks 4 5 6 7 Display Power outlet main switch Front audio system and DVD player Remote control n Remote control 1 Mode select (left side) 2 Power off (left side) 3 Enter 4 Left/Right side select 5 Track/tune select 6 Disc select 7 Play/pause 8 ... Topic 5 Driving Comfort Rear Seat Entertainment System (If Equipped) The rear seat entertainment system is designed to allow the rear passengers to enjoy audio and DVD video.
User Guide 2
Page 1
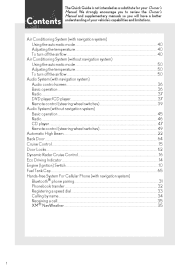
......50 Adjusting the temperature...50 To turn off the airflow...50 Audio System (with navigation system) Audio control screen...36 Basic operation ...36 Radio...37 DVD player/CD player...37 Remote control (steering wheel switches)...39 Audio System (without navigation system) Basic operation ...45 Radio...46 CD player...47 Remote control...
......50 Adjusting the temperature...50 To turn off the airflow...50 Audio System (with navigation system) Audio control screen...36 Basic operation ...36 Radio...37 DVD player/CD player...37 Remote control (steering wheel switches)...39 Audio System (without navigation system) Basic operation ...45 Radio...46 CD player...47 Remote control...
User Guide 2
Page 32
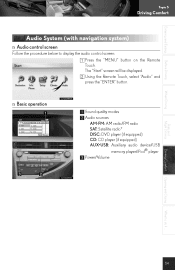
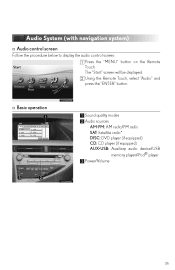
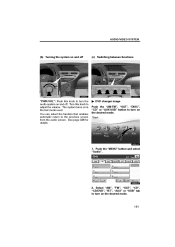
Using the Remote Touch, select "Audio" and press the "ENTER" button. The "Start" screen will be displayed. n Basic operation 1 Sound quality modes 2 Audio sources AM⋅FM: AM radio/FM radio SAT: Satellite radio* DISC: DVD player (if equipped) CD: CD player (if equipped) AUX•USB: Auxiliary audio device/USB memory player/iPod® player 3 Power/Volume 36 Press the "MENU" button on the Remote Touch. Audio System (with navigation system) n Audio control screen Follow the procedure below to display the audio control screen.
Using the Remote Touch, select "Audio" and press the "ENTER" button. The "Start" screen will be displayed. n Basic operation 1 Sound quality modes 2 Audio sources AM⋅FM: AM radio/FM radio SAT: Satellite radio* DISC: DVD player (if equipped) CD: CD player (if equipped) AUX•USB: Auxiliary audio device/USB memory player/iPod® player 3 Power/Volume 36 Press the "MENU" button on the Remote Touch. Audio System (with navigation system) n Audio control screen Follow the procedure below to display the audio control screen.

User Guide 2
Page 33
n Radio 1 2 3 4 5 Station presets Scanning radio stations Radio tuner Station select Seek n Entering station presets Select the desired station by using the tune, seek or scan function. n DVD player/CD player n Playing an audio CD 1 2 3 4 5 6 7 Disc select Repeat play Random playback Search playback Disc load Track select/rewind/fast-forward Eject 37 Using the Remote Touch, select one of the preset switches (1-6), then press the "ENTER" button until a beep is heard, indicating that the station has been set.
n Radio 1 2 3 4 5 Station presets Scanning radio stations Radio tuner Station select Seek n Entering station presets Select the desired station by using the tune, seek or scan function. n DVD player/CD player n Playing an audio CD 1 2 3 4 5 6 7 Disc select Repeat play Random playback Search playback Disc load Track select/rewind/fast-forward Eject 37 Using the Remote Touch, select one of the preset switches (1-6), then press the "ENTER" button until a beep is heard, indicating that the station has been set.
User Guide 2
Page 34
n Playing a CD with MP3/WMA files 1 2 3 4 5 6 7 8 Disc select Repeat play Random playback Search playback Folder select Disc load File select Eject n Playing a DVD (DVD player only) 1 2 3 4 5 6 Disc select DVD operation Image display (full screen) Disc load Chapter select Eject 38
n Playing a CD with MP3/WMA files 1 2 3 4 5 6 7 8 Disc select Repeat play Random playback Search playback Folder select Disc load File select Eject n Playing a DVD (DVD player only) 1 2 3 4 5 6 Disc select DVD operation Image display (full screen) Disc load Chapter select Eject 38
User Guide 2
Page 35
n Loading multiple discs Press and hold 3 Radio mode: radio tuner DVD mode: track/chapter/disc select CD mode: disc/track/file (MP3/WMA) select 39 When the indicator changes from flashing amber to green, insert a disc ...
n Loading multiple discs Press and hold 3 Radio mode: radio tuner DVD mode: track/chapter/disc select CD mode: disc/track/file (MP3/WMA) select 39 When the indicator changes from flashing amber to green, insert a disc ...

User Guide 2
Page 51
...**, Bluetooth® Audio, iPod®, USB Audio *For systems w/o NAV **For systems w/NAV To Change to a different CD/DVD track, SAY: To Change to a different CD/DVD, SAY: To Change Radio Stations, SAY: "Track Up", "Track Down" or "Previous Track" "Disc Up" "Disc Down" "Seek Up" or "Seek Down" "Type Up" or...
...**, Bluetooth® Audio, iPod®, USB Audio *For systems w/o NAV **For systems w/NAV To Change to a different CD/DVD track, SAY: To Change to a different CD/DVD, SAY: To Change Radio Stations, SAY: "Track Up", "Track Down" or "Previous Track" "Disc Up" "Disc Down" "Seek Up" or "Seek Down" "Type Up" or...
Owners Manual
Page 697
... the headlight switch, the screen changes to adjust color and tone. Color and tone adjustment 1. You can adjust the color and the tone while the DVD video, DVD audio and video CD are being played.
... the headlight switch, the screen changes to adjust color and tone. Color and tone adjustment 1. You can adjust the color and the tone while the DVD video, DVD audio and video CD are being played.
Owners Manual
Page 722
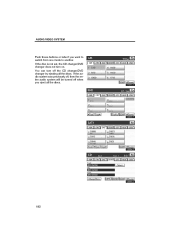
... FM. Action Deletes all icons Command Radio AM FM FM1 FM2 Satellite radio Satellite radio 1 Satellite radio 2 Satellite radio 3 CD DVD CD changer DVD changer Auxiliary Bluetooth audio iPod USB audio Command Audio on and off Command Seek up Seek down Type up Type down Radio operation Action...satellite radio. Selects audio mode to AM. Selects audio mode to Bluetoothr audio. Selects audio mode to CD changer. Selects audio mode to DVD changer. Selects audio mode to satellite radio 3. Seeks down for a radio station. Selects audio mode to CD. Audio On/Off Action Turns...
... FM. Action Deletes all icons Command Radio AM FM FM1 FM2 Satellite radio Satellite radio 1 Satellite radio 2 Satellite radio 3 CD DVD CD changer DVD changer Auxiliary Bluetooth audio iPod USB audio Command Audio on and off Command Seek up Seek down Type up Type down Radio operation Action...satellite radio. Selects audio mode to AM. Selects audio mode to Bluetoothr audio. Selects audio mode to CD changer. Selects audio mode to DVD changer. Selects audio mode to satellite radio 3. Seeks down for a radio station. Selects audio mode to CD. Audio On/Off Action Turns...

Owners Manual
Page 845
... Some basics ...Radio operation ...CD changer operation ...DVD changer operation ...Bluetooth audio operation ...USB memory player/iPod player operation ...D Audio/video remote controls D Rear seat entertainment system features Using the radio ...Using the DVD player ...Playing an audio CD/CD text ...Playing... WMA/MP3 discs ...Playing DVD video/audio ...Using the video mode ...Changing other settings ...D Audio/video system operating hints ...
... Some basics ...Radio operation ...CD changer operation ...DVD changer operation ...Bluetooth audio operation ...USB memory player/iPod player operation ...D Audio/video remote controls D Rear seat entertainment system features Using the radio ...Using the DVD player ...Playing an audio CD/CD text ...Playing... WMA/MP3 discs ...Playing DVD video/audio ...Using the video mode ...Changing other settings ...D Audio/video system operating hints ...
Owners Manual
Page 846
...For details, see page 191. 3 4 5 Disc slot Insert discs into the slot after pushing "LOAD" button. For details, see page 223. " DVD changer " If a Mark Levinson brand audio system is installed, the "Mark Levinson" logo is shown on the screen. AUDIO/VIDEO SYSTEM Quick reference Operations such... as selecting a preset station and adjusting the sound balance are carried out on the panel. 1 2 Function menu tab To control the radio, DVD changer, Bluetoothr audio player, AUX, USB memory player or iPodr player, select the screen tabs. "LOAD" button Push this knob to insert the ...
...For details, see page 191. 3 4 5 Disc slot Insert discs into the slot after pushing "LOAD" button. For details, see page 223. " DVD changer " If a Mark Levinson brand audio system is installed, the "Mark Levinson" logo is shown on the screen. AUDIO/VIDEO SYSTEM Quick reference Operations such... as selecting a preset station and adjusting the sound balance are carried out on the panel. 1 2 Function menu tab To control the radio, DVD changer, Bluetoothr audio player, AUX, USB memory player or iPodr player, select the screen tabs. "LOAD" button Push this knob to insert the ...
Owners Manual
Page 847
... a radio station. (AM, FM1, FM2) For details, see pages 191 and 197. "CH·DISC" button Push the "Ɯ" or "Ɲ" button to turn the DVD changer on . For details, see page 225. 14 187 " " button Push this button to select a preset turning or a selected disc. For details, see pages 191...
... a radio station. (AM, FM1, FM2) For details, see pages 191 and 197. "CH·DISC" button Push the "Ɯ" or "Ɲ" button to turn the DVD changer on . For details, see page 225. 14 187 " " button Push this button to select a preset turning or a selected disc. For details, see pages 191...
Owners Manual
Page 851
... turn on the desired mode. 191 See page 338 for details. U6001LS 1. The system turns on the desired mode. Select "AM", "FM", "SAT", "CD", "CD/DVD", "BT", "AUX" or "USB" tab to the previous screen from the audio screen. Turn this knob to adjust the volume. Push the "MENU" button and.../VIDEO SYSTEM (b) Turning the system on and off (c) Switching between functions "PWR·VOL": Push this knob to turn the audio system on and off. " DVD changer image Push the "AM·FM", "SAT", "DISC", "CD" or "AUX·USB" button to turn on in the last mode used.
... turn on the desired mode. 191 See page 338 for details. U6001LS 1. The system turns on the desired mode. Select "AM", "FM", "SAT", "CD", "CD/DVD", "BT", "AUX" or "USB" tab to the previous screen from the audio screen. Turn this knob to adjust the volume. Push the "MENU" button and.../VIDEO SYSTEM (b) Turning the system on and off (c) Switching between functions "PWR·VOL": Push this knob to turn the audio system on and off. " DVD changer image Push the "AM·FM", "SAT", "DISC", "CD" or "AUX·USB" button to turn on in the last mode used.
Owners Manual
Page 852
If the audio system was previously off, then the entire audio system will be turned off the CD changer/DVD changer by ejecting all the discs. 192 You can turn on. AUDIO/VIDEO SYSTEM Push these buttons or tabs if you eject all the discs. If the disc is not set, the CD changer/DVD changer does not turn off when you want to switch from one mode to another.
If the audio system was previously off, then the entire audio system will be turned off the CD changer/DVD changer by ejecting all the discs. 192 You can turn on. AUDIO/VIDEO SYSTEM Push these buttons or tabs if you eject all the discs. If the disc is not set, the CD changer/DVD changer does not turn off when you want to switch from one mode to another.

Owners Manual
Page 853
Select the tab to select the desired mode when the audio control mode is selected. AUDIO/VIDEO SYSTEM The screen buttons for radio, CD changer, DVD changer, Bluetoothr audio player, AUX, USB memory player and iPodr player operation are displayed on the screen when the audio control mode is selected. INFORMATION You cannot operate dimmed screen buttons. 193
Select the tab to select the desired mode when the audio control mode is selected. AUDIO/VIDEO SYSTEM The screen buttons for radio, CD changer, DVD changer, Bluetoothr audio player, AUX, USB memory player and iPodr player operation are displayed on the screen when the audio control mode is selected. INFORMATION You cannot operate dimmed screen buttons. 193


