User Guide
Page 2
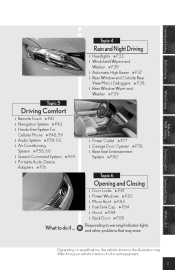
... When Driving Topic 5 Driving Comfort l l l l l l l Remote Touch P.41 Navigation System P.43 Hands-free System For Cellular Phone P.48, 59 Audio System P.54, 63 Air Conditioning System P.58, 68 Speech Command System Portable Audio Device Adapters P.76 Rain and Night Driving l l P.69 Power Outlet P.77 Garage Door Opener P.78 l Rear Seat Entertainment System...
... When Driving Topic 5 Driving Comfort l l l l l l l Remote Touch P.41 Navigation System P.43 Hands-free System For Cellular Phone P.48, 59 Audio System P.54, 63 Air Conditioning System P.58, 68 Speech Command System Portable Audio Device Adapters P.76 Rain and Night Driving l l P.69 Power Outlet P.77 Garage Door Opener P.78 l Rear Seat Entertainment System...
User Guide
Page 6
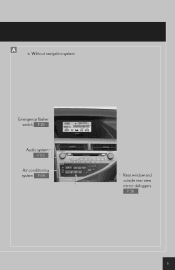
Without navigation system Emergency flasher switch P.25 Audio system P.63 Air conditioning system P.68 Rear window and outside rear view mirror defoggers P.38 6
Without navigation system Emergency flasher switch P.25 Audio system P.63 Air conditioning system P.68 Rear window and outside rear view mirror defoggers P.38 6
User Guide
Page 27
... "Navigation System Owner's Manual". n Pressing and holding the head-up display main switch button for more than 2 seconds changes the display to audio display on the head-up display. Press the head-up display main switch button to do if ...30 Adjust the brightness of the vehicle's .../off . Opening and Closing What to turn navigation* Vehicle speed display Before Driving When Driving Rain and Night Driving Driving Comfort n When using audio system or navigation system the appropriate display is detected in any of the head-up display or remove your sunglasses. *: Refer to see when ...
... "Navigation System Owner's Manual". n Pressing and holding the head-up display main switch button for more than 2 seconds changes the display to audio display on the head-up display. Press the head-up display main switch button to do if ...30 Adjust the brightness of the vehicle's .../off . Opening and Closing What to turn navigation* Vehicle speed display Before Driving When Driving Rain and Night Driving Driving Comfort n When using audio system or navigation system the appropriate display is detected in any of the head-up display or remove your sunglasses. *: Refer to see when ...
User Guide
Page 37
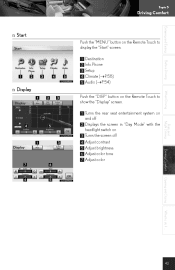
... Comfort Entering and Exiting n Start Push the "MENU" button on the Remote Touch to display the "Start" screen. 1 2 3 4 5 Destination Info.Phone Setup Climate (P.58) Audio (P.54) Before Driving n Display Push the "DISP" button on the Remote Touch to show the "Display" screen. 1 Turns the rear seat entertainment system on...
... Comfort Entering and Exiting n Start Push the "MENU" button on the Remote Touch to display the "Start" screen. 1 2 3 4 5 Destination Info.Phone Setup Climate (P.58) Audio (P.54) Before Driving n Display Push the "DISP" button on the Remote Touch to show the "Display" screen. 1 Turns the rear seat entertainment system on...
User Guide
Page 49
... equipped) CD: CD player (if equipped) AUX•USB: Auxiliary audio device/USB memory player/iPod® player 3 Power/Volume Rain and Night Driving Driving Comfort Opening and Closing What to display the audio control screen. The "Start" screen will be displayed. Using the Remote... Touch, select "Audio" and press the "ENTER" button. Topic 5 Driving Comfort Entering and Exiting Audio System (with navigation system) n Audio control screen Follow the procedure below to ...
... equipped) CD: CD player (if equipped) AUX•USB: Auxiliary audio device/USB memory player/iPod® player 3 Power/Volume Rain and Night Driving Driving Comfort Opening and Closing What to display the audio control screen. The "Start" screen will be displayed. Using the Remote... Touch, select "Audio" and press the "ENTER" button. Topic 5 Driving Comfort Entering and Exiting Audio System (with navigation system) n Audio control screen Follow the procedure below to ...
User Guide
Page 50
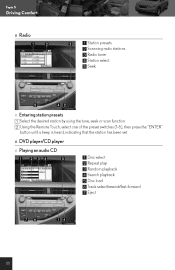
n DVD player/CD player n Playing an audio CD 1 2 3 4 5 6 7 Disc select Repeat play Random playback Search playback Disc load Track select/rewind/fast-forward Eject 55 Topic 5 Driving Comfort n Radio 1 2 3 4 5 Station presets Scanning radio stations Radio tuner Station select Seek n Entering station presets Select the desired station by using the tune, seek or scan function. Using the Remote Touch, select one of the preset switches (1-6), then press the "ENTER" button until a beep is heard, indicating that the station has been set.
n DVD player/CD player n Playing an audio CD 1 2 3 4 5 6 7 Disc select Repeat play Random playback Search playback Disc load Track select/rewind/fast-forward Eject 55 Topic 5 Driving Comfort n Radio 1 2 3 4 5 Station presets Scanning radio stations Radio tuner Station select Seek n Entering station presets Select the desired station by using the tune, seek or scan function. Using the Remote Touch, select one of the preset switches (1-6), then press the "ENTER" button until a beep is heard, indicating that the station has been set.

User Guide
Page 52
To cancel the operation, press the "LOAD" button. If you have inserted all discs. n Remote control (steering wheel switches) The audio system can be canceled automatically. Topic 5 Driving Comfort n Loading a disc Press the "LOAD" button. When the indicator changes from flashing amber to green, insert a disc ...
To cancel the operation, press the "LOAD" button. If you have inserted all discs. n Remote control (steering wheel switches) The audio system can be canceled automatically. Topic 5 Driving Comfort n Loading a disc Press the "LOAD" button. When the indicator changes from flashing amber to green, insert a disc ...
User Guide
Page 58
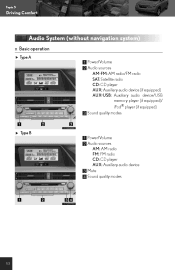
Topic 5 Driving Comfort Audio System (without navigation system) n Basic operation Type A AMFM: AM radio/FM radio SAT: Satellite radio CD: CD player AUX: Auxiliary audio device (if equipped) AUX•USB: Auxiliary audio device/USB memory player (if equipped)/ iPod® player (if equipped) 3 Sound quality modes 1 Power/Volume 2 Audio sources Type B 1 Power/Volume 2 Audio sources AM: AM radio FM: FM radio CD: CD player AUX: Auxiliary audio device 3 Mute 4 Sound quality modes 63
Topic 5 Driving Comfort Audio System (without navigation system) n Basic operation Type A AMFM: AM radio/FM radio SAT: Satellite radio CD: CD player AUX: Auxiliary audio device (if equipped) AUX•USB: Auxiliary audio device/USB memory player (if equipped)/ iPod® player (if equipped) 3 Sound quality modes 1 Power/Volume 2 Audio sources Type B 1 Power/Volume 2 Audio sources AM: AM radio FM: FM radio CD: CD player AUX: Auxiliary audio device 3 Mute 4 Sound quality modes 63
User Guide
Page 60
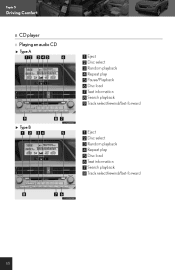
Topic 5 Driving Comfort n CD player n Playing an audio CD Type A 1 2 3 4 5 6 7 8 9 Eject Disc select Random playback Repeat play Pause/Playback Disc load Text information Search playback Track select/rewind/fast-forward Type B 1 2 3 4 5 6 7 8 Eject Disc select Random playback Repeat play Disc load Text information Search playback Track select/rewind/fast-forward 65
Topic 5 Driving Comfort n CD player n Playing an audio CD Type A 1 2 3 4 5 6 7 8 9 Eject Disc select Random playback Repeat play Pause/Playback Disc load Text information Search playback Track select/rewind/fast-forward Type B 1 2 3 4 5 6 7 8 Eject Disc select Random playback Repeat play Disc load Text information Search playback Track select/rewind/fast-forward 65

User Guide
Page 62
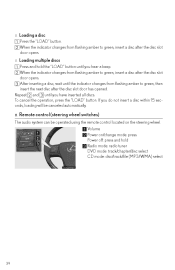
...: press and hold the "LOAD" button until you do not insert a CD within 15 seconds, loading will cancelled automatically. n Remote control (steering wheel switches) The audio system can be operated using the remote control located on the steering wheel. 1 Volume 2 Power on the slot turn from "WAIT" to amber when the...
...: press and hold the "LOAD" button until you do not insert a CD within 15 seconds, loading will cancelled automatically. n Remote control (steering wheel switches) The audio system can be operated using the remote control located on the steering wheel. 1 Volume 2 Power on the slot turn from "WAIT" to amber when the...
User Guide
Page 68
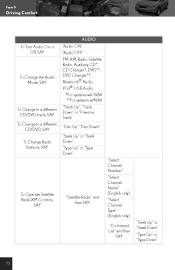
..." FM, AM, Radio, Satellite Radio, Auxiliary, CD*, CD Changer*, DVD**, DVD Changer**, Bluetooth® Audio, iPod®, USB Audio *For systems w/o NAV **For systems w/NAV To Change to a different CD/DVD track, SAY: To Change to a different CD/DVD, SAY: To Change Radio Stations, ..." (English only) "Select Channel Type" (English only) "Command List" and then SAY: "Seek Up" or "Seek Down" "Type Up" or "Type Down" To Change the Audio Mode, SAY: To Operate Satellite RadioXM Controls, SAY: "Satellite Radio" and then SAY: 73
..." FM, AM, Radio, Satellite Radio, Auxiliary, CD*, CD Changer*, DVD**, DVD Changer**, Bluetooth® Audio, iPod®, USB Audio *For systems w/o NAV **For systems w/NAV To Change to a different CD/DVD track, SAY: To Change to a different CD/DVD, SAY: To Change Radio Stations, ..." (English only) "Select Channel Type" (English only) "Command List" and then SAY: "Seek Up" or "Seek Down" "Type Up" or "Type Down" To Change the Audio Mode, SAY: To Operate Satellite RadioXM Controls, SAY: "Satellite Radio" and then SAY: 73
User Guide
Page 70
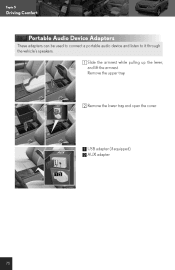
Remove the lower tray and open the cover. 1 USB adapter (if equipped) 2 AUX adapter 75 Slide the armrest while pulling up the lever, and lift the armrest. Topic 5 Driving Comfort Portable Audio Device Adapters These adapters can be used to connect a portable audio device and listen to it through the vehicle's speakers. Remove the upper tray.
Remove the lower tray and open the cover. 1 USB adapter (if equipped) 2 AUX adapter 75 Slide the armrest while pulling up the lever, and lift the armrest. Topic 5 Driving Comfort Portable Audio Device Adapters These adapters can be used to connect a portable audio device and listen to it through the vehicle's speakers. Remove the upper tray.
User Guide
Page 74
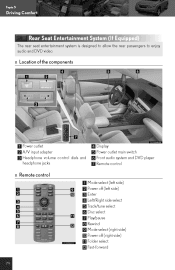
n Location of the components 1 Power outlet 2 A/V input adapter 3 Headphone volume control dials and headphone jacks 4 5 6 7 Display Power outlet main switch Front audio system and DVD player Remote control n Remote control 1 Mode select (left side) 2 Power off (left side) 3 Enter 4 Left/Right side select 5 Track/tune select 6 Disc ...-forward 79 Topic 5 Driving Comfort Rear Seat Entertainment System (If Equipped) The rear seat entertainment system is designed to allow the rear passengers to enjoy audio and DVD video.
n Location of the components 1 Power outlet 2 A/V input adapter 3 Headphone volume control dials and headphone jacks 4 5 6 7 Display Power outlet main switch Front audio system and DVD player Remote control n Remote control 1 Mode select (left side) 2 Power off (left side) 3 Enter 4 Left/Right side select 5 Track/tune select 6 Disc ...-forward 79 Topic 5 Driving Comfort Rear Seat Entertainment System (If Equipped) The rear seat entertainment system is designed to allow the rear passengers to enjoy audio and DVD video.
User Guide 2
Page 1
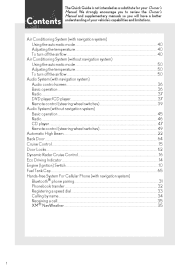
......40 Air Conditioning System (without navigation system) Using the automatic mode...50 Adjusting the temperature...50 To turn off the airflow...50 Audio System (with navigation system) Audio control screen...36 Basic operation ...36 Radio...37 DVD player/CD player...37 Remote control (steering wheel switches)...39... Audio System (without navigation system) Basic operation ...45 Radio...46 CD player...47 Remote control (steering wheel switches)...49 Automatic High Beam...22 Back...
......40 Air Conditioning System (without navigation system) Using the automatic mode...50 Adjusting the temperature...50 To turn off the airflow...50 Audio System (with navigation system) Audio control screen...36 Basic operation ...36 Radio...37 DVD player/CD player...37 Remote control (steering wheel switches)...39... Audio System (without navigation system) Basic operation ...45 Radio...46 CD player...47 Remote control (steering wheel switches)...49 Automatic High Beam...22 Back...
User Guide 2
Page 2
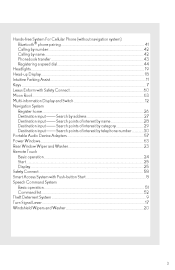
... name...42 Phonebook transfer...43 Registering a speed dial...44 Headlights ...19 Head-up Display ...18 Intuitive Parking Assist...11 Keys ...7 Lexus Enform with Safety Connect...60 Moon Roof...63 Multi-information Display and Switch ...12 Navigation System Register home...26 Destination input ⎯⎯...;⎯ Search points of interest by category...29 Destination input ⎯⎯ Search points of interest by telephone number ...30 Portable Audio Device Adapters ...57 Power Windows...63 Rear Window Wiper and Washer...23 Remote Touch Basic operation...24 Start ...25 Display...25 Safety...
... name...42 Phonebook transfer...43 Registering a speed dial...44 Headlights ...19 Head-up Display ...18 Intuitive Parking Assist...11 Keys ...7 Lexus Enform with Safety Connect...60 Moon Roof...63 Multi-information Display and Switch ...12 Navigation System Register home...26 Destination input ⎯⎯...;⎯ Search points of interest by category...29 Destination input ⎯⎯ Search points of interest by telephone number ...30 Portable Audio Device Adapters ...57 Power Windows...63 Rear Window Wiper and Washer...23 Remote Touch Basic operation...24 Start ...25 Display...25 Safety...
User Guide 2
Page 14
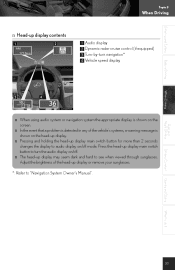
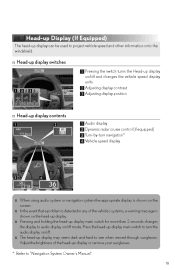
... vehicle speed display units. 2 Adjusting display contrast 3 Adjusting display position n Head-up display contents 1 2 3 4 Audio display Dynamic radar cruise control (if equipped) Turn-by-turn the audio display on /off . Adjust the brightness of the vehicle's systems, a warning message is shown on the head-up ...head-up display main switch for more than 2 seconds changes the display to turn navigation* Vehicle speed display n When using audio system or navigation system the appropriate display is shown on the screen. n Pressing and holding the head-up display main switch to...
... vehicle speed display units. 2 Adjusting display contrast 3 Adjusting display position n Head-up display contents 1 2 3 4 Audio display Dynamic radar cruise control (if equipped) Turn-by-turn the audio display on /off . Adjust the brightness of the vehicle's systems, a warning message is shown on the head-up ...head-up display main switch for more than 2 seconds changes the display to turn navigation* Vehicle speed display n When using audio system or navigation system the appropriate display is shown on the screen. n Pressing and holding the head-up display main switch to...
User Guide 2
Page 21
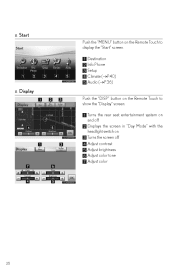
n Start Push the "MENU" button on the Remote Touch to display the "Start" screen. 1 2 3 4 5 Destination Info.Phone Setup Climate (→P.40) Audio (→P.36) n Display Push the "DISP" button on the Remote Touch to show the "Display" screen. 1 Turns the rear seat entertainment system on 2 3 4 5 6 7 and off Displays the screen in "Day Mode" with the headlight switch on Turns the screen off Adjust contrast Adjust brightness Adjust color tone Adjust color 25
n Start Push the "MENU" button on the Remote Touch to display the "Start" screen. 1 2 3 4 5 Destination Info.Phone Setup Climate (→P.40) Audio (→P.36) n Display Push the "DISP" button on the Remote Touch to show the "Display" screen. 1 Turns the rear seat entertainment system on 2 3 4 5 6 7 and off Displays the screen in "Day Mode" with the headlight switch on Turns the screen off Adjust contrast Adjust brightness Adjust color tone Adjust color 25
User Guide 2
Page 32
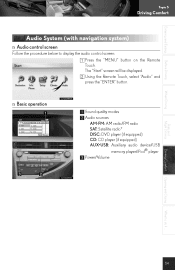
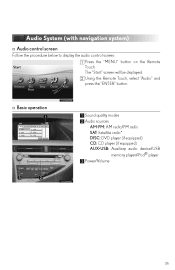
Audio System (with navigation system) n Audio control screen Follow the procedure below to display the audio control screen. Using the Remote Touch, select "Audio" and press the "ENTER" button. The "Start" screen will be displayed. n Basic operation 1 Sound quality modes 2 Audio sources AM⋅FM: AM radio/FM radio SAT: Satellite radio* DISC: DVD player (if equipped) CD: CD player (if equipped) AUX•USB: Auxiliary audio device/USB memory player/iPod® player 3 Power/Volume 36 Press the "MENU" button on the Remote Touch.
Audio System (with navigation system) n Audio control screen Follow the procedure below to display the audio control screen. Using the Remote Touch, select "Audio" and press the "ENTER" button. The "Start" screen will be displayed. n Basic operation 1 Sound quality modes 2 Audio sources AM⋅FM: AM radio/FM radio SAT: Satellite radio* DISC: DVD player (if equipped) CD: CD player (if equipped) AUX•USB: Auxiliary audio device/USB memory player/iPod® player 3 Power/Volume 36 Press the "MENU" button on the Remote Touch.

User Guide 2
Page 33
Using the Remote Touch, select one of the preset switches (1-6), then press the "ENTER" button until a beep is heard, indicating that the station has been set. n Radio 1 2 3 4 5 Station presets Scanning radio stations Radio tuner Station select Seek n Entering station presets Select the desired station by using the tune, seek or scan function. n DVD player/CD player n Playing an audio CD 1 2 3 4 5 6 7 Disc select Repeat play Random playback Search playback Disc load Track select/rewind/fast-forward Eject 37
Using the Remote Touch, select one of the preset switches (1-6), then press the "ENTER" button until a beep is heard, indicating that the station has been set. n Radio 1 2 3 4 5 Station presets Scanning radio stations Radio tuner Station select Seek n Entering station presets Select the desired station by using the tune, seek or scan function. n DVD player/CD player n Playing an audio CD 1 2 3 4 5 6 7 Disc select Repeat play Random playback Search playback Disc load Track select/rewind/fast-forward Eject 37
User Guide 2
Page 35
...) select 39 When the indicator changes from flashing amber to green, insert a disc after the disc slot door opens. n Remote control (steering wheel switches) The audio system can be canceled automatically. n Loading a disc Press the "LOAD" button. Repeat and until you do not insert a disc within 15 seconds, loading will be...
...) select 39 When the indicator changes from flashing amber to green, insert a disc after the disc slot door opens. n Remote control (steering wheel switches) The audio system can be canceled automatically. n Loading a disc Press the "LOAD" button. Repeat and until you do not insert a disc within 15 seconds, loading will be...
