
Owners Manual
Page 2
lPower lDoor Customizing Yo u r L e x u s Customizing Your Lexus A list of color and equipment. 2 Depending on specifications, the vehi cle shown in the illustration m differ from your vehicle in terms of features that may arise. P. 37 Heaters and Ventilators P. 3 8 lRear Sunshade P. 3 8 lTrunk Storage Extension P. 3 9 lLuggage Mat P. 3 9 lSeat lCompass Topic 6 Opening and Closing Locks P.4 1 Windows P.42...
lPower lDoor Customizing Yo u r L e x u s Customizing Your Lexus A list of color and equipment. 2 Depending on specifications, the vehi cle shown in the illustration m differ from your vehicle in terms of features that may arise. P. 37 Heaters and Ventilators P. 3 8 lRear Sunshade P. 3 8 lTrunk Storage Extension P. 3 9 lLuggage Mat P. 3 9 lSeat lCompass Topic 6 Opening and Closing Locks P.4 1 Windows P.42...

Owners Manual
Page 8
... left or right while pressing the "ENGINE START STOP" switch. 9 Topic 1 Entering and Exiting Theft Deterrent System The theft deterrent system includes the followi ng features to help protect your vehicle from outside the hicle. ve The security indicator light comes on to flash, the system is made to start the...
... left or right while pressing the "ENGINE START STOP" switch. 9 Topic 1 Entering and Exiting Theft Deterrent System The theft deterrent system includes the followi ng features to help protect your vehicle from outside the hicle. ve The security indicator light comes on to flash, the system is made to start the...

Owners Manual
Page 28
...) is manufactured under license from a slow to a rapid flash. Press and hold down the desired HomeLink button. If your garage door has the rolling code feature Press the training button on the motor−head u in your vehicle has 3 buttons which can be programme to operate 3 different devices. If the door...
...) is manufactured under license from a slow to a rapid flash. Press and hold down the desired HomeLink button. If your garage door has the rolling code feature Press the training button on the motor−head u in your vehicle has 3 buttons which can be programme to operate 3 different devices. If the door...

Owners Manual
Page 45
... Wireless remote matic door lock function is acti− 60 seconds control vated if door is not opened after being customiz Contact your Lexus dealer for further details. Item Function Default setting ON ON ON ON Driver's door unlocked in one step, all doors unlocked in two... Operation signal (Buzzer) Wireless remote control Unlocking operation Automatic door lock function to be performed by an authorized Lexus dealership. Customizing Your Lexus Your vehicle includes a variety of electronic features that can be personalized to 7 OFF OFF Push twice Push and hold One push ON OFF 51 Some ...
... Wireless remote matic door lock function is acti− 60 seconds control vated if door is not opened after being customiz Contact your Lexus dealer for further details. Item Function Default setting ON ON ON ON Driver's door unlocked in one step, all doors unlocked in two... Operation signal (Buzzer) Wireless remote control Unlocking operation Automatic door lock function to be performed by an authorized Lexus dealership. Customizing Your Lexus Your vehicle includes a variety of electronic features that can be personalized to 7 OFF OFF Push twice Push and hold One push ON OFF 51 Some ...

Owners Manual
Page 49
... do if the vehicle needs to be towed, gets a flat tire, or is involved in this manual. 1 TABLE OF CONTENTS 1 Before driving Adjusting and operating features such as door locks, mirrors, and steering column. 2 When driving Driving, stopping and safe-driving information. 3 Interior...
... do if the vehicle needs to be towed, gets a flat tire, or is involved in this manual. 1 TABLE OF CONTENTS 1 Before driving Adjusting and operating features such as door locks, mirrors, and steering column. 2 When driving Driving, stopping and safe-driving information. 3 Interior...

Owners Manual
Page 228
From -3 (low) to outside air mode. Adjusting the sensitivity of the air intake control in automatic mode 3 STEP 1 Press onds. Recirculated air mode will automatically switch to 3 (high) can be set. 187 for 2 or more secInterior features STEP 2 Press ∧ (increase) or ∨ (decrease) on . 3-1. Using the air conditioning system and defogger Defogging the front windshield Defogging The air conditioning system control operates automatically. It is not possible to return to recirculated air mode when the switch is on the switch.
From -3 (low) to outside air mode. Adjusting the sensitivity of the air intake control in automatic mode 3 STEP 1 Press onds. Recirculated air mode will automatically switch to 3 (high) can be set. 187 for 2 or more secInterior features STEP 2 Press ∧ (increase) or ∨ (decrease) on . 3-1. Using the air conditioning system and defogger Defogging the front windshield Defogging The air conditioning system control operates automatically. It is not possible to return to recirculated air mode when the switch is on the switch.
Owners Manual
Page 232
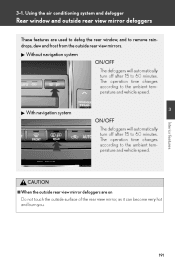
... according to the ambient temperature and vehicle speed. The operation time changes according to the ambient temperature and vehicle speed. 3 Interior features CAUTION Using the air conditioning system and defogger Rear window and outside rear view mirrors. 3-1. Without navigation system ON/OFF The defoggers... will automatically turn off after 15 to remove raindrops, dew and frost from the outside rear view mirror defoggers These features are used to defog the rear window, and to 60 minutes. With navigation system ON/OFF The defoggers will automatically turn...
... according to the ambient temperature and vehicle speed. The operation time changes according to the ambient temperature and vehicle speed. 3 Interior features CAUTION Using the air conditioning system and defogger Rear window and outside rear view mirrors. 3-1. Without navigation system ON/OFF The defoggers... will automatically turn off after 15 to remove raindrops, dew and frost from the outside rear view mirror defoggers These features are used to defog the rear window, and to 60 minutes. With navigation system ON/OFF The defoggers will automatically turn...

Owners Manual
Page 242
Using the audio system Using the CD player Playback CD eject CD insert Search playback Random playback Displays text message Power Volume Selecting a track Repeat play Selecting a CD 3 Interior features Loading CDs 3-2.
Using the audio system Using the CD player Playback CD eject CD insert Search playback Random playback Displays text message Power Volume Selecting a track Repeat play Selecting a CD 3 Interior features Loading CDs 3-2.

Owners Manual
Page 248
3-2. Using the audio system Playing back MP3 and WMA discs Playback CD eject CD insert Search playback Random playback Displays text message Selecting a folder Selecting a file Power Volume Selecting a file Repeat play Selecting a CD 3 Interior features Loading and ejecting MP3 and WMA discs Refer to the section entitled "Using the CD player" for details. (→P. 201) Selecting a folder
3-2. Using the audio system Playing back MP3 and WMA discs Playback CD eject CD insert Search playback Random playback Displays text message Selecting a folder Selecting a file Power Volume Selecting a file Repeat play Selecting a CD 3 Interior features Loading and ejecting MP3 and WMA discs Refer to the section entitled "Using the CD player" for details. (→P. 201) Selecting a folder

Owners Manual
Page 252
... Ver. 2.2, 2.3 ID3 tags. (The number of files per disc: 255 ● File names The only files that can be recognized as with ID3 tags. 3 Interior features 211 The system is compatible with multi-sessions, it is based on ID3 Ver. 1.0 and 1.1.) WMA tags can be displayed correctly. 3-2.
... Ver. 2.2, 2.3 ID3 tags. (The number of files per disc: 255 ● File names The only files that can be recognized as with ID3 tags. 3 Interior features 211 The system is compatible with multi-sessions, it is based on ID3 Ver. 1.0 and 1.1.) WMA tags can be displayed correctly. 3-2.

Owners Manual
Page 256
Using the audio system Optimal use of the audio system Displays the current mode. Changes the following setting. • Listening position (→P. 216) The sound feel setting can be changed to produce the best sound for each listening position. • Sound quality and volume balance (→P. 216) The sound quality and balance setting can be changed to produce the best sound. 3 Interior features • Automatic Sound Levelizer ON/OFF (→P. 217) Using the AUDIO CONTROL function 3-2.
Using the audio system Optimal use of the audio system Displays the current mode. Changes the following setting. • Listening position (→P. 216) The sound feel setting can be changed to produce the best sound for each listening position. • Sound quality and volume balance (→P. 216) The sound quality and balance setting can be changed to produce the best sound. 3 Interior features • Automatic Sound Levelizer ON/OFF (→P. 217) Using the AUDIO CONTROL function 3-2.

Owners Manual
Page 260
...219 FM1→FM2→CD changer→AUX→AM→SAT1→SAT2→SAT3 Adjusting the volume Press + on the power Interior features Press when the audio system is turned OFF. Power on, select audio source Volume Radio: Select radio stations CD: Select tracks, files (MP3... and WMA) and discs 3 Turning on to decrease the volume. Using the audio system Using the steering wheel audio switches Some audio features can be controlled using the switches on the steering wheel. to increase the volume and - Hold down for a few second. 3-2. The audio source...
...219 FM1→FM2→CD changer→AUX→AM→SAT1→SAT2→SAT3 Adjusting the volume Press + on the power Interior features Press when the audio system is turned OFF. Power on, select audio source Volume Radio: Select radio stations CD: Select tracks, files (MP3... and WMA) and discs 3 Turning on to decrease the volume. Using the audio system Using the steering wheel audio switches Some audio features can be controlled using the switches on the steering wheel. to increase the volume and - Hold down for a few second. 3-2. The audio source...

Owners Manual
Page 262
Using the hands-free phone system (for cellular phone) Hands-free phone system features (for cellular phone) Making a phone call Setting a cellular phone Security and system setup Using the phone book Page P. 224 P. 232 P. 236 P. 240 P. 243 3 Interior features Title Using the hands-free phone system (for cellular phone) (if equipped) This system supports Bluetooth®, which allows you to make or receive calls without using cables to connect a cellular phone and the system, and without operating the cellular phone. 3-3.
Using the hands-free phone system (for cellular phone) Hands-free phone system features (for cellular phone) Making a phone call Setting a cellular phone Security and system setup Using the phone book Page P. 224 P. 232 P. 236 P. 240 P. 243 3 Interior features Title Using the hands-free phone system (for cellular phone) (if equipped) This system supports Bluetooth®, which allows you to make or receive calls without using cables to connect a cellular phone and the system, and without operating the cellular phone. 3-3.

Owners Manual
Page 264
...'s body (excluding extremities: hands, wrists, feet and legs). Co-location: This transmitter must not be installed and operated with any other antenna or transmitter. 3 Interior features CAUTION This equipment has very low levels of RF energy that it deemed to comply without maximum permissive exposure evaluation (MPE). 3-3.
...'s body (excluding extremities: hands, wrists, feet and legs). Co-location: This transmitter must not be installed and operated with any other antenna or transmitter. 3 Interior features CAUTION This equipment has very low levels of RF energy that it deemed to comply without maximum permissive exposure evaluation (MPE). 3-3.

Owners Manual
Page 268
... is heard. Using the hands-free phone system (for cellular phone) Using the hands-free phone system for registration completion is necessary to be 3 Interior features b. STEP 1 STEP 2 Register a phone name by using a voice command or . A passkey is displayed and heard, and voice guidance instruction for the operation of the following...
... is heard. Using the hands-free phone system (for cellular phone) Using the hands-free phone system for registration completion is necessary to be 3 Interior features b. STEP 1 STEP 2 Register a phone name by using a voice command or . A passkey is displayed and heard, and voice guidance instruction for the operation of the following...

Owners Manual
Page 270
... be used Changing the passkey 3 Security Phonebook Lock Phonebook Unlock Pair Phone Change Name Setup Phone Setup Delete List phones Select phone Set Passkey Interior features System Setup Guidance Volume Setting voice guidance volume (Guidance Vol) Initialize Initialization 229
... be used Changing the passkey 3 Security Phonebook Lock Phonebook Unlock Pair Phone Change Name Setup Phone Setup Delete List phones Select phone Set Passkey Interior features System Setup Guidance Volume Setting voice guidance volume (Guidance Vol) Initialize Initialization 229

Owners Manual
Page 274
Press desired name is registered. 233 Dial by using Speed dialing STEP 1 STEP 2 STEP 3 Press Press . . c. while the Interior features STEP 3 b. Select "Dial" by one of the following methods: a. Press . and say "List names". 3-3. Press and say "Dial". . Press b. Press the preset button in which ...
Press desired name is registered. 233 Dial by using Speed dialing STEP 1 STEP 2 STEP 3 Press Press . . c. while the Interior features STEP 3 b. Select "Dial" by one of the following methods: a. Press . and say "List names". 3-3. Press and say "Dial". . Press b. Press the preset button in which ...

Owners Manual
Page 276
Interior features 3 or select "Dial" by using a voice command or . Using the hands-free phone system (for cellular phone) STEP 2 Select the number by using a voice command or Deleting: Select "Delete" by either of the following operations can be performed: Dialing: Press . b. Storing the number in the phone book: Select "Store" by using a voice command or . 3-3. Select the desired number by using . Say "Previous" or "Go back" until the desired number is displayed. The following methods: a.
Interior features 3 or select "Dial" by using a voice command or . Using the hands-free phone system (for cellular phone) STEP 2 Select the number by using a voice command or Deleting: Select "Delete" by either of the following operations can be performed: Dialing: Press . b. Storing the number in the phone book: Select "Store" by using a voice command or . 3-3. Select the desired number by using . Say "Previous" or "Go back" until the desired number is displayed. The following methods: a.

Owners Manual
Page 278
name is being read aloud, press Pattern B STEP 2 Interior features Select a cellular phone to be used by either of the following methods, and select "Confirm" by using . Using the hands-free phone system (for cellular ...
name is being read aloud, press Pattern B STEP 2 Interior features Select a cellular phone to be used by either of the following methods, and select "Confirm" by using . Using the hands-free phone system (for cellular ...

Owners Manual
Page 280
Changing the passkey STEP 1 Select "Set Passkey" by using . Pattern A STEP 2 Press , say a 4 to 8-digit number, and select "Confirm" by . 3 using a voice command or Pattern B Interior features STEP 2 Select a 4 to 8-digit number by using a voice command or . STEP 3 When the entire number to be deleted by using The number should be registered as a passkey has been input, press once again. Using the hands-free phone system (for cellular phone) Pattern B STEP 2 Select a desired cellular phone to be input 1 digit at a time. . 3-3.
Changing the passkey STEP 1 Select "Set Passkey" by using . Pattern A STEP 2 Press , say a 4 to 8-digit number, and select "Confirm" by . 3 using a voice command or Pattern B Interior features STEP 2 Select a 4 to 8-digit number by using a voice command or . STEP 3 When the entire number to be deleted by using The number should be registered as a passkey has been input, press once again. Using the hands-free phone system (for cellular phone) Pattern B STEP 2 Select a desired cellular phone to be input 1 digit at a time. . 3-3.
