
Navigation Manual
Page 54
... each of GPS signals, it is indicated by ferry, the route guidance shows a sea route. INFORMATION D Even if the "Allow Freeway" indicator is indicated by a green line. After choosing conditions, touch the "OK" switch. Upon reception of the 3 routes. When searching for a route, the system avoids routes where the indicator is...
... each of GPS signals, it is indicated by ferry, the route guidance shows a sea route. INFORMATION D Even if the "Allow Freeway" indicator is indicated by a green line. After choosing conditions, touch the "OK" switch. Upon reception of the 3 routes. When searching for a route, the system avoids routes where the indicator is...
Navigation Manual
Page 85
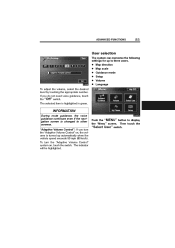
..., select the desired level by touching the appropriate number. INFORMATION During route guidance, the voice guidance continues even if the navigation screen is highlighted in green. The indicator will be highlighted. ADVANCED FUNCTIONS 85 User selection The system can memorize the following settings for up automatically when the vehicle speed exceeds...
..., select the desired level by touching the appropriate number. INFORMATION During route guidance, the voice guidance continues even if the navigation screen is highlighted in green. The indicator will be highlighted. ADVANCED FUNCTIONS 85 User selection The system can memorize the following settings for up automatically when the vehicle speed exceeds...

Navigation Manual
Page 103
The message appears and the quick distance calibration is highlighted in green. 4. Push the "MENU" button. 2. To perform a distance calibration procedure, touch the "Tire Change" switch on the "Calibration" screen. A few seconds later, a map screen will be ...
The message appears and the quick distance calibration is highlighted in green. 4. Push the "MENU" button. 2. To perform a distance calibration procedure, touch the "Tire Change" switch on the "Calibration" screen. A few seconds later, a map screen will be ...

Navigation Manual
Page 106
INFORMATION If your vehicle strays from the guidance route, the system searches for a new route to the previous route depending on the display. Touch the "On" switch of "Auto Reroute". Touch the "Change" switch. The "Adjust Time Zone" screen appears on how far you back to the destination. Touch the "Setup" switch. The selected switch is highlighted in green. 2. The new route may or may not take you are off the original guidance route. 3. Push the "MENU" button. 3. 106 ADVANCED FUNCTIONS Adjusting time zone 1.
INFORMATION If your vehicle strays from the guidance route, the system searches for a new route to the previous route depending on the display. Touch the "On" switch of "Auto Reroute". Touch the "Change" switch. The "Adjust Time Zone" screen appears on how far you back to the destination. Touch the "Setup" switch. The selected switch is highlighted in green. 2. The new route may or may not take you are off the original guidance route. 3. Push the "MENU" button. 3. 106 ADVANCED FUNCTIONS Adjusting time zone 1.

Navigation Manual
Page 107
The selected switch is highlighted in green. When the "Auto Voice Guidance" feature is turned on, the voice guidance can be heard only if you push the "MAP/VOICE" button. Push the "... "Setup" screen. 3. To turn the "Auto Voice Guidance" mode on the screen and the "Setup" screen will be displayed. 2. The selected switch is highlighted in green. 5. ADVANCED FUNCTIONS 107 Auto voice guidance When the "Auto Voice Guidance" feature is turned off, the voice guidance can be heard automatically. Then switch to...
The selected switch is highlighted in green. When the "Auto Voice Guidance" feature is turned on, the voice guidance can be heard only if you push the "MAP/VOICE" button. Push the "... "Setup" screen. 3. To turn the "Auto Voice Guidance" mode on the screen and the "Setup" screen will be displayed. 2. The selected switch is highlighted in green. 5. ADVANCED FUNCTIONS 107 Auto voice guidance When the "Auto Voice Guidance" feature is turned off, the voice guidance can be heard automatically. Then switch to...

Navigation Manual
Page 134
... the beeps sound at shorter intervals than in step 1 . 3 About 25 cm (0.8 ft.) to about 100 cm (3.0 ft.)*: 4 bars (green, yellow, orange and red) appear on the display but you that your Lexus dealer. NOTE: *The display and beeps can be activated or deactivated. D If the indicators remain on the front or...
... the beeps sound at shorter intervals than in step 1 . 3 About 25 cm (0.8 ft.) to about 100 cm (3.0 ft.)*: 4 bars (green, yellow, orange and red) appear on the display but you that your Lexus dealer. NOTE: *The display and beeps can be activated or deactivated. D If the indicators remain on the front or...

Navigation Manual
Page 167
... set or canceled. Touching this switch changes to the nearest hour, touch ":00" switch. While daylight saving time is set, this switch is highlighted in green. Auto Adjust OFF: To reset the hour, touch the "H" switch. To adjust the time to the time zone selection screen. OTHER FUNCTIONS 167 5u006 5u007... Auto Adjust ON: When you touch this switch, the time is set to the GPS clock, and this switch is highlighted in green. Time Zone: You can be set and the previous screen returns.
... set or canceled. Touching this switch changes to the nearest hour, touch ":00" switch. While daylight saving time is set, this switch is highlighted in green. Auto Adjust OFF: To reset the hour, touch the "H" switch. To adjust the time to the time zone selection screen. OTHER FUNCTIONS 167 5u006 5u007... Auto Adjust ON: When you touch this switch, the time is set to the GPS clock, and this switch is highlighted in green. Time Zone: You can be set and the previous screen returns.

Navigation Manual
Page 176
.... 4 Floor/Windshield − Air flows mainly from which air is delivered can be adjusted automatically. If quick heating or cooling is depressed while operating in green. The function of the manual control buttons is desired − Push the "TEMP" or "PASSENGER TEMP" button on either side and hold it until the...
.... 4 Floor/Windshield − Air flows mainly from which air is delivered can be adjusted automatically. If quick heating or cooling is depressed while operating in green. The function of the manual control buttons is desired − Push the "TEMP" or "PASSENGER TEMP" button on either side and hold it until the...
Navigation Manual
Page 177
... high The fan speed can be set to the RECIRCULATED AIR mode. Each time you push the air intake control button, the mode changes in green. AIR CONDITIONING 177 If manual fan speed control is desired − If manual switching of air intake is delivered.
... high The fan speed can be set to the RECIRCULATED AIR mode. Each time you push the air intake control button, the mode changes in green. AIR CONDITIONING 177 If manual fan speed control is desired − If manual switching of air intake is delivered.

Navigation Manual
Page 195
... radio, cassette tape and compact disc player operation are listening to you are displayed on the screen. The selected switch is also important. Keep in green. Touch them lightly and directly on the liquid crystal display. Touching the "SOUND" switch on the screen displays the sound adjustment screen. A good balance of...
... radio, cassette tape and compact disc player operation are listening to you are displayed on the screen. The selected switch is also important. Keep in green. Touch them lightly and directly on the liquid crystal display. Touching the "SOUND" switch on the screen displays the sound adjustment screen. A good balance of...

Navigation Manual
Page 200
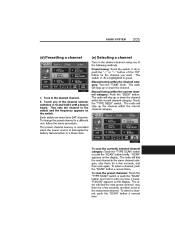
200 AUDIO SYSTEM (b) Presetting a station (c) Selecting a station Your Lexus has an electronic tuning radio (ETR). To change the preset station to the switch and the frequency appears on the switch. Each time you want. ... turn the knob, the radio will step up or down to another . 1. The preset station memory is cancelled when the power source is highlighted in green and station frequency appears on reception. Tune in the desired station. 2. Preset tuning: Touch the switch (1−6) or push the " Ɯ " or " Ɲ " button of...
200 AUDIO SYSTEM (b) Presetting a station (c) Selecting a station Your Lexus has an electronic tuning radio (ETR). To change the preset station to the switch and the frequency appears on the switch. Each time you want. ... turn the knob, the radio will step up or down to another . 1. The preset station memory is cancelled when the power source is highlighted in green and station frequency appears on reception. Tune in the desired station. 2. Preset tuning: Touch the switch (1−6) or push the " Ɯ " or " Ɲ " button of...
Navigation Manual
Page 205
... a channel, push the "SCAN" button a second time. "P.SCAN" appears on the display. The preset channel memory is cancelled when the power source is highlighted in green. Preset tuning: Touch the switch (1−6) or push the " Ɯ " or " Ɲ " button of the "CH" button for a few seconds, and then move to the...
... a channel, push the "SCAN" button a second time. "P.SCAN" appears on the display. The preset channel memory is cancelled when the power source is highlighted in green. Preset tuning: Touch the switch (1−6) or push the " Ɯ " or " Ɲ " button of the "CH" button for a few seconds, and then move to the...

Navigation Manual
Page 209
... reduces tape noise by about 10 dB. For best sound reproduction, play your tapes with the double-D symbol. The player will be highlighted in The " green. To stop or eject the cassette tape, push the " " button. If a cassette is put in the slot, push the "TAPE" button. Touch the switch again...
... reduces tape noise by about 10 dB. For best sound reproduction, play your tapes with the double-D symbol. The player will be highlighted in The " green. To stop or eject the cassette tape, push the " " button. If a cassette is put in the slot, push the "TAPE" button. Touch the switch again...

Navigation Manual
Page 212
The green indicators at the lowest empty disc number. If the label faces down, the disc cannot be in the "ACC" or "ON" position. 212 AUDIO SYSTEM ...
The green indicators at the lowest empty disc number. If the label faces down, the disc cannot be in the "ACC" or "ON" position. 212 AUDIO SYSTEM ...

Navigation Manual
Page 213
... and "WAIT" appears on and the "WAIT" changes to the "LOAD", the CD door opens. 2. Insert only one or feed them in the player. The green indicators at both ends of another one disc while the CD door is displayed, the operation will be canceled automatically. Push the " " button for the...
... and "WAIT" appears on and the "WAIT" changes to the "LOAD", the CD door opens. 2. Insert only one or feed them in the player. The green indicators at both ends of another one disc while the CD door is displayed, the operation will be canceled automatically. Push the " " button for the...
Navigation Manual
Page 215
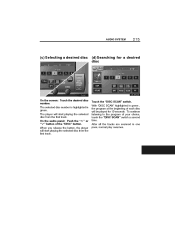
... disc will be played for a desired disc On the screen: Touch the desired disc number. Touch the "DISC SCAN" switch. With "DISC SCAN" highlighted in green , the program at the beginning of the "DISC" button. To continue listening to the program of your choice, touch the "DISC SCAN" switch a second time... selected disc from the first track. The selected disc number is highlighted in one pass, normal play resumes. After all the tracks are scanned in green. When you release the button, the player will start playing the selected disc from the first track.
... disc will be played for a desired disc On the screen: Touch the desired disc number. Touch the "DISC SCAN" switch. With "DISC SCAN" highlighted in green , the program at the beginning of the "DISC" button. To continue listening to the program of your choice, touch the "DISC SCAN" switch a second time... selected disc from the first track. The selected disc number is highlighted in one pass, normal play resumes. After all the tracks are scanned in green. When you release the button, the player will start playing the selected disc from the first track.

Navigation Manual
Page 216
... fast forward the disc. Touch the "SCAN" switch. The compact disc player will resume playing from the beginning. After all the tracks are scanned in green. When you release the button, the player will continue scanning at track 1. Fast forward: Touch the " " switch and hold it will start playing the selected...
... fast forward the disc. Touch the "SCAN" switch. The compact disc player will resume playing from the beginning. After all the tracks are scanned in green. When you release the button, the player will continue scanning at track 1. Fast forward: Touch the " " switch and hold it will start playing the selected...
