

Owners Manual
Page 8
PICTORIAL INDEX Page 1 2 3 4 5 6 7 8 9 10 Page 11 12 13 14 15 16 17 18 19 20 21 Driving position memory switch ...168 Power rear view mirror control switch ...111 Door lock switch and power window switches ...30, 40 Fuel filler door opener ...85 Trunk lid opener ...84 Hood lock release lever ......
PICTORIAL INDEX Page 1 2 3 4 5 6 7 8 9 10 Page 11 12 13 14 15 16 17 18 19 20 21 Driving position memory switch ...168 Power rear view mirror control switch ...111 Door lock switch and power window switches ...30, 40 Fuel filler door opener ...85 Trunk lid opener ...84 Hood lock release lever ......

Owners Manual
Page 10
PICTORIAL INDEX Page 1 2 3 4 5 6 7 8 9 10 Page 11 12 13 14 15 16 17 18 19 20 21 Driving position memory switch ...168 Power rear view mirror control switch ...111 Door lock switch and power window switches ...30, 40 Fuel filler door opener ...85 Trunk lid opener ...84 Hood lock release lever ......
PICTORIAL INDEX Page 1 2 3 4 5 6 7 8 9 10 Page 11 12 13 14 15 16 17 18 19 20 21 Driving position memory switch ...168 Power rear view mirror control switch ...111 Door lock switch and power window switches ...30, 40 Fuel filler door opener ...85 Trunk lid opener ...84 Hood lock release lever ......

Owners Manual
Page 17
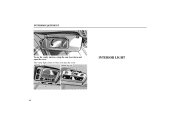
PICTORIAL INDEX EXTERIOR VIEW Page 1 2 3 4 Rear window defogger ...39 Trunk lid ...83 Fuel filler door ...85 Hood ...81 Headlights ...32, 399 Moon roof ...88 Outside rear view mirror 109 Door ...27 Windshield wiper and washer 38 Tire and wheel ...363 65S012-4 5 6 7 8 9 10 65S011-4 For detailed information, refer to the description given in each section. xvii
PICTORIAL INDEX EXTERIOR VIEW Page 1 2 3 4 Rear window defogger ...39 Trunk lid ...83 Fuel filler door ...85 Hood ...81 Headlights ...32, 399 Moon roof ...88 Outside rear view mirror 109 Door ...27 Windshield wiper and washer 38 Tire and wheel ...363 65S012-4 5 6 7 8 9 10 65S011-4 For detailed information, refer to the description given in each section. xvii

Owners Manual
Page 50
SECTION INSTRUMENTS AND CONTROLS Switches Headlight switch ...32 Headlight dimmer and turn signal switch ...35 Fog light switch ...37 Windshield wiper and washer switch ...38 Rear window and outside rear view mirror defogger switch . 39 Power window switches ...40 Emergency flasher switch ...44 Seat heater switches ...45 1- 2 HEADLIGHT SWITCH 32
SECTION INSTRUMENTS AND CONTROLS Switches Headlight switch ...32 Headlight dimmer and turn signal switch ...35 Fog light switch ...37 Windshield wiper and washer switch ...38 Rear window and outside rear view mirror defogger switch . 39 Power window switches ...40 Emergency flasher switch ...44 Seat heater switches ...45 1- 2 HEADLIGHT SWITCH 32

Owners Manual
Page 57
The thin heater wires on , push the switch. The system will quickly clear the surface. SWITCHES REAR WINDOW AND OUTSIDE REAR VIEW MIRROR DEFOGGER SWITCH To turn the electric rear window defogger on the inside of the rear window and the heater panels in the "ON" position. The ignition key must be in the outside rear view mirrors will automatically shut off when the defogger has operated about 15 minutes. 39 An indicator light is on when the defogger is operating.
The thin heater wires on , push the switch. The system will quickly clear the surface. SWITCHES REAR WINDOW AND OUTSIDE REAR VIEW MIRROR DEFOGGER SWITCH To turn the electric rear window defogger on the inside of the rear window and the heater panels in the "ON" position. The ignition key must be in the outside rear view mirrors will automatically shut off when the defogger has operated about 15 minutes. 39 An indicator light is on when the defogger is operating.

Owners Manual
Page 58
... operating the switch. D To prevent the battery from being discharged, do not operate the defogger continuously longer than necessary. 40 If the outside rear view mirrors are heavily coated with ice, use may cause the battery to turn the defogger off them when the switch is desired, simply actuate the switch... again. POWER WINDOW SWITCHES NOTICE D When cleaning the inside of the rear window, be careful not to melt snow. SWITCHES CAUTION Since the mirror surfaces can get hot, keep your hands off .
... operating the switch. D To prevent the battery from being discharged, do not operate the defogger continuously longer than necessary. 40 If the outside rear view mirrors are heavily coated with ice, use may cause the battery to turn the defogger off them when the switch is desired, simply actuate the switch... again. POWER WINDOW SWITCHES NOTICE D When cleaning the inside of the rear window, be careful not to melt snow. SWITCHES CAUTION Since the mirror surfaces can get hot, keep your hands off .

Owners Manual
Page 83
SECTION INSTRUMENTS AND CONTROLS Interior equipment Vanity mirrors ...65 Interior light ...66 Personal lights ...67 Ignition switch light ...68 Clock ...69 Cigarette lighter and ashtray ...69 Glovebox ...72 Garage door opener ...73 Cup holders ...76 Floor mat ...78 Luggage stowage precautions ...80 1- 4 VANITY MIRRORS 65
SECTION INSTRUMENTS AND CONTROLS Interior equipment Vanity mirrors ...65 Interior light ...66 Personal lights ...67 Ignition switch light ...68 Clock ...69 Cigarette lighter and ashtray ...69 Glovebox ...72 Garage door opener ...73 Cup holders ...76 Floor mat ...78 Luggage stowage precautions ...80 1- 4 VANITY MIRRORS 65
Owners Manual
Page 84
The vanity light comes on when you open the cover. INTERIOR LIGHT 66 INTERIOR EQUIPMENT To use the vanity mirrors, swing the sun visor down and open the cover.
The vanity light comes on when you open the cover. INTERIOR LIGHT 66 INTERIOR EQUIPMENT To use the vanity mirrors, swing the sun visor down and open the cover.

Owners Manual
Page 111
SECTION INSTRUMENTS AND CONTROLS Comfort adjustment Front seats ...94 Head restraints ...102 Tilt and telescopic steering wheell ...104 Outside rear view mirrors ...109 Inside rear view mirror ...113 Seat belts ...115 SRS airbags ...128 Child restraint ...143 Driving position memory system ...168 1- 6 93
SECTION INSTRUMENTS AND CONTROLS Comfort adjustment Front seats ...94 Head restraints ...102 Tilt and telescopic steering wheell ...104 Outside rear view mirrors ...109 Inside rear view mirror ...113 Seat belts ...115 SRS airbags ...128 Child restraint ...143 Driving position memory system ...168 1- 6 93

Owners Manual
Page 127
... careful when judging the size or distance of your vehicle in a normal flat mirror. When the inside rear view mirror darkens in the outside rear view mirrors also darken to reduce the reflection of the headlights of the following vehicle. For details, see the side of any object seen in... the outside rear view mirror on page 113. It is a convex mirror with a curved surface. When you can just see "Inside rear view mirror" on the passenger's side. Any object seen in a convex...
... careful when judging the size or distance of your vehicle in a normal flat mirror. When the inside rear view mirror darkens in the outside rear view mirrors also darken to reduce the reflection of the headlights of the following vehicle. For details, see the side of any object seen in... the outside rear view mirror on page 113. It is a convex mirror with a curved surface. When you can just see "Inside rear view mirror" on the passenger's side. Any object seen in a convex...

Owners Manual
Page 128
COMFORT ADJUSTMENT CAUTION D Do not adjust the mirror while the vehicle is on. 110 It may cause the driver to mishandle the vehicle and an accident may occur, resulting in personal injuries. D Since the mirror surfaces can get hot, keep your hands off them when the rear window and outside rear view mirror defogger switch is moving.
COMFORT ADJUSTMENT CAUTION D Do not adjust the mirror while the vehicle is on. 110 It may cause the driver to mishandle the vehicle and an accident may occur, resulting in personal injuries. D Since the mirror surfaces can get hot, keep your hands off them when the rear window and outside rear view mirror defogger switch is moving.

Owners Manual
Page 129
The power rear view mirror can be adjusted when the key is in the desired side. NOTICE If ice should jam the mirror, do not operate the control or scrape the mirror face. Use a spray de-icer to free the mirror. 111 COMFORT ADJUSTMENT Power rear view mirror control To adjust the power rear view mirror, first place the master switch at "L" (left) or "R" (right), and move the control switch in the "ACC" or "ON" position.
The power rear view mirror can be adjusted when the key is in the desired side. NOTICE If ice should jam the mirror, do not operate the control or scrape the mirror face. Use a spray de-icer to free the mirror. 111 COMFORT ADJUSTMENT Power rear view mirror control To adjust the power rear view mirror, first place the master switch at "L" (left) or "R" (right), and move the control switch in the "ACC" or "ON" position.

Owners Manual
Page 130
The rear view mirrors can be extended and properly adjusted before driving. 112 CAUTION Do not drive with the mirrors folded backward. COMFORT ADJUSTMENT Folding rear view mirrors To fold the rear view mirror, push backward. Both the driver and passenger side rear view mirrors must be folded backward for parking in restricted areas.
The rear view mirrors can be extended and properly adjusted before driving. 112 CAUTION Do not drive with the mirrors folded backward. COMFORT ADJUSTMENT Folding rear view mirrors To fold the rear view mirror, push backward. Both the driver and passenger side rear view mirrors must be folded backward for parking in restricted areas.

Owners Manual
Page 131
... the rear of headlights. 113 When the outside rear view mirror surfaces will also become darker. Pushing the switch changes the mode between "AUTO" and "DAY". The indicator comes on , the inside rear view mirror surface changes, the outside air temperature is normal. COMFORT ADJUSTMENT... INSIDE REAR VIEW MIRROR Adjust the mirror so that you , the mirror surface darkens slightly to the detection of your vehicle in response to reduce the...
... the rear of headlights. 113 When the outside rear view mirror surfaces will also become darker. Pushing the switch changes the mode between "AUTO" and "DAY". The indicator comes on , the inside rear view mirror surface changes, the outside air temperature is normal. COMFORT ADJUSTMENT... INSIDE REAR VIEW MIRROR Adjust the mirror so that you , the mirror surface darkens slightly to the detection of your vehicle in response to reduce the...

Owners Manual
Page 132
COMFORT ADJUSTMENT CAUTION Do not adjust the mirror while the vehicle is moving. It may cause the driver to mishandle the vehicle and an accident may occur resulting in personal injuries. 114
COMFORT ADJUSTMENT CAUTION Do not adjust the mirror while the vehicle is moving. It may cause the driver to mishandle the vehicle and an accident may occur resulting in personal injuries. 114

Owners Manual
Page 186
DRIVING POSITION MEMORY SYSTEM The micro computer can be done when the ignition key is in the "ON" position, and the selector lever is in the "P" position. To remove the child restraint system, press the buckle-release button and allow the belt to retract. COMFORT ADJUSTMENT 2. This can only be entered into the computer's memory. Two different driving position profiles can memorize the position of the driver's seat, the positions of the tilt and telescopic steering, and outside rear view mirrors. Setting a driving position 168
DRIVING POSITION MEMORY SYSTEM The micro computer can be done when the ignition key is in the "ON" position, and the selector lever is in the "P" position. To remove the child restraint system, press the buckle-release button and allow the belt to retract. COMFORT ADJUSTMENT 2. This can only be entered into the computer's memory. Two different driving position profiles can memorize the position of the driver's seat, the positions of the tilt and telescopic steering, and outside rear view mirrors. Setting a driving position 168

Owners Manual
Page 187
... and the new position will be recorded. COMFORT ADJUSTMENT 1. Activating a memorized position 169 Adjust the driver's seat, tilt and telescopic steering and outside rear view mirrors to first activate the memorized position, then make only slight changes to an already memorized position, the easiest way is to the desired position. 2. To...
... and the new position will be recorded. COMFORT ADJUSTMENT 1. Activating a memorized position 169 Adjust the driver's seat, tilt and telescopic steering and outside rear view mirrors to first activate the memorized position, then make only slight changes to an already memorized position, the easiest way is to the desired position. 2. To...

Owners Manual
Page 230
...'s ventilation system, keep the inlet grilles in the vehicle, drive with the windows open and the trunk lid closed. Adjust inside and outside rear view mirrors. 4. IGNITION SWITCH WITH STEERING LOCK BEFORE STARTING THE ENGINE 1. Check the area around the vehicle before entering it. 2. D If you have sufficient fuel. 212 STARTING...
...'s ventilation system, keep the inlet grilles in the vehicle, drive with the windows open and the trunk lid closed. Adjust inside and outside rear view mirrors. 4. IGNITION SWITCH WITH STEERING LOCK BEFORE STARTING THE ENGINE 1. Check the area around the vehicle before entering it. 2. D If you have sufficient fuel. 212 STARTING...

Owners Manual
Page 284
...to the pressure recommended by the trailer manufacturer in respect to the scheduled maintenance information in schedule D Lexus recommends that you do not, install required rear view mirrors appropriate for your lights. D Retighten all fixing bolts of the towing ball and bracket after approximately 1000... may damage your vehicle's electrical system and cause a malfunction of your trailer. Pre-towing safety check D Check that your rear view mirrors conform to any new power train component (engine, transmission, differential, wheel bearing, etc.) for the first 800 km (500 miles) of...
...to the pressure recommended by the trailer manufacturer in respect to the scheduled maintenance information in schedule D Lexus recommends that you do not, install required rear view mirrors appropriate for your lights. D Retighten all fixing bolts of the towing ball and bracket after approximately 1000... may damage your vehicle's electrical system and cause a malfunction of your trailer. Pre-towing safety check D Check that your rear view mirrors conform to any new power train component (engine, transmission, differential, wheel bearing, etc.) for the first 800 km (500 miles) of...

Owners Manual
Page 395
... panel lights Discharge warning light, multiport fuel injection system/sequential multiport fuel injection system, SRS airbag system Instrument panel lights, glovebox light Outside rear view mirror defogger Turn signal lights Stop lights, cruise control system cancel device Cigarette lighter, theft deterrent system, shift lock system, SRS airbag system, instrument panel lights...
... panel lights Discharge warning light, multiport fuel injection system/sequential multiport fuel injection system, SRS airbag system Instrument panel lights, glovebox light Outside rear view mirror defogger Turn signal lights Stop lights, cruise control system cancel device Cigarette lighter, theft deterrent system, shift lock system, SRS airbag system, instrument panel lights...