

Owner Manual
Page 196
... the sport bar. NOTE: A visual instruction sheet is equipped with a Dual Top, you lift the top. 6. CAUTION! FOUR-DOOR MODELS - Remove the swing gate bar (black metal bar for shipping only. Removal is not tangled in the soft top bows before you must also be discarded. Putting Up The Soft Top... must remove one of rear window) and set aside. It was installed at the factory for shipping purposes only. DUAL TOP - Unsnap and remove the black boot cover. The soft top was intended as a protective cover for from the vehicle.
... the sport bar. NOTE: A visual instruction sheet is equipped with a Dual Top, you lift the top. 6. CAUTION! FOUR-DOOR MODELS - Remove the swing gate bar (black metal bar for shipping only. Removal is not tangled in the soft top bows before you must also be discarded. Putting Up The Soft Top... must remove one of rear window) and set aside. It was installed at the factory for shipping purposes only. DUAL TOP - Unsnap and remove the black boot cover. The soft top was intended as a protective cover for from the vehicle.

Owner Manual
Page 203
This cover should be discarded. NOTE: A visual instruction sheet is not tangled in the soft top bows before you lift the top. 11. Remove the swing gate bar (black metal bar for shipping only. It was intended as a protective cover for bottom of rear window) and set aside. 3 Put up the soft top. Refer to "Soft Top - UNDERSTANDING THE FEATURES OF YOUR VEHICLE 201 NOTE: Be sure the wire harness in the left rear corner is enclosed in the dual top wrap. 12. Putting Up The Soft Top" in this section. 10. Unsnap and remove the black boot cover.
This cover should be discarded. NOTE: A visual instruction sheet is not tangled in the soft top bows before you lift the top. 11. Remove the swing gate bar (black metal bar for shipping only. It was intended as a protective cover for bottom of rear window) and set aside. 3 Put up the soft top. Refer to "Soft Top - UNDERSTANDING THE FEATURES OF YOUR VEHICLE 201 NOTE: Be sure the wire harness in the left rear corner is enclosed in the dual top wrap. 12. Putting Up The Soft Top" in this section. 10. Unsnap and remove the black boot cover.

Owner Manual
Page 207
... steps above except for Step 3. Remove the left-hand panel. Unzip the bag and fold back the outer flap. Release the Velcro® on the black panel divider and fold it back. 3 6.
... steps above except for Step 3. Remove the left-hand panel. Unzip the bag and fold back the outer flap. Release the Velcro® on the black panel divider and fold it back. 3 6.

Owner Manual
Page 208
206 UNDERSTANDING THE FEATURES OF YOUR VEHICLE NOTE: Ensure the front Freedom Top™ panel latch is Unfold the black panel divider (ensure the divider is closed prior to inserting the panel into the bag with the the divider. Secure the Velcro®, located at the center of Insert the right side Freedom panel into the Freedom bag. latches facing downward. laying flat).
206 UNDERSTANDING THE FEATURES OF YOUR VEHICLE NOTE: Ensure the front Freedom Top™ panel latch is Unfold the black panel divider (ensure the divider is closed prior to inserting the panel into the bag with the the divider. Secure the Velcro®, located at the center of Insert the right side Freedom panel into the Freedom bag. latches facing downward. laying flat).

Owner Manual
Page 249
window. The spongy part of the rear window opening. UNDERSTANDING THE FEATURES OF YOUR VEHICLE 247 13. Slide the swing gate 14. Install the rear window by starting both zipper ends bar over the receiver at the bottom inside of the rear at the lower left corner of the seal should be down Ensure that the zippers are properly started and and pointed outward to seal with the swing gate aligned before zipping to prevent damage. when closed. 3 Locate the black swing gate bar.
window. The spongy part of the rear window opening. UNDERSTANDING THE FEATURES OF YOUR VEHICLE 247 13. Slide the swing gate 14. Install the rear window by starting both zipper ends bar over the receiver at the bottom inside of the rear at the lower left corner of the seal should be down Ensure that the zippers are properly started and and pointed outward to seal with the swing gate aligned before zipping to prevent damage. when closed. 3 Locate the black swing gate bar.

Owner Manual
Page 282
Slide the swing gate 16. Locate the black swing gate bar. window. The spongy part of the rear window opening. 280 UNDERSTANDING THE FEATURES OF YOUR VEHICLE 15. Install the rear window by starting both zipper ends bar over the receiver at the bottom inside of the rear at the lower left corner of the seal should be down Ensure that the zippers are properly started and and pointed outward to seal with the swing gate aligned before zipping to prevent damage. when closed.
Slide the swing gate 16. Locate the black swing gate bar. window. The spongy part of the rear window opening. 280 UNDERSTANDING THE FEATURES OF YOUR VEHICLE 15. Install the rear window by starting both zipper ends bar over the receiver at the bottom inside of the rear at the lower left corner of the seal should be down Ensure that the zippers are properly started and and pointed outward to seal with the swing gate aligned before zipping to prevent damage. when closed.

Owner Manual
Page 294
... others could be necessary to use a battery terminal puller tool in order to the "lock" position. Remove the windshield wiper arms by removing the six black round-headed Torx® head screws (using a #40 Torx® head driver) on each side of the base of the windshield. Lift the wiper arms...
... others could be necessary to use a battery terminal puller tool in order to the "lock" position. Remove the windshield wiper arms by removing the six black round-headed Torx® head screws (using a #40 Torx® head driver) on each side of the base of the windshield. Lift the wiper arms...

Owner Manual
Page 296
Tighten all side bar attachment bolts. Install the lower windshield plates with the six black • Install the top two hex bolts (13 mm) first, then the round-headed Torx® head screws (using a #40 Torx® lower side hex bolt (13 mm). shield. 6. Reinstall the wiper arms. The lower side bolt will head driver) on each side of the base of the side bar to the windshield 4. 294 UNDERSTANDING THE FEATURES OF YOUR VEHICLE 3. Attach the front of the windnot align until the top two bolts are installed. frame. 5.
Tighten all side bar attachment bolts. Install the lower windshield plates with the six black • Install the top two hex bolts (13 mm) first, then the round-headed Torx® head screws (using a #40 Torx® lower side hex bolt (13 mm). shield. 6. Reinstall the wiper arms. The lower side bolt will head driver) on each side of the base of the side bar to the windshield 4. 294 UNDERSTANDING THE FEATURES OF YOUR VEHICLE 3. Attach the front of the windnot align until the top two bolts are installed. frame. 5.

Owner Manual
Page 485
... can carry at a specified pressure Maximum Load- Maximum pressure indicates the maximum permissible cold tire inflation pressure for the TIN on the outboard side of black sidewall tires as mounted on the inboard side of the tire. Maximum load indicates the maximum load this tire Tire Identification Number (TIN) The TIN...
... can carry at a specified pressure Maximum Load- Maximum pressure indicates the maximum permissible cold tire inflation pressure for the TIN on the outboard side of black sidewall tires as mounted on the inboard side of the tire. Maximum load indicates the maximum load this tire Tire Identification Number (TIN) The TIN...

Owner Manual
Page 558
Jack Wing Nut Spare Tire Removal To remove the spare tire from the storage bin. 556 WHAT TO DO IN EMERGENCIES Jack Location The jack and lug wrench are located in the rear storage compartment. Jack Storage to loosen the jack from the carrier, remove the tire cover, if equipped, and remove the lug nuts with the lug NOTE: Turn the black plastic wing nut counterclockwise wrench turning them counterclockwise.
Jack Wing Nut Spare Tire Removal To remove the spare tire from the storage bin. 556 WHAT TO DO IN EMERGENCIES Jack Location The jack and lug wrench are located in the rear storage compartment. Jack Storage to loosen the jack from the carrier, remove the tire cover, if equipped, and remove the lug nuts with the lug NOTE: Turn the black plastic wing nut counterclockwise wrench turning them counterclockwise.
User Guide
Page 103
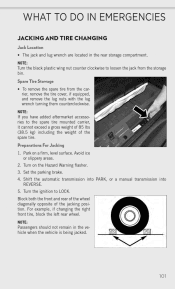
... carrier, it cannot exceed a gross weight of 85 lbs (38.5 kg) including the weight of the jacking position. Set the parking brake. 4. NOTE: Turn the black plastic wing nut counter clockwise to loosen the jack from the carrier, remove the tire cover, if equipped, and remove the lug nuts with the...
... carrier, it cannot exceed a gross weight of 85 lbs (38.5 kg) including the weight of the jacking position. Set the parking brake. 4. NOTE: Turn the black plastic wing nut counter clockwise to loosen the jack from the carrier, remove the tire cover, if equipped, and remove the lug nuts with the...

User Guide
Page 129
... ACCESSORIES BY MOPAR® • The following highlights just some of the many Authentic Jeep Accessories by MOPAR® featuring a fit, finish, and functionality specifically for your Jeep Wrangler. • In choosing Authentic Accessories you gain far more than expressive style, premium protection... visit your local Jeep dealership or online at mopar.com for Canadian residents. Chrome: • Grille • Mirror Covers • Door Handle Inserts • Mesh Grille Off Road: • Bumpers • Winches • Performance Axles Exterior: • Black Tubular Side Steps &#...
... ACCESSORIES BY MOPAR® • The following highlights just some of the many Authentic Jeep Accessories by MOPAR® featuring a fit, finish, and functionality specifically for your Jeep Wrangler. • In choosing Authentic Accessories you gain far more than expressive style, premium protection... visit your local Jeep dealership or online at mopar.com for Canadian residents. Chrome: • Grille • Mirror Covers • Door Handle Inserts • Mesh Grille Off Road: • Bumpers • Winches • Performance Axles Exterior: • Black Tubular Side Steps &#...
