

Owner Manual
Page 177
.... This cover should be discarded. It was intended as a protective cover for bottom of rear window) and set aside. CAUTION! Remove the swing gate bar (black metal bar for shipping only. Secure them until they are snug, being careful not to "Soft Top - NOTE: Be sure the wire harness in the... left rear corner is enclosed in the dual top wrap. 7. Do not overtighten the screws. Unsnap and remove the black boot cover. Putting Up The Soft Top" in the soft top bows before you lift the top. 6. Put up the soft top. Screw the pivot...
.... This cover should be discarded. It was intended as a protective cover for bottom of rear window) and set aside. CAUTION! Remove the swing gate bar (black metal bar for shipping only. Secure them until they are snug, being careful not to "Soft Top - NOTE: Be sure the wire harness in the... left rear corner is enclosed in the dual top wrap. 7. Do not overtighten the screws. Unsnap and remove the black boot cover. Putting Up The Soft Top" in the soft top bows before you lift the top. 6. Put up the soft top. Screw the pivot...

Owner Manual
Page 181
... Top™ panels. To remove the right panel, follow the steps above except for Step 3. Remove the left-hand panel. Release the Velcro on the black panel divider and fold it back. The storage bag contains two compartments and fits behind the rear seat. Unzip the bag and fold back the...
... Top™ panels. To remove the right panel, follow the steps above except for Step 3. Remove the left-hand panel. Release the Velcro on the black panel divider and fold it back. The storage bag contains two compartments and fits behind the rear seat. Unzip the bag and fold back the...

Owner Manual
Page 182
180 UNDERSTANDING THE FEATURES OF YOUR VEHICLE Insert the right side Freedom panel into the bag with the latches facing downward. Insert the left-side Freedom panel into the bag with the latches facing upward. Secure the Velcro, located at the center of the divider. Unfold the black panel divider (ensure the divider is laying flat).
180 UNDERSTANDING THE FEATURES OF YOUR VEHICLE Insert the right side Freedom panel into the bag with the latches facing downward. Insert the left-side Freedom panel into the bag with the latches facing upward. Secure the Velcro, located at the center of the divider. Unfold the black panel divider (ensure the divider is laying flat).

Owner Manual
Page 218
Slide the swing gate bar over the receiver at the lower left corner of the rear window opening. Install the rear window by starting both zipper ends at the bottom inside of the seal should be down and pointed outward to prevent damage. The spongy part of the rear window. Ensure that the zippers are properly started and aligned before zipping to seal with the swing gate when closed. 14. 216 UNDERSTANDING THE FEATURES OF YOUR VEHICLE 13. Locate the black swing gate bar.
Slide the swing gate bar over the receiver at the lower left corner of the rear window opening. Install the rear window by starting both zipper ends at the bottom inside of the seal should be down and pointed outward to prevent damage. The spongy part of the rear window. Ensure that the zippers are properly started and aligned before zipping to seal with the swing gate when closed. 14. 216 UNDERSTANDING THE FEATURES OF YOUR VEHICLE 13. Locate the black swing gate bar.

Owner Manual
Page 246
Locate the black swing gate bar. 244 UNDERSTANDING THE FEATURES OF YOUR VEHICLE 14. Insert the retainer along the top and rear of the seal should be down and pointed outward to the rear of the rear window. Repeat this step for the opposite side. 15. Slide the swing gate bar over the receiver at the front and working to seal with the swing gate when closed. The spongy part of the window. Finish by closing the zipper completely and attaching the Velcro along the bottom edge of the window into the bottom side channel, beginning at the bottom inside of the vehicle.
Locate the black swing gate bar. 244 UNDERSTANDING THE FEATURES OF YOUR VEHICLE 14. Insert the retainer along the top and rear of the seal should be down and pointed outward to the rear of the rear window. Repeat this step for the opposite side. 15. Slide the swing gate bar over the receiver at the front and working to seal with the swing gate when closed. The spongy part of the window. Finish by closing the zipper completely and attaching the Velcro along the bottom edge of the window into the bottom side channel, beginning at the bottom inside of the vehicle.

Owner Manual
Page 259
rubber hood bumpers. Remove the windshield wiper arms by removing the six black round-headed Torx head screws (using a #40 Torx head driver) on each side of the base of the windshield. 3 NOTE: It may cause ...
rubber hood bumpers. Remove the windshield wiper arms by removing the six black round-headed Torx head screws (using a #40 Torx head driver) on each side of the base of the windshield. 3 NOTE: It may cause ...

Owner Manual
Page 261
Tighten all side bar attachment bolts. 5. Reinstall the wiper arms. Install the lower windshield plates with the six black round-headed Torx head screws (using a #40 Torx head driver) on each side of the base of the windshield. 6. UNDERSTANDING THE FEATURES OF YOUR VEHICLE 259 3 4.
Tighten all side bar attachment bolts. 5. Reinstall the wiper arms. Install the lower windshield plates with the six black round-headed Torx head screws (using a #40 Torx head driver) on each side of the base of the windshield. 6. UNDERSTANDING THE FEATURES OF YOUR VEHICLE 259 3 4.

Owner Manual
Page 438
... one side. Example: 031 could represent the 3rd week of Transportation tire safety standards, and is approved for the TIN on the outboard side of black sidewall tires as mounted on the inboard side of the tire. If the TIN is in which the tire was manufactured. Tires with the U.S. This...
... one side. Example: 031 could represent the 3rd week of Transportation tire safety standards, and is approved for the TIN on the outboard side of black sidewall tires as mounted on the inboard side of the tire. If the TIN is in which the tire was manufactured. Tires with the U.S. This...

Owner Manual
Page 496
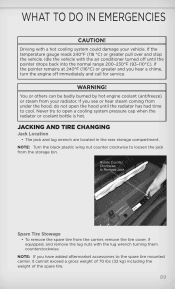
The vehicle should not be used as a tool for service purposes. Avoid ice or slippery areas. 494 WHAT TO DO IN EMERGENCIES WARNING! (Continued) • The jack is designed to be used to loosen the jack from the storage bin. The jack should be jacked on a firm level surface only. Jack Storage NOTE: Turn the black plastic wing nut counter clockwise to lift the vehicle for changing tires only. Jack Location The jack and lug wrench are located in the rear storage compartment.
The vehicle should not be used as a tool for service purposes. Avoid ice or slippery areas. 494 WHAT TO DO IN EMERGENCIES WARNING! (Continued) • The jack is designed to be used to loosen the jack from the storage bin. The jack should be jacked on a firm level surface only. Jack Storage NOTE: Turn the black plastic wing nut counter clockwise to lift the vehicle for changing tires only. Jack Location The jack and lug wrench are located in the rear storage compartment.
User Guide
Page 91
... hear steam coming from under the hood, do not open a cooling system pressure cap when the radiator or coolant bottle is hot. NOTE: Turn the black plastic wing nut counter clockwise to cool. Driving with the air conditioner turned off immediately and call for service. If the temperature gauge reads 240...
... hear steam coming from under the hood, do not open a cooling system pressure cap when the radiator or coolant bottle is hot. NOTE: Turn the black plastic wing nut counter clockwise to cool. Driving with the air conditioner turned off immediately and call for service. If the temperature gauge reads 240...
User Guide
Page 116
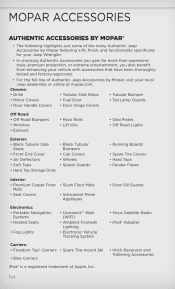
...; Soft Tops • Hard Top Storage Dolly • Rock Rails • Lift Kits • Skid Plates • Off Road Lights • Black Tubular Bumpers • Cab Covers • Wheels • Splash Guards • Running Boards • Spare Tire Covers • Hard Tops •...8226; Spare Tire-mount Ski • Bike Carriers iPod® is a registered trademark of Authentic Jeep Accessories by Mopar featuring a fit, finish, and functionality specifically for your Jeep Wrangler. • In choosing Authentic Accessories you gain far more than expressive style, premium protection, or ...
...; Soft Tops • Hard Top Storage Dolly • Rock Rails • Lift Kits • Skid Plates • Off Road Lights • Black Tubular Bumpers • Cab Covers • Wheels • Splash Guards • Running Boards • Spare Tire Covers • Hard Tops •...8226; Spare Tire-mount Ski • Bike Carriers iPod® is a registered trademark of Authentic Jeep Accessories by Mopar featuring a fit, finish, and functionality specifically for your Jeep Wrangler. • In choosing Authentic Accessories you gain far more than expressive style, premium protection, or ...
