

Owner Manual
Page 140
WARNING! • Adjusting a seat while driving may be sure that the seat adjusters have latched. Serious injury or death could result in the seat, lift up on the bar and move forward and rearward on the seat to be dangerous. Release the bar once the desired position has been reached. ...
WARNING! • Adjusting a seat while driving may be sure that the seat adjusters have latched. Serious injury or death could result in the seat, lift up on the bar and move forward and rearward on the seat to be dangerous. Release the bar once the desired position has been reached. ...

Owner Manual
Page 142
WARNING! Do not ride with the seatback reclined so that the shoulder belt is no longer resting against your chest. In a collision you could slide under the seat belt, which could result in serious injury or death. Reclining Seat Lever To return the seatback, lift the lever, lean forward and release the lever. 140 UNDERSTANDING THE FEATURES OF YOUR VEHICLE Driver's Seatback Recline To adjust the seatback, lift the lever located on the outboard side of the seat, lean back to the desired angle and release the lever.
WARNING! Do not ride with the seatback reclined so that the shoulder belt is no longer resting against your chest. In a collision you could slide under the seat belt, which could result in serious injury or death. Reclining Seat Lever To return the seatback, lift the lever, lean forward and release the lever. 140 UNDERSTANDING THE FEATURES OF YOUR VEHICLE Driver's Seatback Recline To adjust the seatback, lift the lever located on the outboard side of the seat, lean back to the desired angle and release the lever.

Owner Manual
Page 143
UNDERSTANDING THE FEATURES OF YOUR VEHICLE 141 Fold-Flat Front Passenger Seat To fold the front passenger seat, lift the recliner handle to the full upward position and push the seatback forward until it rests on the seat cushion. 3 Front Passenger Seat Folded Flat Fold-Flat Front Passenger Seat Lever
UNDERSTANDING THE FEATURES OF YOUR VEHICLE 141 Fold-Flat Front Passenger Seat To fold the front passenger seat, lift the recliner handle to the full upward position and push the seatback forward until it rests on the seat cushion. 3 Front Passenger Seat Folded Flat Fold-Flat Front Passenger Seat Lever

Owner Manual
Page 148
146 UNDERSTANDING THE FEATURES OF YOUR VEHICLE WARNING! Rear Seats Folded Flat To raise the seatback, pull the strap forward and lift the seatback into position the seat will not provide the proper stability for child seats and/or passengers. If the seatback is securely locked into position. An improperly latched seat could cause serious injury. Be certain that the seatback is not securely locked into its upright position.
146 UNDERSTANDING THE FEATURES OF YOUR VEHICLE WARNING! Rear Seats Folded Flat To raise the seatback, pull the strap forward and lift the seatback into position the seat will not provide the proper stability for child seats and/or passengers. If the seatback is securely locked into position. An improperly latched seat could cause serious injury. Be certain that the seatback is not securely locked into its upright position.
Owner Manual
Page 150
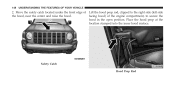
Safety Catch Hood Prop Rod Move the safety catch located under the front edge of the engine compartment, to the right side (left side the hood, near the center and raise the hood. Place the hood prop at the location stamped into the inner hood surface. facing hood) of Lift the hood prop rod, clipped to secure the hood in the open position. 148 UNDERSTANDING THE FEATURES OF YOUR VEHICLE 2.
Safety Catch Hood Prop Rod Move the safety catch located under the front edge of the engine compartment, to the right side (left side the hood, near the center and raise the hood. Place the hood prop at the location stamped into the inner hood surface. facing hood) of Lift the hood prop rod, clipped to secure the hood in the open position. 148 UNDERSTANDING THE FEATURES OF YOUR VEHICLE 2.

Owner Manual
Page 183
ment and lift the lid open the upper storage compartment, push inward on CONSOLE FEATURES The floor console contains both an upper and lower the lower handle to unlatch the upper lid and lift the lid open. 3 Lower Storage Compartment Upper Storage Compartment UNDERSTANDING THE FEATURES OF YOUR VEHICLE 181 To open the lower storage compartment, lift upward on the upper handle to unlatch the lower storage compartstorage compartment. To open .
ment and lift the lid open the upper storage compartment, push inward on CONSOLE FEATURES The floor console contains both an upper and lower the lower handle to unlatch the upper lid and lift the lid open. 3 Lower Storage Compartment Upper Storage Compartment UNDERSTANDING THE FEATURES OF YOUR VEHICLE 181 To open the lower storage compartment, lift upward on the upper handle to unlatch the lower storage compartstorage compartment. To open .

Owner Manual
Page 193
...; Travel at high speeds, resulting in damage to the cargo or your vehicle. Wind forces, due to a load. Improperly secured loads can add sudden upward lift to natural causes or nearby truck traffic, can fly off the vehicle, particularly at reduced speeds and turn corners carefully when carrying large or heavy...
...; Travel at high speeds, resulting in damage to the cargo or your vehicle. Wind forces, due to a load. Improperly secured loads can add sudden upward lift to natural causes or nearby truck traffic, can fly off the vehicle, particularly at reduced speeds and turn corners carefully when carrying large or heavy...

Owner Manual
Page 330
...brake pressure is applied to the slipping wheel(s) and engine power is spinning faster than the other vehicles. ERM can not prevent wheel lift due to a limited slip differential and controls the wheel spin across a driven axle. This feature remains active even if TCS and ...reduced to "Electronic Stability Control (ESC)" in this section of this manual. Electronic Roll Mitigation (ERM) This system anticipates the potential for wheel lift by monitoring the driver's steering wheel input and the speed of the driven wheels. 328 STARTING AND OPERATING WARNING! (Continued) • The ...
...brake pressure is applied to the slipping wheel(s) and engine power is spinning faster than the other vehicles. ERM can not prevent wheel lift due to a limited slip differential and controls the wheel spin across a driven axle. This feature remains active even if TCS and ...reduced to "Electronic Stability Control (ESC)" in this section of this manual. Electronic Roll Mitigation (ERM) This system anticipates the potential for wheel lift by monitoring the driver's steering wheel input and the speed of the driven wheels. 328 STARTING AND OPERATING WARNING! (Continued) • The ...

Owner Manual
Page 331
ERM cannot prevent all wheel lift or roll overs, especially those that wheel lift or roll over may occur. The capabilities of an ERMequipped vehicle must never be fully deactivated by putting the vehicle into ESC "Full Off" mode. ...
ERM cannot prevent all wheel lift or roll overs, especially those that wheel lift or roll over may occur. The capabilities of an ERMequipped vehicle must never be fully deactivated by putting the vehicle into ESC "Full Off" mode. ...

Owner Manual
Page 390
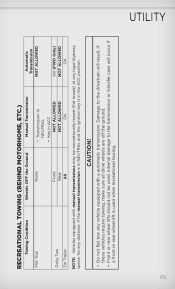
If these vehicles require towing, make sure all drive wheels are off the ground. • Front or rear wheel lifts should not be towed with an automatic transmission. Internal damage to the drivetrain will occur if a front or rear wheel lift is that FWD (NOT 4WD) automatic transmission models may be used when recreational towing. The only exception is used . 388 STARTING AND OPERATING CAUTION! • Do not flat tow any vehicle equipped with the front wheels raised on a dolly. Damage to the transmission or transfer case will result.
If these vehicles require towing, make sure all drive wheels are off the ground. • Front or rear wheel lifts should not be towed with an automatic transmission. Internal damage to the drivetrain will occur if a front or rear wheel lift is that FWD (NOT 4WD) automatic transmission models may be used when recreational towing. The only exception is used . 388 STARTING AND OPERATING CAUTION! • Do not flat tow any vehicle equipped with the front wheels raised on a dolly. Damage to the transmission or transfer case will result.

Owner Manual
Page 394
.... • Being under a jacked-up vehicle is dangerous. Pull far enough off the jack and fall on a jack. The vehicle should not be raised on a lift. • Never start or run the engine while the vehicle is on a firm level surface only. The jack should be crushed. You could slip off...
.... • Being under a jacked-up vehicle is dangerous. Pull far enough off the jack and fall on a jack. The vehicle should not be raised on a lift. • Never start or run the engine while the vehicle is on a firm level surface only. The jack should be crushed. You could slip off...
Owner Manual
Page 395
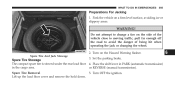
... ice or slippery areas. Set the parking brake. Spare Tire Stowage The compact spare tire is stowed under the rear load floor 4. Spare Tire Removal Lift up the load floor cover and remove the hold down. 5. Do not attempt to avoid the danger of being hit when operating the jack or...
... ice or slippery areas. Set the parking brake. Spare Tire Stowage The compact spare tire is stowed under the rear load floor 4. Spare Tire Removal Lift up the load floor cover and remove the hold down. 5. Do not attempt to avoid the danger of being hit when operating the jack or...

Owner Manual
Page 396
... and set an automatic transmission in the vehicle while the vehicle is on a jack. • Only use the jack in the positions indicated and for lifting this vehicle during a tire change. (Continued) NOTE: Passengers should not remain in PARK;
... and set an automatic transmission in the vehicle while the vehicle is on a jack. • Only use the jack in the positions indicated and for lifting this vehicle during a tire change. (Continued) NOTE: Passengers should not remain in PARK;

Owner Manual
Page 399
... plastic trim, the plastic has the jack screw to remove the tire. 4. Rear Jacking Location 6 Raise the vehicle only enough to the right. Minimum tire lift securely engaged. provides maximum stability. It could slip off the jack and hurt someone near it. tire just clears the surface and enough clearance is... make the vehicle less stable. WHAT TO DO IN EMERGENCIES 397 3. Using the swivel wrench raise the vehicle by turning For vehicles equipped with the lift area closest to the wheel to install the spare tire.
... plastic trim, the plastic has the jack screw to remove the tire. 4. Rear Jacking Location 6 Raise the vehicle only enough to the right. Minimum tire lift securely engaged. provides maximum stability. It could slip off the jack and hurt someone near it. tire just clears the surface and enough clearance is... make the vehicle less stable. WHAT TO DO IN EMERGENCIES 397 3. Using the swivel wrench raise the vehicle by turning For vehicles equipped with the lift area closest to the wheel to install the spare tire.
Owner Manual
Page 411
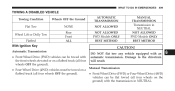
... transmission in NEUTRAL NOT ALLOWED FWD Models ONLY BEST METHOD CAUTION! WHAT TO DO IN EMERGENCIES 409 TOWING A DISABLED VEHICLE Towing Condition Flat Tow Wheel Lift or Dolly Tow Flatbed With Ignition Key Automatic Transmission • Front Wheel Drive (FWD) vehicles can be flat towed (all four wheels on a flatbed truck...
... transmission in NEUTRAL NOT ALLOWED FWD Models ONLY BEST METHOD CAUTION! WHAT TO DO IN EMERGENCIES 409 TOWING A DISABLED VEHICLE Towing Condition Flat Tow Wheel Lift or Dolly Tow Flatbed With Ignition Key Automatic Transmission • Front Wheel Drive (FWD) vehicles can be flat towed (all four wheels on a flatbed truck...
User Guide
Page 15
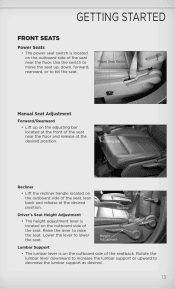
Manual Seat Adjustment Forward/Rearward • Lift up , down, forward, rearward, or to tilt the seat. Driver's Seat Height Adjustment • The height adjustment lever is located on the adjusting bar located ... side of the seat, lean back and release at the desired position. Lower the lever to decrease the lumbar support as desired. 13 Recliner • Lift the recliner handle located on the outboard side of the seatback. Rotate the lumbar lever downward to increase the lumbar support or upward to lower...
Manual Seat Adjustment Forward/Rearward • Lift up , down, forward, rearward, or to tilt the seat. Driver's Seat Height Adjustment • The height adjustment lever is located on the adjusting bar located ... side of the seat, lean back and release at the desired position. Lower the lever to decrease the lumbar support as desired. 13 Recliner • Lift the recliner handle located on the outboard side of the seatback. Rotate the lumbar lever downward to increase the lumbar support or upward to lower...

User Guide
Page 41
... Center 430/430N User's Manual for more tracks. • It is also possible to import display pictures to the internal hard disk drive. To access, lift up on the internal hard disk drive. ELECTRONICS • Pressing the "MEDIA" hard-key and then the "AUX" soft-key to change the mode to...
... Center 430/430N User's Manual for more tracks. • It is also possible to import display pictures to the internal hard disk drive. To access, lift up on the internal hard disk drive. ELECTRONICS • Pressing the "MEDIA" hard-key and then the "AUX" soft-key to change the mode to...
User Guide
Page 67
...tow any vehicle equipped with manual transmissions may be used when recreational towing. Internal damage to the drivetrain will occur if a front or rear wheel lift is in the ACC position. If these vehicles require towing, make sure all drive wheels are off the ground. • Front or rear wheel... lifts should not be recreationally towed (flat towed) at any legal highway speed, for any distance, if the manual transmission is in NEUTRAL and the ...
...tow any vehicle equipped with manual transmissions may be used when recreational towing. Internal damage to the drivetrain will occur if a front or rear wheel lift is in the ACC position. If these vehicles require towing, make sure all drive wheels are off the ground. • Front or rear wheel... lifts should not be recreationally towed (flat towed) at any legal highway speed, for any distance, if the manual transmission is in NEUTRAL and the ...

User Guide
Page 73
... high speed driving or trailer towing up the load floor cover and remove the hold down and the light turns off . Spare Tire Removal • Lift up long grades on hot days, the automatic transmission oil may become too hot. • When the transmission overheat warning light turns on, you may...
... high speed driving or trailer towing up the load floor cover and remove the hold down and the light turns off . Spare Tire Removal • Lift up long grades on hot days, the automatic transmission oil may become too hot. • When the transmission overheat warning light turns on, you may...

User Guide
Page 75
Turn the jack screw to the left . 73 Minimum tire lift provides maximum stability. 5. Remove the wheel nuts and pull the wheel and wheel covers, where applicable, off the hub. NOTE: The wheel cover is securely ... jack is positioned, turn the jack screw to the right until the tire just clears the surface and enough clearance is properly engaged with the lift area closest to the wheel to the right. Lightly tighten the nuts.
Turn the jack screw to the left . 73 Minimum tire lift provides maximum stability. 5. Remove the wheel nuts and pull the wheel and wheel covers, where applicable, off the hub. NOTE: The wheel cover is securely ... jack is positioned, turn the jack screw to the right until the tire just clears the surface and enough clearance is properly engaged with the lift area closest to the wheel to the right. Lightly tighten the nuts.

