

Owner Manual
Page 20
... armed. disarm it, the Vehicle Security Alarm will flash slowly. This shows that the Vehicle Security Alarm is arming. After approximately 16 seconds, sound, the headlights, park lamps and/or turn signals the Vehicle Security Light will turn off the To Arm The System horn after three minutes, the parking lights...
... armed. disarm it, the Vehicle Security Alarm will flash slowly. This shows that the Vehicle Security Alarm is arming. After approximately 16 seconds, sound, the headlights, park lamps and/or turn signals the Vehicle Security Light will turn off the To Arm The System horn after three minutes, the parking lights...
Owner Manual
Page 23
... least 4 seconds, but no longer than Illuminated Approach - Refer to deactivate the Vehicle Security Alarm. 1. Press and hold the UNLOCK button This feature activates the headlights for further information. equipped with the EVIC, perform the Security Alarm activated will operate if the 4. Repeat these steps if you are turned on the...
... least 4 seconds, but no longer than Illuminated Approach - Refer to deactivate the Vehicle Security Alarm. 1. Press and hold the UNLOCK button This feature activates the headlights for further information. equipped with the EVIC, perform the Security Alarm activated will operate if the 4. Repeat these steps if you are turned on the...
Owner Manual
Page 26
... OFF, press and General Information hold the PANIC button on . 1. When the Panic Alarm is 5 mph (8 km/h) or greater. Operation is subject to the the headlights and park lights will flash, the horn will following conditions: pulse on , RS-210 of proved by the party responsible for details. This device may...
... OFF, press and General Information hold the PANIC button on . 1. When the Panic Alarm is 5 mph (8 km/h) or greater. Operation is subject to the the headlights and park lights will flash, the horn will following conditions: pulse on , RS-210 of proved by the party responsible for details. This device may...
Owner Manual
Page 92
...; Flash-To-Pass ...152 If Equipped ...139 ▫ Driver's Seatback Recline ...140 ▫ Fold-Flat Front Passenger Seat ...141 ...149 ▫ Multifunction Lever ...149 ▫ Headlights And Parking Lights ...150 ▫ Daytime Running Lights - 90 UNDERSTANDING THE FEATURES OF YOUR VEHICLE Ⅵ Voice Command - If Equipped ...147 ▫ Voice Training ...134...
...; Flash-To-Pass ...152 If Equipped ...139 ▫ Driver's Seatback Recline ...140 ▫ Fold-Flat Front Passenger Seat ...141 ...149 ▫ Multifunction Lever ...149 ▫ Headlights And Parking Lights ...150 ▫ Daytime Running Lights - 90 UNDERSTANDING THE FEATURES OF YOUR VEHICLE Ⅵ Voice Command - If Equipped ...147 ▫ Voice Training ...134...
Owner Manual
Page 96
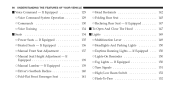
The mirror should be reduced by moving the small control under the mirror to center on the view through the rear window. Adjust the mirror to the night position (toward the windshield). Adjusting Rearview Mirror 94 UNDERSTANDING THE FEATURES OF YOUR VEHICLE MIRRORS Inside Day/Night Mirror A two-point pivot system allows for horizontal and vertical mirror adjustment. Headlight glare can be adjusted while set in the day position (toward the rear of vehicle).
The mirror should be reduced by moving the small control under the mirror to center on the view through the rear window. Adjust the mirror to the night position (toward the windshield). Adjusting Rearview Mirror 94 UNDERSTANDING THE FEATURES OF YOUR VEHICLE MIRRORS Inside Day/Night Mirror A two-point pivot system allows for horizontal and vertical mirror adjustment. Headlight glare can be adjusted while set in the day position (toward the rear of vehicle).

Owner Manual
Page 97
... feature is disabled when the vehicle is activated. UNDERSTANDING THE FEATURES OF YOUR VEHICLE 95 Automatic Dimming Mirror - If Equipped This mirror automatically adjusts for headlight glare from vehicles behind you.
... feature is disabled when the vehicle is activated. UNDERSTANDING THE FEATURES OF YOUR VEHICLE 95 Automatic Dimming Mirror - If Equipped This mirror automatically adjusts for headlight glare from vehicles behind you.

Owner Manual
Page 151
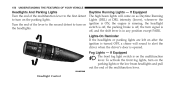
... The multifunction lever controls the operation of the steering column. 3 WARNING! Be sure the hood is located on the left side of the headlights, parking lights, turn signals, headlight beam selection, instrument panel light dimming, interior lights, the passing lights, and the fog lights. If the hood is in motion and block...
... The multifunction lever controls the operation of the steering column. 3 WARNING! Be sure the hood is located on the left side of the headlights, parking lights, turn signals, headlight beam selection, instrument panel light dimming, interior lights, the passing lights, and the fog lights. If the hood is in motion and block...
Owner Manual
Page 152
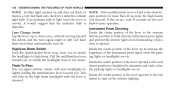
... the second detent to turn on the multifunction lever. To activate the front fog lights, turn on the parking lights. Lights-On Reminder If the headlights or parking lights are left on after the ignition is turned OFF, a chime will come on as Daytime Running to alert the driver when the... is off, the parking brake is off , and the shift lever is on the parking lights or the low beam headlights and pull out the end of the multifunction lever to the first detent The high beam lights will sound to turn signal is opened. If ...
... the second detent to turn on the multifunction lever. To activate the front fog lights, turn on the parking lights. Lights-On Reminder If the headlights or parking lights are left on after the ignition is turned OFF, a chime will come on as Daytime Running to alert the driver when the... is off, the parking brake is off , and the shift lever is on the parking lights or the low beam headlights and pull out the end of the multifunction lever to the first detent The high beam lights will sound to turn signal is opened. If ...
Owner Manual
Page 153
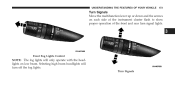
UNDERSTANDING THE FEATURES OF YOUR VEHICLE 151 Turn Signals Move the multifunction lever up or down and the arrows on each side of the instrument cluster flash to show proper operation of the front and rear turn signal lights. 3 Front Fog Lights Control NOTE: The fog lights will turn off the fog lights. Turn Signals Selecting high beam headlights will only operate with the headlights on low beam.
UNDERSTANDING THE FEATURES OF YOUR VEHICLE 151 Turn Signals Move the multifunction lever up or down and the arrows on each side of the instrument cluster flash to show proper operation of the front and rear turn signal lights. 3 Front Fog Lights Control NOTE: The fog lights will turn off the fog lights. Turn Signals Selecting high beam headlights will only operate with the headlights on low beam.
Owner Manual
Page 154
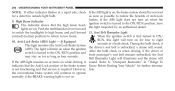
... to the last will flash three times then automatically turn off . lightly pulling the multifunction lever toward you . toward you , to switch the headlights back to low beam. NOTE: If the multifunction lever is defective. If an indicator fails to light when the lever is moved, it would ...the Push the multifunction lever away from illuminating when a door is opened. Rotate the center portion of the instrument panel lights when the parkthe headlights to high beam. This Rotate the center portion of the lever up or down once, without moving beyond the detent, and the turn signal ...
... to the last will flash three times then automatically turn off . lightly pulling the multifunction lever toward you . toward you , to switch the headlights back to low beam. NOTE: If the multifunction lever is defective. If an indicator fails to light when the lever is moved, it would ...the Push the multifunction lever away from illuminating when a door is opened. Rotate the center portion of the instrument panel lights when the parkthe headlights to high beam. This Rotate the center portion of the lever up or down once, without moving beyond the detent, and the turn signal ...
Owner Manual
Page 202
If the ABS light does not turn on . Push the multifunction lever forward to switch the headlights to high beam, and pull toward 11. Anti-Lock Brake (ABS) Light - However, tion. Seat Belt Reminder Light When the ignition switch is unbuckled, a chime ...
If the ABS light does not turn on . Push the multifunction lever forward to switch the headlights to high beam, and pull toward 11. Anti-Lock Brake (ABS) Light - However, tion. Seat Belt Reminder Light When the ignition switch is unbuckled, a chime ...
Owner Manual
Page 222
... this feature is selected the power window and hold the SELECT button when in this feature is selected the driver can choose to have the headlights remain on the first press of the RKE transmitter UNLOCK button. Headlamp Off Delay When this display until "Driver's Door 1st" or "All Doors" appears...
... this feature is selected the power window and hold the SELECT button when in this feature is selected the driver can choose to have the headlights remain on the first press of the RKE transmitter UNLOCK button. Headlamp Off Delay When this display until "Driver's Door 1st" or "All Doors" appears...
Owner Manual
Page 223
... Uconnect™ gps system units "OFF", "45 sec.", "5 min.", or "10 min." appears to make your When this display until the compass is selected the headlights will activate selection. Press and hold the SELECT button when in this feature is calibrated. If Equipped unlocked using the RKE transmitter. Refer to This...
... Uconnect™ gps system units "OFF", "45 sec.", "5 min.", or "10 min." appears to make your When this display until the compass is selected the headlights will activate selection. Press and hold the SELECT button when in this feature is calibrated. If Equipped unlocked using the RKE transmitter. Refer to This...
Owner Manual
Page 448
... or rag that are lighter and not use scrapers or other sharp instruments which may less susceptible to stone breakage than glass headlights. Instrument Panel Cover To minimize the possibility of scratching the lenses and The instrument panel cover has a low glare surface which... may cause respiratory harm. able reflections. WARNING! scratch the elements. To minimizes reflections on the mirror. Do Cleaning Headlights Your vehicle has plastic headlights that you are using. Do not use remove road dirt, wash with MOPAR Glass Cleaner or any commercial Many are...
... or rag that are lighter and not use scrapers or other sharp instruments which may less susceptible to stone breakage than glass headlights. Instrument Panel Cover To minimize the possibility of scratching the lenses and The instrument panel cover has a low glare surface which... may cause respiratory harm. able reflections. WARNING! scratch the elements. To minimizes reflections on the mirror. Do Cleaning Headlights Your vehicle has plastic headlights that you are using. Do not use remove road dirt, wash with MOPAR Glass Cleaner or any commercial Many are...

Owner Manual
Page 489
... of Coolant (Antifreeze) ...432 Corrosion Protection ...442 Cruise Light ...204 Cupholders ...181 Customer Assistance ...475 Delay (Intermittent) Wipers ...155 Diagnostic System, Onboard ...415 Dimmer Switch, Headlight ...152 Dipsticks Power Steering ...320 Disposal Antifreeze (Engine Coolant) ...434 Engine Oil ...421 Door Locks ...29 Door Locks, Automatic ...31 Door Opener, Garage ...161 Downshifting...
... of Coolant (Antifreeze) ...432 Corrosion Protection ...442 Cruise Light ...204 Cupholders ...181 Customer Assistance ...475 Delay (Intermittent) Wipers ...155 Diagnostic System, Onboard ...415 Dimmer Switch, Headlight ...152 Dipsticks Power Steering ...320 Disposal Antifreeze (Engine Coolant) ...434 Engine Oil ...421 Door Locks ...29 Door Locks, Automatic ...31 Door Opener, Garage ...161 Downshifting...
Owner Manual
Page 492
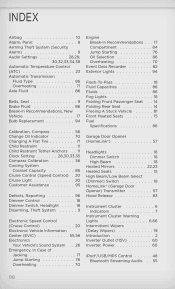
...;) ...99 Garage Door Opener (HomeLink®) ...161 Hazard Warning Flasher ...390 Gas Cap (Fuel Filler Cap) ...371,373,415 Head Restraints ...142 Gasoline (Fuel) ...454 Headlights ...453 Cleaning ...446 Gasoline, Clean Air ...367 High Beam ...152 Gasoline, Reformulated ...367 High Beam/Low Beam Select Switch ...152 Gauges Passing ...152 Coolant Temperature...
...;) ...99 Garage Door Opener (HomeLink®) ...161 Hazard Warning Flasher ...390 Gas Cap (Fuel Filler Cap) ...371,373,415 Head Restraints ...142 Gasoline (Fuel) ...454 Headlights ...453 Cleaning ...446 Gasoline, Clean Air ...367 High Beam ...152 Gasoline, Reformulated ...367 High Beam/Low Beam Select Switch ...152 Gauges Passing ...152 Coolant Temperature...
Owner Manual
Page 494
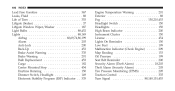
... ...201 Bulb Replacement ...453 Cargo ...182 Center Mounted Stop ...454 Daytime Running ...150 Dimmer Switch, Headlight ...149 Electronic Stability Program (ESP) Indicator . . 335 Engine Temperature Warning ...201 Exterior ...88 Fog ...150,210,453 Headlight Switch ...150 Headlights ...150 High Beam Indicator ...200 Instrument Cluster ...150 License ...454 Lights On Reminder ...150 Low Fuel...
... ...201 Bulb Replacement ...453 Cargo ...182 Center Mounted Stop ...454 Daytime Running ...150 Dimmer Switch, Headlight ...149 Electronic Stability Program (ESP) Indicator . . 335 Engine Temperature Warning ...201 Exterior ...88 Fog ...150,210,453 Headlight Switch ...150 Headlights ...150 High Beam Indicator ...200 Instrument Cluster ...150 License ...454 Lights On Reminder ...150 Low Fuel...
User Guide
Page 20
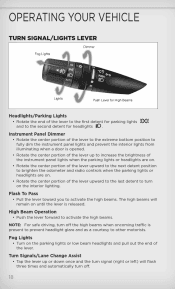
...; Rotate the center portion of the lever up or down once and the turn off the high beams when oncoming traffic is present to prevent headlight glare and as a courtesy to activate the high beams. NOTE: For safe driving, turn on until the lever is released. Fog Lights • Turn on.... Flash To Pass • Pull the lever toward you to brighten the odometer and radio controls when the parking lights or headlights are on the parking lights or low beam headlights and pull out the end of the lever upward to the last detent to turn off . 18 Turn Signals/Lane Change...
...; Rotate the center portion of the lever up or down once and the turn off the high beams when oncoming traffic is present to prevent headlight glare and as a courtesy to activate the high beams. NOTE: For safe driving, turn on until the lever is released. Fog Lights • Turn on.... Flash To Pass • Pull the lever toward you to brighten the odometer and radio controls when the parking lights or headlights are on the parking lights or low beam headlights and pull out the end of the lever upward to the last detent to turn off . 18 Turn Signals/Lane Change...
User Guide
Page 100
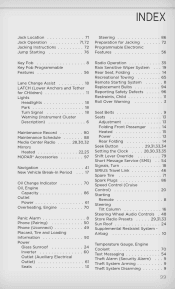
... ...86 Cruise Control (Speed Control) . 20 Cruise Light ...20 Customer Assistance ...95 Defects, Reporting ...96 Dimmer Control ...18 Dimmer Switch, Headlight ...18 Disarming, Theft System ...9 Electronic Speed Control (Cruise Control) ...20 Electronic Vehicle Information Center (EVIC) ...55,56 Electronics Your Vehicle's ...Rear Seat ...14 Freeing A Stuck Vehicle ...81 Front Heated Seats ...15 Fuel Specifications ...86 Garage Door Opener (HomeLink®) ...57 Headlights ...18 Dimmer Switch ...18 High Beam ...18 Heated Mirrors ...22,23 Heated Seats ...15 High Beam/Low Beam Select (Dimmer) Switch ...
... ...86 Cruise Control (Speed Control) . 20 Cruise Light ...20 Customer Assistance ...95 Defects, Reporting ...96 Dimmer Control ...18 Dimmer Switch, Headlight ...18 Disarming, Theft System ...9 Electronic Speed Control (Cruise Control) ...20 Electronic Vehicle Information Center (EVIC) ...55,56 Electronics Your Vehicle's ...Rear Seat ...14 Freeing A Stuck Vehicle ...81 Front Heated Seats ...15 Fuel Specifications ...86 Garage Door Opener (HomeLink®) ...57 Headlights ...18 Dimmer Switch ...18 High Beam ...18 Heated Mirrors ...22,23 Heated Seats ...15 High Beam/Low Beam Select (Dimmer) Switch ...
User Guide
Page 101
Mirrors Heated ...MOPAR® Accessories ...90 ...88 ...28,30,32 ...22,23 ...97 Steering ...86 Preparation for CHildren) ...11 Lights Headlights ...18 Park ...18 Turn Signal ...18 Warning (Instrument Cluster Description) ...6 Maintenance Record . Navigation ...41 New Vehicle Break-In Period ...17 Oil Change Indicator ...70 Oil, ...
Mirrors Heated ...MOPAR® Accessories ...90 ...88 ...28,30,32 ...22,23 ...97 Steering ...86 Preparation for CHildren) ...11 Lights Headlights ...18 Park ...18 Turn Signal ...18 Warning (Instrument Cluster Description) ...6 Maintenance Record . Navigation ...41 New Vehicle Break-In Period ...17 Oil Change Indicator ...70 Oil, ...

