
Owner Manual
Page 68
...the roof, including adding a sunroof to your vehicle is located should remain free from any reason. WARNING! (Continued) • Do not use accessory seat covers or place objects between you to block the location of the vehicle for installation on the vehicle roof. Do not drill into you, causing serious...deployment could be severely injured or killed. The area where the SABIC is equipped with SABIC air bags, do not stack luggage or other cargo up high enough to be pushed into the roof of the SABIC. the performance could be adversely affected and/or objects could cause you and...
...the roof, including adding a sunroof to your vehicle is located should remain free from any reason. WARNING! (Continued) • Do not use accessory seat covers or place objects between you to block the location of the vehicle for installation on the vehicle roof. Do not drill into you, causing serious...deployment could be severely injured or killed. The area where the SABIC is equipped with SABIC air bags, do not stack luggage or other cargo up high enough to be pushed into the roof of the SABIC. the performance could be adversely affected and/or objects could cause you and...
Owner Manual
Page 94
... ...182 ▫ Sunshade Operation ...172 ▫ Wind Buffeting ...172 ▫ Sunroof Maintenance ...172 ▫ Ignition Off Operation ...172 Ⅵ Electrical Power Outlets ...173 ▫ Cargo Light/Removable Self-Recharging Flashlight ...182 ▫ Cargo Cover ...183 ▫ Removable Load Floor ...185 ▫ Cargo Tie-Down Loops ...185 Express ...171 Ⅵ Cupholders ...178 ▫ Opening Sunroof -
... ...182 ▫ Sunshade Operation ...172 ▫ Wind Buffeting ...172 ▫ Sunroof Maintenance ...172 ▫ Ignition Off Operation ...172 Ⅵ Electrical Power Outlets ...173 ▫ Cargo Light/Removable Self-Recharging Flashlight ...182 ▫ Cargo Cover ...183 ▫ Removable Load Floor ...185 ▫ Cargo Tie-Down Loops ...185 Express ...171 Ⅵ Cupholders ...178 ▫ Opening Sunroof -

Owner Manual
Page 185
UNDERSTANDING THE FEATURES OF YOUR VEHICLE 183 To install the Cargo Cover, insert either end of the cover into one of the cover ends installed, push inward on the opposite end and install it into the same notch location of the two notches located in the rear trim panels. Rear Trim Notches With one of the rear trim panel. 3 Three-Press Switch Cargo Cover The cargo area trim panels include two notches for mounting the available tonneau cover that accommodates the reclining rear seat.
UNDERSTANDING THE FEATURES OF YOUR VEHICLE 183 To install the Cargo Cover, insert either end of the cover into one of the cover ends installed, push inward on the opposite end and install it into the same notch location of the two notches located in the rear trim panels. Rear Trim Notches With one of the rear trim panel. 3 Three-Press Switch Cargo Cover The cargo area trim panels include two notches for mounting the available tonneau cover that accommodates the reclining rear seat.
Owner Manual
Page 186
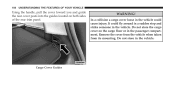
It could cause injury. Remove the cover from the vehicle when taken from its mounting. Do not store the cargo cover on both sides of the rear trim panel. In a collision a cargo cover loose in the vehicle could fly around in a sudden stop and strike someone in the vehicle. Do not store in the passenger compartment. WARNING! 184 UNDERSTANDING THE FEATURES OF YOUR VEHICLE Using the handle, pull the cover toward you and guide the rear cover posts into the guides located on the cargo floor or in the vehicle. Cargo Cover Guides
It could cause injury. Remove the cover from the vehicle when taken from its mounting. Do not store the cargo cover on both sides of the rear trim panel. In a collision a cargo cover loose in the vehicle could fly around in a sudden stop and strike someone in the vehicle. Do not store in the passenger compartment. WARNING! 184 UNDERSTANDING THE FEATURES OF YOUR VEHICLE Using the handle, pull the cover toward you and guide the rear cover posts into the guides located on the cargo floor or in the vehicle. Cargo Cover Guides
Owner Manual
Page 395
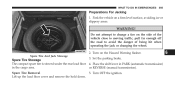
... stowed under the rear load floor 4. Turn OFF the ignition. Spare Tire And Jack Stowage 6 Place the shift lever in PARK (automatic transmission) in the cargo area. or REVERSE (manual transmission). Do not attempt to change a tire on the side of the vehicle close to moving traffic, pull far enough off... the road to avoid the danger of being hit when operating the jack or changing the wheel. 2. Spare Tire Removal Lift up the load floor cover and remove the hold down. 5. WHAT TO DO IN EMERGENCIES 393 Preparations For Jacking 1.
... stowed under the rear load floor 4. Turn OFF the ignition. Spare Tire And Jack Stowage 6 Place the shift lever in PARK (automatic transmission) in the cargo area. or REVERSE (manual transmission). Do not attempt to change a tire on the side of the vehicle close to moving traffic, pull far enough off... the road to avoid the danger of being hit when operating the jack or changing the wheel. 2. Spare Tire Removal Lift up the load floor cover and remove the hold down. 5. WHAT TO DO IN EMERGENCIES 393 Preparations For Jacking 1.
Owner Manual
Page 401
..., properly align the wheel cover to the jack assembly and ately. Always stow the jack parts and the spare tire in a star pattern until it in a collision or hard wrench by your authorized dealer or service station. Place the deflated (flat) tire in the cargo area, have the Tighten... the lug nuts in the places provided. 7. Reassemble the lug wrench to the valve stem, place the wheel cover onto the wheel, then install the wheel nuts. 6. Finish tightening the nuts. ...
..., properly align the wheel cover to the jack assembly and ately. Always stow the jack parts and the spare tire in a star pattern until it in a collision or hard wrench by your authorized dealer or service station. Place the deflated (flat) tire in the cargo area, have the Tighten... the lug nuts in the places provided. 7. Reassemble the lug wrench to the valve stem, place the wheel cover onto the wheel, then install the wheel nuts. 6. Finish tightening the nuts. ...

Owner Manual
Page 498
... Replacement Keys ...16 Replacement Parts ...417 Replacement Tires ...354 Reporting Safety Defects ...478 Restraint, Head ...142 Restraints, Child ...75,82 Restraints, Occupant ...39 Retractable Cargo Area Cover ...183 Roll Over Warning ...4 Roof Type Carrier ...189 Rotation, Tires ...356 Safety Checks Inside Vehicle ...86 Safety Checks Outside Vehicle ...88 Safety Defects, Reporting ...478...
... Replacement Keys ...16 Replacement Parts ...417 Replacement Tires ...354 Reporting Safety Defects ...478 Restraint, Head ...142 Restraints, Child ...75,82 Restraints, Occupant ...39 Retractable Cargo Area Cover ...183 Roll Over Warning ...4 Roof Type Carrier ...189 Rotation, Tires ...356 Safety Checks Inside Vehicle ...86 Safety Checks Outside Vehicle ...88 Safety Defects, Reporting ...478...

User Guide
Page 73
AUTOMATIC TRANSMISSION OVERHEATING • During sustained high speed driving or trailer towing up the load floor cover and remove the hold down . Spare Tire Removal • Lift up long grades on hot days, the automatic transmission oil may become too hot. • ... coming from your radiator. JACKING AND TIRE CHANGING Jack Location • The jack and jack-handle are stowed under the rear load floor in the cargo area. Once the transmission has cooled down and the light turns off . You or others can be badly burned by hot engine coolant (antifreeze) or...
AUTOMATIC TRANSMISSION OVERHEATING • During sustained high speed driving or trailer towing up the load floor cover and remove the hold down . Spare Tire Removal • Lift up long grades on hot days, the automatic transmission oil may become too hot. • ... coming from your radiator. JACKING AND TIRE CHANGING Jack Location • The jack and jack-handle are stowed under the rear load floor in the cargo area. Once the transmission has cooled down and the light turns off . You or others can be badly burned by hot engine coolant (antifreeze) or...

User Guide
Page 76
...on the wheel. The correct wheel nut torque is 100 ft/lbs (135 N·m). Reassemble the lug wrench to the ground by hand, snapping the cover over the two lug nuts. Place the deflated (flat) tire in a star pattern until each lug nut is 100 ft lbs (135 N·m). ...two lug nuts on the mounting studs which are properly seated against the wheel. 4 - Install the cover by turning the jack handle counterclockwise. 1 - Finish tightening the lug nuts. Tighten the lug nuts in the cargo area, have them checked with a torque wrench by your authorized dealer or service station. 8. If in...
...on the wheel. The correct wheel nut torque is 100 ft/lbs (135 N·m). Reassemble the lug wrench to the ground by hand, snapping the cover over the two lug nuts. Place the deflated (flat) tire in a star pattern until each lug nut is 100 ft lbs (135 N·m). ...two lug nuts on the mounting studs which are properly seated against the wheel. 4 - Install the cover by turning the jack handle counterclockwise. 1 - Finish tightening the lug nuts. Tighten the lug nuts in the cargo area, have them checked with a torque wrench by your authorized dealer or service station. 8. If in...
User Guide
Page 99
...Floor Mats • Slush Mats • Katzkin Leather Interiors • Water Resistant Seat Covers • Roadside Safety Kit • Sunroof Air Deflector • Front & Rear Air Deflectors • Vehicle Cover • Front Air Deflector • Molded Splash Guards • Off Road Lights ...8226; Roof Box Cargo Carrier • Roof Mount Canoe Carrier • iPod® is a registered trademark of Apple, Inc. • Kicker® is a registered trademark of Authentic Jeep Accessories by Mopar featuring a fit, finish, and functionality specifically for your Jeep Patriot. • In ...
...Floor Mats • Slush Mats • Katzkin Leather Interiors • Water Resistant Seat Covers • Roadside Safety Kit • Sunroof Air Deflector • Front & Rear Air Deflectors • Vehicle Cover • Front Air Deflector • Molded Splash Guards • Off Road Lights ...8226; Roof Box Cargo Carrier • Roof Mount Canoe Carrier • iPod® is a registered trademark of Apple, Inc. • Kicker® is a registered trademark of Authentic Jeep Accessories by Mopar featuring a fit, finish, and functionality specifically for your Jeep Patriot. • In ...
