
Owner's Manual
Page 49
... Automatic Locking Mode Use the Automatic Locking Mode anytime a child safety Energy Management Feature seat is designed to help reduce the belt 2. This feature is installed in a seating position that is now in the rear seat. The belt will hear a clicking sound. As the belt retracts, you will still retract to...
... Automatic Locking Mode Use the Automatic Locking Mode anytime a child safety Energy Management Feature seat is designed to help reduce the belt 2. This feature is installed in a seating position that is now in the rear seat. The belt will hear a clicking sound. As the belt retracts, you will still retract to...
Owner's Manual
Page 76
... residents, should only be struck by the lap/ shoulder belt. Standards. It could be appropriate for your child site for actly when installing an infant or child restraint. The child could come loose in the front seat may cause severe or fatal injury to the infant. ...sure that it has a label certifying that you will use a Belt Positioning Booster Seat. Chrysler Group LLC also recommends that • Improper installation can lead to Transport Canada's web- http://www.tc.gc.ca/ restraint: roadsafety/safedrivers/childsafety/index.htm • Before buying any restraint...
... residents, should only be struck by the lap/ shoulder belt. Standards. It could be appropriate for your child site for actly when installing an infant or child restraint. The child could come loose in the front seat may cause severe or fatal injury to the infant. ...sure that it has a label certifying that you will use a Belt Positioning Booster Seat. Chrysler Group LLC also recommends that • Improper installation can lead to Transport Canada's web- http://www.tc.gc.ca/ restraint: roadsafety/safedrivers/childsafety/index.htm • Before buying any restraint...

Owner's Manual
Page 77
... it tight if necessary. "Automatic Locking Mode". • In the rear seat, you need it could strike the occupants or seatbacks and Installing Child Restraints Using the Vehicle Seat cause serious personal injury. Both types of belt path of the child restraint and slide the latch plate seatbelts... are • To install a child restraint, first, pull enough of the seat equipped with time, so check retractor. not work when you may vehicle with the &#...
... it tight if necessary. "Automatic Locking Mode". • In the rear seat, you need it could strike the occupants or seatbacks and Installing Child Restraints Using the Vehicle Seat cause serious personal injury. Both types of belt path of the child restraint and slide the latch plate seatbelts... are • To install a child restraint, first, pull enough of the seat equipped with time, so check retractor. not work when you may vehicle with the &#...
Owner's Manual
Page 78
... CHildren (LATCH) again. age system called LATCH, which stands for Lower Children too Large for Booster Seats Anchors and Tether for the installation of the child restraint without comfortably and whose legs are capable of the seat when their back. ing LATCH-compatible child seats having flexible...webbing-mounted lower attachments. A child's squirming or belt several times to wear the shoulder belt provides for CHildren. fixed lower attachments must be installed in a rear seat. The LATCH system Children who are large enough to shorten it. If you still can move the child closer to ...
... CHildren (LATCH) again. age system called LATCH, which stands for Lower Children too Large for Booster Seats Anchors and Tether for the installation of the child restraint without comfortably and whose legs are capable of the seat when their back. ing LATCH-compatible child seats having flexible...webbing-mounted lower attachments. A child's squirming or belt several times to wear the shoulder belt provides for CHildren. fixed lower attachments must be installed in a rear seat. The LATCH system Children who are large enough to shorten it. If you still can move the child closer to ...

Owner's Manual
Page 79
... child restraints in adjacent rear seating positions, you can use the LATCH anchors or the vehicle's seat belt for typical installation instructions. Child restraints having attachments designed to connect to the lower anchorages are now available. In fact, many child restraint... center position. Rear Seat LATCH Child restraints systems having tether straps and hooks for connection to "Installing the Child Restraint System" for the outboard position, but you can only install the child restraints using the vehicle's seat belts. 78 THINGS TO KNOW BEFORE STARTING YOUR VEHICLE...
... child restraints in adjacent rear seating positions, you can use the LATCH anchors or the vehicle's seat belt for typical installation instructions. Child restraints having attachments designed to connect to the lower anchorages are now available. In fact, many child restraint... center position. Rear Seat LATCH Child restraints systems having tether straps and hooks for connection to "Installing the Child Restraint System" for the outboard position, but you can only install the child restraints using the vehicle's seat belts. 78 THINGS TO KNOW BEFORE STARTING YOUR VEHICLE...

Owner's Manual
Page 80
...advantage We urge you are also available for behind the child restraint and out of the available attachments provided with a hook and means for adjusting installing the child restraint, buckle the seat belt so the the tension in the vehicle that before with a tether strap with your manufacturer when... installing your child restraint. stow the seat belt out of the reach of tucking the seat belt products. If the buckled seat belt interferes with child...
...advantage We urge you are also available for behind the child restraint and out of the available attachments provided with a hook and means for adjusting installing the child restraint, buckle the seat belt so the the tension in the vehicle that before with a tether strap with your manufacturer when... installing your child restraint. stow the seat belt out of the reach of tucking the seat belt products. If the buckled seat belt interferes with child...
Owner's Manual
Page 81
... anchor position directly behind the child seat to the child. WARNING! Not all three straps as we have described here. The tether strap should be installed as you push the child restraint rearward and downward into the seat. An incorrectly anchored tether strap could lead to increased head motion and possible... lower and tether straps so that come with the child restraint system. Rear Seat Tether Anchors NOTE: If your child restraint seat is not LATCHcompatible, install the restraint using the vehicle seat belts.
... anchor position directly behind the child seat to the child. WARNING! Not all three straps as we have described here. The tether strap should be installed as you push the child restraint rearward and downward into the seat. An incorrectly anchored tether strap could lead to increased head motion and possible... lower and tether straps so that come with the child restraint system. Rear Seat Tether Anchors NOTE: If your child restraint seat is not LATCHcompatible, install the restraint using the vehicle seat belts.

Owner's Manual
Page 82
... Procedures" in "Maintaining Your VePets should be avoided. 2 AREA. OILS MUST NEVER BE USED. THINGS TO KNOW BEFORE STARTING YOUR VEHICLE 81 The engine oil installed in . preted as an indication of operation. Wide-open throttle acceleration in low gear can be detrimental and should be thrown about and possibly injured...
... Procedures" in "Maintaining Your VePets should be avoided. 2 AREA. OILS MUST NEVER BE USED. THINGS TO KNOW BEFORE STARTING YOUR VEHICLE 81 The engine oil installed in . preted as an indication of operation. Wide-open throttle acceleration in low gear can be detrimental and should be thrown about and possibly injured...

Owner's Manual
Page 85
... 84 THINGS TO KNOW BEFORE STARTING YOUR VEHICLE Defroster Check operation by selecting the defrost mode and place the blower control on top of already installed floor mats. You should be properly secured to fit the foot well of your defroster is inoperable. Use only floor mats that leave the ...pedal area unobstructed and that are properly attached to the floor mat fasteners. • Never place or install floor mats or other floor coverings in the vehicle that they cannot slip out of position and interfere with the pedals or impair safe operation...
... 84 THINGS TO KNOW BEFORE STARTING YOUR VEHICLE Defroster Check operation by selecting the defrost mode and place the blower control on top of already installed floor mats. You should be properly secured to fit the foot well of your defroster is inoperable. Use only floor mats that leave the ...pedal area unobstructed and that are properly attached to the floor mat fasteners. • Never place or install floor mats or other floor coverings in the vehicle that they cannot slip out of position and interfere with the pedals or impair safe operation...

Owner's Manual
Page 86
...can cause interference with the brake pedal and accelerator pedal operation causing loss of control of the vehicle. Failure to properly follow floor mat installation or mounting can become trapped under the brake pedal and accelerator pedal causing a loss of vehicle control. • If required, mounting ...posts must be properly installed, if not equipped from the factory. Lights Have someone observe the operation of exterior lights while you work the controls. THINGS TO KNOW...
...can cause interference with the brake pedal and accelerator pedal operation causing loss of control of the vehicle. Failure to properly follow floor mat installation or mounting can become trapped under the brake pedal and accelerator pedal causing a loss of vehicle control. • If required, mounting ...posts must be properly installed, if not equipped from the factory. Lights Have someone observe the operation of exterior lights while you work the controls. THINGS TO KNOW...

Owner's Manual
Page 175
... OF YOUR VEHICLE To operate the flashlight, press the switch once for high, To install the Cargo Cover, insert either end of the cover into one of the cover ends installed, push inward on the opposite end and install it into the same notch location of the two notches located in the rear...
... OF YOUR VEHICLE To operate the flashlight, press the switch once for high, To install the Cargo Cover, insert either end of the cover into one of the cover ends installed, push inward on the opposite end and install it into the same notch location of the two notches located in the rear...

Owner's Manual
Page 177
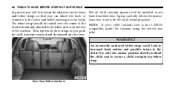
176 UNDERSTANDING THE FEATURES OF YOUR VEHICLE Removable Load Floor Cargo Tie-Down Loops The cargo area load floor is removable and can be There are four D-rings installed in the cargo area for washed with mild soap and water. Cargo Load Floor D-Rings securing cargo.
176 UNDERSTANDING THE FEATURES OF YOUR VEHICLE Removable Load Floor Cargo Tie-Down Loops The cargo area load floor is removable and can be There are four D-rings installed in the cargo area for washed with mild soap and water. Cargo Load Floor D-Rings securing cargo.

Owner's Manual
Page 181
... located at the upper edge of the window. • Keep all objects a safe distance from the window. Failure to follow these cautions can order and install MOPAR crossbars built specifically for this roof rack system. The the seven detent positions, retighten the thumb screws to the heating elements. uniformly distributed over...
... located at the upper edge of the window. • Keep all objects a safe distance from the window. Failure to follow these cautions can order and install MOPAR crossbars built specifically for this roof rack system. The the seven detent positions, retighten the thumb screws to the heating elements. uniformly distributed over...

Owner's Manual
Page 182
... surfboards, or loads with large frontal area should be secured and placed on top of the crossbars, not directly on the roof rack without crossbars installed. If it is placed over the windshield, such as a towing feature. Always distribute heavy loads as evenly as possible and secure the load appropriately. •...
... surfboards, or loads with large frontal area should be secured and placed on top of the crossbars, not directly on the roof rack without crossbars installed. If it is placed over the windshield, such as a towing feature. Always distribute heavy loads as evenly as possible and secure the load appropriately. •...

Owner's Manual
Page 198
... continuously equipped on the vehicle that is illuminated, the sys- type, and/or style. Your vehicle has also been equipped with a of reasons, including the installation of the same size, When the malfunction indicator is not of replacement or TPMS, as damage to indicate when the system is equipped with a TPMS...
... continuously equipped on the vehicle that is illuminated, the sys- type, and/or style. Your vehicle has also been equipped with a of reasons, including the installation of the same size, When the malfunction indicator is not of replacement or TPMS, as damage to indicate when the system is equipped with a TPMS...
Owner's Manual
Page 199
... Electronic Vehicle Information Center (EVIC) in the instrument cluster, warnings such as it is properly reset, or that the door jamb sticker is loose, improperly installed, or damaged, a Vehicle Odometer Messages "gASCAP" message will display: TRIP ODOMETER button to the purchaser the correct mileage that it was before the repair or...
... Electronic Vehicle Information Center (EVIC) in the instrument cluster, warnings such as it is properly reset, or that the door jamb sticker is loose, improperly installed, or damaged, a Vehicle Odometer Messages "gASCAP" message will display: TRIP ODOMETER button to the purchaser the correct mileage that it was before the repair or...

Owner's Manual
Page 254
... device if the AUX jack is Sirius Satellite Pressing the AUX button will display for five seconds (when the ignition is included with the factory-installed satellite 4 TIME Button (Auxiliary Mode) Press this button to change the mode to the one year of day. sports, news, entertainment, and programming for chilNOTE...
... device if the AUX jack is Sirius Satellite Pressing the AUX button will display for five seconds (when the ignition is included with the factory-installed satellite 4 TIME Button (Auxiliary Mode) Press this button to change the mode to the one year of day. sports, news, entertainment, and programming for chilNOTE...

Owner's Manual
Page 264
... position and the radio on, press the SETUP button and scroll using the TUNE/SCROLL control knob until Sirius ID is included with the factory-installed satellite radio system in SAT mode, press the MENU button on the touch screen. The Electronic Serial Number/Sirius Identification ESN/SID Access With REU...
... position and the radio on, press the SETUP button and scroll using the TUNE/SCROLL control knob until Sirius ID is included with the factory-installed satellite radio system in SAT mode, press the MENU button on the touch screen. The Electronic Serial Number/Sirius Identification ESN/SID Access With REU...

Owner's Manual
Page 322
Installation of such equipment should be susceptible to interference caused by qualified professionals. WARNING! This interference can cause possible loss of Anti-Lock braking capability. The ... be the same size and type and tires must be equipped with an optional advanced electronic brake control system that may be performed by improperly installed or high output radio transmitting equipment. ELECTRONIC BRAKE CONTROL SYSTEM Your vehicle may continue to run for the computer.
Installation of such equipment should be susceptible to interference caused by qualified professionals. WARNING! This interference can cause possible loss of Anti-Lock braking capability. The ... be the same size and type and tires must be equipped with an optional advanced electronic brake control system that may be performed by improperly installed or high output radio transmitting equipment. ELECTRONIC BRAKE CONTROL SYSTEM Your vehicle may continue to run for the computer.

Owner's Manual
Page 347
... mph (48 km/h) or for further information. Refer to "Freeing A Stuck Vehicle" in "What To Do In Do not install a wheel cover or attempt to do so could result in mud, sand, snow, or ice conditions, do not take your spare. Do ...not install more than one compact spare tire/wheel on the compact spare wheel, since the wheel is worn to the tread wear... vehicle may result. CAUTION! Damage to your vehicle through an automatic car wash with the compact spare installed. Because of vehicle control.
... mph (48 km/h) or for further information. Refer to "Freeing A Stuck Vehicle" in "What To Do In Do not install a wheel cover or attempt to do so could result in mud, sand, snow, or ice conditions, do not take your spare. Do ...not install more than one compact spare tire/wheel on the compact spare wheel, since the wheel is worn to the tread wear... vehicle may result. CAUTION! Damage to your vehicle through an automatic car wash with the compact spare installed. Because of vehicle control.


