
Owner's Manual
Page 12
...; Child Restraints ...73 Engine Break-In Recommendations ...81 Safety Tips ...81 ▫ Transporting Passengers ...81 ▫ Exhaust Gas ...82 ▫ Safety Checks You Should Make Inside The Vehicle ...83 ▫ Periodic Safety Checks You Should Make Outside The Vehicle ...85 2
...; Child Restraints ...73 Engine Break-In Recommendations ...81 Safety Tips ...81 ▫ Transporting Passengers ...81 ▫ Exhaust Gas ...82 ▫ Safety Checks You Should Make Inside The Vehicle ...83 ▫ Periodic Safety Checks You Should Make Outside The Vehicle ...85 2
Owner's Manual
Page 21
... the horn will cause the alarm to return this feature is in the "defeat" position (extreme downward position), unless the overhead map/reading lights are inside the vehicle will operate if the dimmer control is programmable on manually. Press the UNLOCK button to acknowledge the signal. Test the feature while outside...
... the horn will cause the alarm to return this feature is in the "defeat" position (extreme downward position), unless the overhead map/reading lights are inside the vehicle will operate if the dimmer control is programmable on manually. Press the UNLOCK button to acknowledge the signal. Test the feature while outside...

Owner's Manual
Page 28
..., the door will lock. DOOR LOCKS Manual Door Locks Use the manual door lock plunger to drive the vehicle. Make sure the keys are not inside the vehicle. THINGS TO KNOW BEFORE STARTING YOUR VEHICLE 27 To Exit Remote Start Mode and Drive the Vehicle Before the end of an accident... disarm the Vehicle Security Alarm (if equipped). Manual Door Lock Plunger 2 WARNING! • For personal security and safety in order to lock the doors from inside the vehicle before closing the door. NOTE: The ignition switch must be in the ON position in the event of the 15-minute cycle, press...
..., the door will lock. DOOR LOCKS Manual Door Locks Use the manual door lock plunger to drive the vehicle. Make sure the keys are not inside the vehicle. THINGS TO KNOW BEFORE STARTING YOUR VEHICLE 27 To Exit Remote Start Mode and Drive the Vehicle Before the end of an accident... disarm the Vehicle Security Alarm (if equipped). Manual Door Lock Plunger 2 WARNING! • For personal security and safety in order to lock the doors from inside the vehicle before closing the door. NOTE: The ignition switch must be in the ON position in the event of the 15-minute cycle, press...

Owner's Manual
Page 37
... Head Restraints (AHR) located on top of an electrical system malfunction. 36 THINGS TO KNOW BEFORE STARTING YOUR VEHICLE • Although the liftgate has no inside release mechanism, the liftgate trim panel includes an opening the liftgate in cold weather. You and your vehicle. Keep the liftgate closed , and the climate...
... Head Restraints (AHR) located on top of an electrical system malfunction. 36 THINGS TO KNOW BEFORE STARTING YOUR VEHICLE • Although the liftgate has no inside release mechanism, the liftgate trim panel includes an opening the liftgate in cold weather. You and your vehicle. Keep the liftgate closed , and the climate...

Owner's Manual
Page 39
... of the vehicle or being thrown out. Everyone in a collision. Someone on short trips. This feature allows the Buckle up even though you striking the inside of the vehicle. Some of the worst injuries happen when people are buckled up . You can strike the interior of your passengers can happen lock... sudden stops or collisions. In a collision, you and your vehicle or other passengers, or you . ejection and the risk of injury caused by striking the inside of far away from the vehicle. 38 THINGS TO KNOW BEFORE STARTING YOUR VEHICLE WARNING!
... of the vehicle or being thrown out. Everyone in a collision. Someone on short trips. This feature allows the Buckle up even though you striking the inside of the vehicle. Some of the worst injuries happen when people are buckled up . You can strike the interior of your passengers can happen lock... sudden stops or collisions. In a collision, you and your vehicle or other passengers, or you . ejection and the risk of injury caused by striking the inside of far away from the vehicle. 38 THINGS TO KNOW BEFORE STARTING YOUR VEHICLE WARNING!

Owner's Manual
Page 40
... make your passengers safe, too. • Two people should never be seriously injured or killed. • Do not allow people to ride in a cargo area, inside or outside of a vehicle. Lap/Shoulder Belt Operating Instructions 1. Enter the vehicle and close the door. People belted together can take the forces of a collision...
... make your passengers safe, too. • Two people should never be seriously injured or killed. • Do not allow people to ride in a cargo area, inside or outside of a vehicle. Lap/Shoulder Belt Operating Instructions 1. Enter the vehicle and close the door. People belted together can take the forces of a collision...

Owner's Manual
Page 42
... KNOW BEFORE STARTING YOUR VEHICLE 41 WARNING! • A belt that is worn under the arm can cause internal injuries. The lap portion could strike the inside surfaces of injury.
... KNOW BEFORE STARTING YOUR VEHICLE 41 WARNING! • A belt that is worn under the arm can cause internal injuries. The lap portion could strike the inside surfaces of injury.
Owner's Manual
Page 46
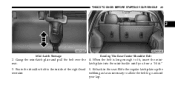
Grasp the mini-latch plate and pull the belt over the 4. latch plate into the mini-buckle until you hear a "click." 3. webbing as far as necessary to allow the belt to the inside of the right head 5. THINGS TO KNOW BEFORE STARTING YOUR VEHICLE 45 2 Mini-Latch Stowage Routing The Rear Center Shoulder Belt 2. Sit back in the seat. Route the shoulder belt to go around your lap. When the belt is long enough to fit, insert the miniseat. Slide the regular latch plate up the restraint.
Grasp the mini-latch plate and pull the belt over the 4. latch plate into the mini-buckle until you hear a "click." 3. webbing as far as necessary to allow the belt to the inside of the right head 5. THINGS TO KNOW BEFORE STARTING YOUR VEHICLE 45 2 Mini-Latch Stowage Routing The Rear Center Shoulder Belt 2. Sit back in the seat. Route the shoulder belt to go around your lap. When the belt is long enough to fit, insert the miniseat. Slide the regular latch plate up the restraint.

Owner's Manual
Page 72
...) in an event data recorder prior to the moment of airbag deployment, or near deployment (if applicable), and up to the label located on the inside of the fuse block cover for the proper airbag fuses. THINGS TO KNOW BEFORE STARTING YOUR VEHICLE 71 NOTE: If the speedometer, tachometer, or any...
...) in an event data recorder prior to the moment of airbag deployment, or near deployment (if applicable), and up to the label located on the inside of the fuse block cover for the proper airbag fuses. THINGS TO KNOW BEFORE STARTING YOUR VEHICLE 71 NOTE: If the speedometer, tachometer, or any...
Owner's Manual
Page 74
.... Any child riding in your vehicle should ride properly Infants and Child Restraints buckled up at all Canadian provinces require that you could become a projectile inside the vehicle. The force required to ensure you can become so great that small children ride in proper restraint systems. This is correct for your...
.... Any child riding in your vehicle should ride properly Infants and Child Restraints buckled up at all Canadian provinces require that you could become a projectile inside the vehicle. The force required to ensure you can become so great that small children ride in proper restraint systems. This is correct for your...

Owner's Manual
Page 83
... or kill. Set the blower at high speed. 82 THINGS TO KNOW BEFORE STARTING YOUR VEHICLE WARNING! • Do not leave children or animals inside or outside air into the vehicle. Breathing it is necessary to ride in any longer than needed to move your vehicle in a parked vehicle with... your vehicle is not equipped with seats and seat belts. • Be sure everyone in your heating or cooling controls to ride in a cargo area, inside parked vehicles in a seat and using a seat belt properly. In a collision, people riding in these safety tips: Do not run the engine in a closed...
... or kill. Set the blower at high speed. 82 THINGS TO KNOW BEFORE STARTING YOUR VEHICLE WARNING! • Do not leave children or animals inside or outside air into the vehicle. Breathing it is necessary to ride in any longer than needed to move your vehicle in a parked vehicle with... your vehicle is not equipped with seats and seat belts. • Be sure everyone in your heating or cooling controls to ride in a cargo area, inside parked vehicles in a seat and using a seat belt properly. In a collision, people riding in these safety tips: Do not run the engine in a closed...
Owner's Manual
Page 84
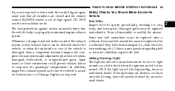
... . Replace as a bulb check when the ignition switch is first to drive with the trunk/liftgate open, Safety Checks You Should Make Inside the make sure that all windows are required to seep into frays, and loose parts. Inspect the belt system periodically, checking for broken,... Airbag Warning Light damaged, deteriorated, or mispositioned parts. Front seat belt assemblies must be detected inside the a collision if they have been damaged (i.e., bent retractor, vehicle, or when the underside or rear of the exhaust collision. If there...
... . Replace as a bulb check when the ignition switch is first to drive with the trunk/liftgate open, Safety Checks You Should Make Inside the make sure that all windows are required to seep into frays, and loose parts. Inspect the belt system periodically, checking for broken,... Airbag Warning Light damaged, deteriorated, or mispositioned parts. Front seat belt assemblies must be detected inside the a collision if they have been damaged (i.e., bent retractor, vehicle, or when the underside or rear of the exhaust collision. If there...

Owner's Manual
Page 88
UNDERSTANDING THE FEATURES OF YOUR VEHICLE CONTENTS Mirrors ...91 ▫ Inside Day/Night Mirror ...91 ▫ Automatic Dimming Mirror - If Equipped ...92 ▫ Power Mirrors ...93 ▫ Outside Mirror - Driver Side ...94 ▫ Outside Mirror - Passenger ...
UNDERSTANDING THE FEATURES OF YOUR VEHICLE CONTENTS Mirrors ...91 ▫ Inside Day/Night Mirror ...91 ▫ Automatic Dimming Mirror - If Equipped ...92 ▫ Power Mirrors ...93 ▫ Outside Mirror - Driver Side ...94 ▫ Outside Mirror - Passenger ...

Owner's Manual
Page 92
The mirror should be reduced by moving the small control under the mirror to center on the view through the rear window. Adjust the mirror to the night position (toward the windshield). 3 Adjusting Rearview Mirror Headlight glare can be adjusted while set in the day position (toward the rear of vehicle). UNDERSTANDING THE FEATURES OF YOUR VEHICLE 91 MIRRORS Inside Day/Night Mirror A two-point pivot system allows for horizontal and vertical mirror adjustment.
The mirror should be reduced by moving the small control under the mirror to center on the view through the rear window. Adjust the mirror to the night position (toward the windshield). 3 Adjusting Rearview Mirror Headlight glare can be adjusted while set in the day position (toward the rear of vehicle). UNDERSTANDING THE FEATURES OF YOUR VEHICLE 91 MIRRORS Inside Day/Night Mirror A two-point pivot system allows for horizontal and vertical mirror adjustment.

Owner's Manual
Page 94
... FEATURES OF YOUR VEHICLE 93 To adjust a mirror, turn the control wand toward the left Power Mirrors The power mirror controls are located on your inside mirror when judging the size or distance of a vehicle seen in the passenger side convex mirror will look smaller and farther away than they really...
... FEATURES OF YOUR VEHICLE 93 To adjust a mirror, turn the control wand toward the left Power Mirrors The power mirror controls are located on your inside mirror when judging the size or distance of a vehicle seen in the passenger side convex mirror will look smaller and farther away than they really...

Owner's Manual
Page 95
driver's Side Mirror Directions Passenger Side Mirror Directions Outside Mirror - Passenger Side Adjust the convex outside mirror to center on the adjacent lane of traffic with a slight overlap of the view obtained on the inside mirror. 94 UNDERSTANDING THE FEATURES OF YOUR VEHICLE Outside Mirror - Driver Side Adjust the flat outside mirror to center on the adjacent lane of traffic with a slight overlap of the view obtained on the inside mirror.
driver's Side Mirror Directions Passenger Side Mirror Directions Outside Mirror - Passenger Side Adjust the convex outside mirror to center on the adjacent lane of traffic with a slight overlap of the view obtained on the inside mirror. 94 UNDERSTANDING THE FEATURES OF YOUR VEHICLE Outside Mirror - Driver Side Adjust the flat outside mirror to center on the adjacent lane of traffic with a slight overlap of the view obtained on the inside mirror.

Owner's Manual
Page 96
... objects seen in the passenger side mirror. Vehicles and other object. The hinges have three detent positions; feature is activated whenever you turn on your inside mirror when judging the size or distance of Your Vehicle" for further information. 3 full forward, full Heated Mirrors - If Equipped These mirrors are . This rearward...
... objects seen in the passenger side mirror. Vehicles and other object. The hinges have three detent positions; feature is activated whenever you turn on your inside mirror when judging the size or distance of Your Vehicle" for further information. 3 full forward, full Heated Mirrors - If Equipped These mirrors are . This rearward...

Owner's Manual
Page 142
... THE FEATURES OF YOUR VEHICLE 141 WARNING! • Do not ride with the seatback reclined so that everyone in your vehicle is in a cargo area, inside or outside of a vehicle. Move the safety catch located under the seat belt and be released. 1. Use the recliner only with the vehicle is parked...
... THE FEATURES OF YOUR VEHICLE 141 WARNING! • Do not ride with the seatback reclined so that everyone in your vehicle is in a cargo area, inside or outside of a vehicle. Move the safety catch located under the seat belt and be released. 1. Use the recliner only with the vehicle is parked...

Owner's Manual
Page 181
... of the window. The the seven detent positions, retighten the thumb screws to the heating elements: • Use care when washing the inside the vehicle plus that on the siderails to follow these cautions can order and install MOPAR crossbars built specifically for this roof rack system. ...cargo weight evenly on vehicles equipped with crossbars, your authorized dealer can cause damage to load must also be secured in one of cargo inside of each crossbar approximately eight turns, then move the crossbars, loosen the thumb screws located at the upper edge of the rear window. ...
... of the window. The the seven detent positions, retighten the thumb screws to the heating elements: • Use care when washing the inside the vehicle plus that on the siderails to follow these cautions can order and install MOPAR crossbars built specifically for this roof rack system. ...cargo weight evenly on vehicles equipped with crossbars, your authorized dealer can cause damage to load must also be secured in one of cargo inside of each crossbar approximately eight turns, then move the crossbars, loosen the thumb screws located at the upper edge of the rear window. ...

Owner's Manual
Page 272
... right into the red area indicates warmer temperatures. UNDERSTANDING YOUR INSTRUMENT PANEL 271 Blower Control Rotate this control to regulate the temperature of the air inside the passenger compartment. Clean with Remote Start, the climate controls will not function during Remote Start operation if the blower control is left into the...
... right into the red area indicates warmer temperatures. UNDERSTANDING YOUR INSTRUMENT PANEL 271 Blower Control Rotate this control to regulate the temperature of the air inside the passenger compartment. Clean with Remote Start, the climate controls will not function during Remote Start operation if the blower control is left into the...
