Owner's Manual
Page 13
Airbag...48 ▫ Event Data Recorder (EDR) ...58 ▫ Child Restraint ...60 Engine Break-In Recommendations ...68 Safety Tips ...69 ▫ Exhaust Gas ...69 ▫ Safety Checks You Should Make Inside The Vehicle ...69 ▫ Periodic Safety Checks You Should Make Outside The Vehicle ...70 2 THINGS TO KNOW BEFORE STARTING YOUR VEHICLE 11 ▫ Enhanced Driver Seat Belt Reminder System (BeltAlert ) ...46 ▫ Seat Belt Extender ...47 ▫ Seat Belts And Pregnant Women ...48 ▫ Driver And Front Passenger Supplemental Restraint System (SRS) -
Airbag...48 ▫ Event Data Recorder (EDR) ...58 ▫ Child Restraint ...60 Engine Break-In Recommendations ...68 Safety Tips ...69 ▫ Exhaust Gas ...69 ▫ Safety Checks You Should Make Inside The Vehicle ...69 ▫ Periodic Safety Checks You Should Make Outside The Vehicle ...70 2 THINGS TO KNOW BEFORE STARTING YOUR VEHICLE 11 ▫ Enhanced Driver Seat Belt Reminder System (BeltAlert ) ...46 ▫ Seat Belt Extender ...47 ▫ Seat Belts And Pregnant Women ...48 ▫ Driver And Front Passenger Supplemental Restraint System (SRS) -
Owner's Manual
Page 24
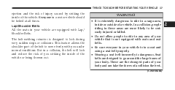
... you want to "Sound Horn with the ignition switch in Section 4. 22 THINGS TO KNOW BEFORE STARTING YOUR VEHICLE 2. Repeat these steps if you are inside the vehicle will cause the horn to 90 seconds when the doors are locked with the RKE transmitter. The time for up to chirp when...
... you want to "Sound Horn with the ignition switch in Section 4. 22 THINGS TO KNOW BEFORE STARTING YOUR VEHICLE 2. Repeat these steps if you are inside the vehicle will cause the horn to 90 seconds when the doors are locked with the RKE transmitter. The time for up to chirp when...

Owner's Manual
Page 28
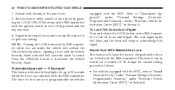
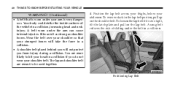
...touching the new batteries with rubbing alcohol. 3. To reassemble the RKE transmitter case, snap the two halves together. Make sure the keys are not inside the vehicle. If you park and leave the vehicle. (Continued) Skin oils may cause battery deterioration. If the plunger is down when the door...you touch a battery, clean it with your fingers. DOOR LOCKS Manual Door Locks Use the manual door lock plunger to lock the doors from inside the vehicle before closing the door. Remove and replace the batteries. 26 THINGS TO KNOW BEFORE STARTING YOUR VEHICLE 2. NOTE: If the RKE ...
...touching the new batteries with rubbing alcohol. 3. To reassemble the RKE transmitter case, snap the two halves together. Make sure the keys are not inside the vehicle. If you park and leave the vehicle. (Continued) Skin oils may cause battery deterioration. If the plunger is down when the door...you touch a battery, clean it with your fingers. DOOR LOCKS Manual Door Locks Use the manual door lock plunger to lock the doors from inside the vehicle before closing the door. Remove and replace the batteries. 26 THINGS TO KNOW BEFORE STARTING YOUR VEHICLE 2. NOTE: If the RKE ...
Owner's Manual
Page 37
... an electrical system malfunction. 2 WARNING! • Driving with one fluid motion. THINGS TO KNOW BEFORE STARTING YOUR VEHICLE 35 • Although the liftgate has no inside release mechanism, the liftgate trim panel includes an opening with a snap-in cap that all windows are closed, and the climate control blower switch is...
... an electrical system malfunction. 2 WARNING! • Driving with one fluid motion. THINGS TO KNOW BEFORE STARTING YOUR VEHICLE 35 • Although the liftgate has no inside release mechanism, the liftgate trim panel includes an opening with a snap-in cap that all windows are closed, and the climate control blower switch is...
Owner's Manual
Page 39
... areas are equipped with Lap/ Shoulder Belts. THINGS TO KNOW BEFORE STARTING YOUR VEHICLE 37 ejection and the risk of injury caused by striking the inside or outside of a vehicle. Lap/Shoulder Belts All the seats in your vehicle that is not equipped with you striking the... is designed to go around the large bones of your body and can take the forces of you under normal conditions. Everyone in a cargo area, inside of your body. These are designed to lock during very sudden stops or collisions. The belt webbing retractor is dangerous. Seat belts are the strongest...
... areas are equipped with Lap/ Shoulder Belts. THINGS TO KNOW BEFORE STARTING YOUR VEHICLE 37 ejection and the risk of injury caused by striking the inside or outside of a vehicle. Lap/Shoulder Belts All the seats in your vehicle that is not equipped with you striking the... is designed to go around the large bones of your body and can take the forces of you under normal conditions. Everyone in a cargo area, inside of your body. These are designed to lock during very sudden stops or collisions. The belt webbing retractor is dangerous. Seat belts are the strongest...
Owner's Manual
Page 42
... in a collision, increasing head and neck injury. Wear the belt over your shoulder so that is worn under your abdomen. Your body could strike the inside surfaces of sliding under the arm can cause internal injuries. To remove slack in the lap belt portion, pull up on the lap belt. Positioning...
... in a collision, increasing head and neck injury. Wear the belt over your shoulder so that is worn under your abdomen. Your body could strike the inside surfaces of sliding under the arm can cause internal injuries. To remove slack in the lap belt portion, pull up on the lap belt. Positioning...

Owner's Manual
Page 45
Routing The Rear Center Shoulder Belt Route the shoulder belt to the inside of the right head restraint. 2 Mini-Latch Stowage 2. THINGS TO KNOW BEFORE STARTING YOUR VEHICLE 43 3. Grasp the mini-latch plate and pull the belt over the seat.
Routing The Rear Center Shoulder Belt Route the shoulder belt to the inside of the right head restraint. 2 Mini-Latch Stowage 2. THINGS TO KNOW BEFORE STARTING YOUR VEHICLE 43 3. Grasp the mini-latch plate and pull the belt over the seat.
Owner's Manual
Page 62
... vehicle should ride properly buckled up at all Canadian provinces require that you could not hold even an infant on your lap could become a missile inside the vehicle. In a collision, an unrestrained child, even a tiny baby, can be prosecuted for the child's size. WARNING! Children 12 years and younger should be...
... vehicle should ride properly buckled up at all Canadian provinces require that you could not hold even an infant on your lap could become a missile inside the vehicle. In a collision, an unrestrained child, even a tiny baby, can be prosecuted for the child's size. WARNING! Children 12 years and younger should be...

Owner's Manual
Page 71
... these safety tips: Do not run the engine in or out of the area. Set the blower at high speed. Safety Checks You Should Make Inside The Vehicle Seat Belts Inspect the belt system periodically, checking for cuts, frays and loose parts. Front seat belt assemblies must be replaced immediately. If...
... these safety tips: Do not run the engine in or out of the area. Set the blower at high speed. Safety Checks You Should Make Inside The Vehicle Seat Belts Inspect the belt system periodically, checking for cuts, frays and loose parts. Front seat belt assemblies must be replaced immediately. If...
Owner's Manual
Page 73
UNDERSTANDING THE FEATURES OF YOUR VEHICLE CONTENTS Mirrors ...75 ▫ Inside Day/Night Mirror ...75 ▫ Automatic Dimming Inside Mirror - If Equipped ...76 ▫ Outside Mirror - Driver's Side ...77 ▫ Outside Mirror - Passenger's Side ...77 ▫ Folding Outside Mirrors - If Equipped ...78 ▫ Power ...
UNDERSTANDING THE FEATURES OF YOUR VEHICLE CONTENTS Mirrors ...75 ▫ Inside Day/Night Mirror ...75 ▫ Automatic Dimming Inside Mirror - If Equipped ...76 ▫ Outside Mirror - Driver's Side ...77 ▫ Outside Mirror - Passenger's Side ...77 ▫ Folding Outside Mirrors - If Equipped ...78 ▫ Power ...

Owner's Manual
Page 77
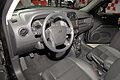
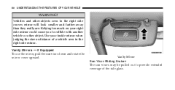
The mirror should be reduced by moving the small control under the mirror to center on the view through the rear window. Adjust the mirror to the night position (toward the windshield). 3 Adjusting Rearview Mirror Headlight glare can be adjusted while set in the day position (toward the rear of vehicle). UNDERSTANDING THE FEATURES OF YOUR VEHICLE 75 MIRRORS Inside Day/Night Mirror A two-point pivot system allows for horizontal and vertical mirror adjustment.
The mirror should be reduced by moving the small control under the mirror to center on the view through the rear window. Adjust the mirror to the night position (toward the windshield). 3 Adjusting Rearview Mirror Headlight glare can be adjusted while set in the day position (toward the rear of vehicle). UNDERSTANDING THE FEATURES OF YOUR VEHICLE 75 MIRRORS Inside Day/Night Mirror A two-point pivot system allows for horizontal and vertical mirror adjustment.

Owner's Manual
Page 78
You can turn the feature on or off by pressing the button at the base of the mirror. Apply the solution onto a clean cloth and wipe the mirror clean. 76 UNDERSTANDING THE FEATURES OF YOUR VEHICLE Automatic Dimming Inside Mirror - If Equipped This mirror automatically adjusts for headlight glare from vehicles behind you. CAUTION! To avoid damage to indicate when the dimming feature is activated. A light next to the button will illuminate to the mirror during cleaning, never spray any cleaning solution directly onto the mirror. Automatic Dimming Mirror
You can turn the feature on or off by pressing the button at the base of the mirror. Apply the solution onto a clean cloth and wipe the mirror clean. 76 UNDERSTANDING THE FEATURES OF YOUR VEHICLE Automatic Dimming Inside Mirror - If Equipped This mirror automatically adjusts for headlight glare from vehicles behind you. CAUTION! To avoid damage to indicate when the dimming feature is activated. A light next to the button will illuminate to the mirror during cleaning, never spray any cleaning solution directly onto the mirror. Automatic Dimming Mirror

Owner's Manual
Page 79
UNDERSTANDING THE FEATURES OF YOUR VEHICLE 77 Outside Mirror - Driver's Side Adjust the flat (drivers side) outside mirror to center on the adjacent lane of traffic with a slight overlap of the view obtained on the inside mirror. Outside Mirror - Passenger's Side Adjust the convex (passengers side) outside mirror to center on the adjacent lane of traffic with a slight overlap of the view obtained on the inside mirror. 3 Drivers Side Mirror Directions Passenger Side Mirror Directions
UNDERSTANDING THE FEATURES OF YOUR VEHICLE 77 Outside Mirror - Driver's Side Adjust the flat (drivers side) outside mirror to center on the adjacent lane of traffic with a slight overlap of the view obtained on the inside mirror. Outside Mirror - Passenger's Side Adjust the convex (passengers side) outside mirror to center on the adjacent lane of traffic with a slight overlap of the view obtained on the inside mirror. 3 Drivers Side Mirror Directions Passenger Side Mirror Directions
Owner's Manual
Page 80
... and normal. Vehicles and other object. The hinges have three detent positions; 78 UNDERSTANDING THE FEATURES OF YOUR VEHICLE WARNING! Relying too much on your inside mirror when judging the size or distance of a vehicle seen in the passenger side convex mirror will look smaller and farther away than they really...
... and normal. Vehicles and other object. The hinges have three detent positions; 78 UNDERSTANDING THE FEATURES OF YOUR VEHICLE WARNING! Relying too much on your inside mirror when judging the size or distance of a vehicle seen in the passenger side convex mirror will look smaller and farther away than they really...
Owner's Manual
Page 82
... are. Vanity Mirrors - If Equipped To use the mirror, pull the sun visor down and rotate the mirror cover upward. Relying too much on your inside mirror when judging the size or distance of the side glass. Vehicles and other object. 80 UNDERSTANDING THE FEATURES OF YOUR VEHICLE WARNING!
... are. Vanity Mirrors - If Equipped To use the mirror, pull the sun visor down and rotate the mirror cover upward. Relying too much on your inside mirror when judging the size or distance of the side glass. Vehicles and other object. 80 UNDERSTANDING THE FEATURES OF YOUR VEHICLE WARNING!
Owner's Manual
Page 123
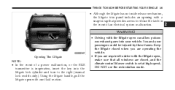
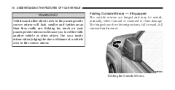
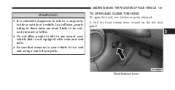
... release lever located on the left kick panel. 3 Hood Release Lever UNDERSTANDING THE FEATURES OF YOUR VEHICLE 121 WARNING! • It is in a cargo area, inside or outside of a vehicle. TO OPEN AND CLOSE THE HOOD To open the hood, two latches must be seriously injured or killed. • Do not...
... release lever located on the left kick panel. 3 Hood Release Lever UNDERSTANDING THE FEATURES OF YOUR VEHICLE 121 WARNING! • It is in a cargo area, inside or outside of a vehicle. TO OPEN AND CLOSE THE HOOD To open the hood, two latches must be seriously injured or killed. • Do not...

Owner's Manual
Page 161
... elements. To prevent excessive battery drain, use , place them in one of the vehicle) as optional equipment. Use care when washing the inside the vehicle, plus the load on both the side rail and the cross rail. Cross rails must be installed prior to prevent damaging the ...order and install Mopar cross rails built specifically for this roof rack system or a number of aftermarket rails that the total occupant and luggage load inside of the vehicle. Use a soft cloth and a mild washing solution, wiping parallel to heating elements. Cross rails must be secured in detent ...
... elements. To prevent excessive battery drain, use , place them in one of the vehicle) as optional equipment. Use care when washing the inside the vehicle, plus the load on both the side rail and the cross rail. Cross rails must be installed prior to prevent damaging the ...order and install Mopar cross rails built specifically for this roof rack system or a number of aftermarket rails that the total occupant and luggage load inside of the vehicle. Use a soft cloth and a mild washing solution, wiping parallel to heating elements. Cross rails must be secured in detent ...

Owner's Manual
Page 247
... or insects. Fabric front fascia protectors may reduce air flow to right. The fan speed increases as you select. The blue area of the air inside the passenger compartment. UNDERSTANDING YOUR INSTRUMENT PANEL 245 NOTE: For maximum airflow to the rear seat passengers, the center instrument panel outlets can be aimed...
... or insects. Fabric front fascia protectors may reduce air flow to right. The fan speed increases as you select. The blue area of the air inside the passenger compartment. UNDERSTANDING YOUR INSTRUMENT PANEL 245 NOTE: For maximum airflow to the rear seat passengers, the center instrument panel outlets can be aimed...

Owner's Manual
Page 248
... weather. For maximum defogging, select the Outside Air position. Air Conditioning (A/C) A/C Operation Use this button to fog on the inside because of the air inside the vehicle. 246 UNDERSTANDING YOUR INSTRUMENT PANEL Circulation Control Use this button to choose between outside odors, smoke, or dust and ...to cool the interior rapidly upon initial start up inside air stuffy and window fogging may make the inside the vehicle. NOTE: Continuous use of the recirculate mode may occur. Extended use the recirculate mode to achieve...
... weather. For maximum defogging, select the Outside Air position. Air Conditioning (A/C) A/C Operation Use this button to fog on the inside because of the air inside the vehicle. 246 UNDERSTANDING YOUR INSTRUMENT PANEL Circulation Control Use this button to choose between outside odors, smoke, or dust and ...to cool the interior rapidly upon initial start up inside air stuffy and window fogging may make the inside the vehicle. NOTE: Continuous use of the recirculate mode may occur. Extended use the recirculate mode to achieve...

Owner's Manual
Page 249
The filter will not operate in floor, mix or defrost modes. • See "Circulation Control" in the optional Security Group. it does not filter air inside the passenger compartment. Filter media includes a particle filtration layer. See the maintenance schedule for service. 4 NOTE: • Recirculation Mode will reduce, but not eliminate, diesel ...
The filter will not operate in floor, mix or defrost modes. • See "Circulation Control" in the optional Security Group. it does not filter air inside the passenger compartment. Filter media includes a particle filtration layer. See the maintenance schedule for service. 4 NOTE: • Recirculation Mode will reduce, but not eliminate, diesel ...
