Owner's Manual
Page 24
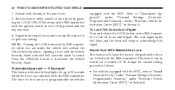
... vehicle by pressing the LOCK/UNLOCK buttons on the RKE transmitter to lock all doors and liftgate. Illuminated Approach - If Equipped This feature activates the headlights for this feature to "Sound Horn with the RKE transmitter. To Lock The Doors And Liftgate Press and release the LOCK button on the RKE...
... vehicle by pressing the LOCK/UNLOCK buttons on the RKE transmitter to lock all doors and liftgate. Illuminated Approach - If Equipped This feature activates the headlights for this feature to "Sound Horn with the RKE transmitter. To Lock The Doors And Liftgate Press and release the LOCK button on the RKE...
Owner's Manual
Page 26
... rules and with the ignition switch in the vehicle will pulse on and off the Panic Alarm by pressing the LOCK/UNLOCK buttons on , the headlights and park lights will flash, the horn will activate the Vehicle Security Alarm. Repeat these steps if you are in the LOCK position and the...
... rules and with the ignition switch in the vehicle will pulse on and off the Panic Alarm by pressing the LOCK/UNLOCK buttons on , the headlights and park lights will flash, the horn will activate the Vehicle Security Alarm. Repeat these steps if you are in the LOCK position and the...
Owner's Manual
Page 74
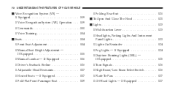
...; Fold-Flat Front Passenger Seat ...119 ▫ Folding Rear Seat ...120 To Open And Close The Hood ...121 Lights ...123 ▫ Multifunction Lever ...123 ▫ Headlights, Parking Lights And Instrument Panel Lights ...123 ▫ Lights-On Reminder ...124 ▫ Fog Lights - If Equipped ...124 ▫ Daytime Running Lights (DRL) - If Equipped...
...; Fold-Flat Front Passenger Seat ...119 ▫ Folding Rear Seat ...120 To Open And Close The Hood ...121 Lights ...123 ▫ Multifunction Lever ...123 ▫ Headlights, Parking Lights And Instrument Panel Lights ...123 ▫ Lights-On Reminder ...124 ▫ Fog Lights - If Equipped ...124 ▫ Daytime Running Lights (DRL) - If Equipped...

Owner's Manual
Page 77
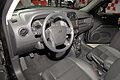
The mirror should be reduced by moving the small control under the mirror to center on the view through the rear window. Headlight glare can be adjusted while set in the day position (toward the rear of vehicle). UNDERSTANDING THE FEATURES OF YOUR VEHICLE 75 MIRRORS Inside Day/Night Mirror A two-point pivot system allows for horizontal and vertical mirror adjustment. Adjust the mirror to the night position (toward the windshield). 3 Adjusting Rearview Mirror
The mirror should be reduced by moving the small control under the mirror to center on the view through the rear window. Headlight glare can be adjusted while set in the day position (toward the rear of vehicle). UNDERSTANDING THE FEATURES OF YOUR VEHICLE 75 MIRRORS Inside Day/Night Mirror A two-point pivot system allows for horizontal and vertical mirror adjustment. Adjust the mirror to the night position (toward the windshield). 3 Adjusting Rearview Mirror

Owner's Manual
Page 78
A light next to the button will illuminate to the mirror during cleaning, never spray any cleaning solution directly onto the mirror. To avoid damage to indicate when the dimming feature is activated. Automatic Dimming Mirror Apply the solution onto a clean cloth and wipe the mirror clean. CAUTION! You can turn the feature on or off by pressing the button at the base of the mirror. 76 UNDERSTANDING THE FEATURES OF YOUR VEHICLE Automatic Dimming Inside Mirror - If Equipped This mirror automatically adjusts for headlight glare from vehicles behind you.
A light next to the button will illuminate to the mirror during cleaning, never spray any cleaning solution directly onto the mirror. To avoid damage to indicate when the dimming feature is activated. Automatic Dimming Mirror Apply the solution onto a clean cloth and wipe the mirror clean. CAUTION! You can turn the feature on or off by pressing the button at the base of the mirror. 76 UNDERSTANDING THE FEATURES OF YOUR VEHICLE Automatic Dimming Inside Mirror - If Equipped This mirror automatically adjusts for headlight glare from vehicles behind you.
Owner's Manual
Page 125
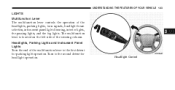
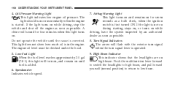
Turn to the first detent for headlight operation. 3 Headlight Control The multifunction lever is located on the left side of the headlights, parking lights, turn signals, headlight beam selection, instrument panel light dimming, interior lights, the passing lights, and the fog lights. UNDERSTANDING THE FEATURES OF YOUR VEHICLE 123 LIGHTS Multifunction Lever The multifunction lever controls the operation of the steering column. Headlights, Parking Lights and Instrument Panel Lights Turn the end of the multifunction lever to the second detent for parking light operation.
Turn to the first detent for headlight operation. 3 Headlight Control The multifunction lever is located on the left side of the headlights, parking lights, turn signals, headlight beam selection, instrument panel light dimming, interior lights, the passing lights, and the fog lights. UNDERSTANDING THE FEATURES OF YOUR VEHICLE 123 LIGHTS Multifunction Lever The multifunction lever controls the operation of the steering column. Headlights, Parking Lights and Instrument Panel Lights Turn the end of the multifunction lever to the second detent for parking light operation.
Owner's Manual
Page 126
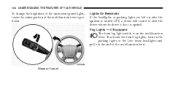
Fog Lights - If Equipped The front fog light switch is on after the ignition is turned OFF, a chime will sound to alert the driver when the driver's door is opened. Lights-On Reminder If the headlights or parking lights are left on the multifunction lever. Dimmer Control 124 UNDERSTANDING THE FEATURES OF YOUR VEHICLE To change the brightness of the instrument panel lights, rotate the center portion of the multifunction lever. To activate the front fog lights, turn on the parking lights or the Low beam headlights and pull out the end of the multifunction lever up or down.
Fog Lights - If Equipped The front fog light switch is on after the ignition is turned OFF, a chime will sound to alert the driver when the driver's door is opened. Lights-On Reminder If the headlights or parking lights are left on the multifunction lever. Dimmer Control 124 UNDERSTANDING THE FEATURES OF YOUR VEHICLE To change the brightness of the instrument panel lights, rotate the center portion of the multifunction lever. To activate the front fog lights, turn on the parking lights or the Low beam headlights and pull out the end of the multifunction lever up or down.
Owner's Manual
Page 127
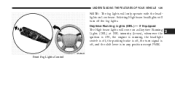
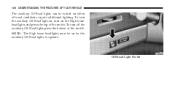
Selecting High beam headlights will turn signal is in any position except PARK. 3 Front Fog Lights Control UNDERSTANDING THE FEATURES OF YOUR VEHICLE 125 NOTE: The fog lights will only operate with the headlights on as Daytime Running Lights (DRL) at DRL intensity (lower), whenever the ignition is ON, the engine is running, the headlight switch is off, the parking brake is off, the turn off , and the shift lever is off the fog lights. Daytime Running Lights (DRL) - If Equipped The High beam lights will come on Low beam.
Selecting High beam headlights will turn signal is in any position except PARK. 3 Front Fog Lights Control UNDERSTANDING THE FEATURES OF YOUR VEHICLE 125 NOTE: The fog lights will only operate with the headlights on as Daytime Running Lights (DRL) at DRL intensity (lower), whenever the ignition is ON, the engine is running, the headlight switch is off, the parking brake is off, the turn off , and the shift lever is off the fog lights. Daytime Running Lights (DRL) - If Equipped The High beam lights will come on Low beam.
Owner's Manual
Page 128
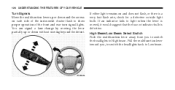
... lever up or down and the arrows on and does not flash, or there is defective. Pull the multifunction lever toward you to switch the headlights to Low beam. High Beam/Low Beam Select Switch Push the multifunction lever away from you , to switch the... headlights back to High beam. You can signal a lane change by moving the lever partially up or down without moving beyond the detent. If an indicator ...
... lever up or down and the arrows on and does not flash, or there is defective. Pull the multifunction lever toward you to switch the headlights to Low beam. High Beam/Low Beam Select Switch Push the multifunction lever away from you , to switch the... headlights back to High beam. You can signal a lane change by moving the lever partially up or down without moving beyond the detent. If an indicator ...

Owner's Manual
Page 129
...seconds for proper operation and use of these auxiliary lights, contact your State Authorities for the next flash-to be covered when operating your headlights by lightly pulling the multifunction lever toward you. Having them illuminated on the front bumper should be illegal in the flash-topass position ...for more than 30 seconds, the High beams will cause the headlights to turn on at High beam and remain on public streets, highways, roads, etc. This will shut off. Off-Road Lights - If Equipped...
...seconds for proper operation and use of these auxiliary lights, contact your State Authorities for the next flash-to be covered when operating your headlights by lightly pulling the multifunction lever toward you. Having them illuminated on the front bumper should be illegal in the flash-topass position ...for more than 30 seconds, the High beams will cause the headlights to turn on at High beam and remain on public streets, highways, roads, etc. This will shut off. Off-Road Lights - If Equipped...
Owner's Manual
Page 130
NOTE: The High beam headlights must be turned on for the auxiliary Off-Road lights to operate. 128 UNDERSTANDING THE FEATURES OF YOUR VEHICLE The auxiliary Off-Road lights can be on when off the auxiliary Off-Road lights press the bottom of the switch. To turn on the High beam headlights and press the top of the switch. Off-Road Light Switch To turn the auxiliary Off-Road light on, turn off -road conditions require additional lighting.
NOTE: The High beam headlights must be turned on for the auxiliary Off-Road lights to operate. 128 UNDERSTANDING THE FEATURES OF YOUR VEHICLE The auxiliary Off-Road lights can be on when off the auxiliary Off-Road lights press the bottom of the switch. To turn on the High beam headlights and press the top of the switch. Off-Road Light Switch To turn the auxiliary Off-Road light on, turn off -road conditions require additional lighting.
Owner's Manual
Page 170
...cause is first turned ON. Speedometer Indicates vehicle speed. 7. The light should turn signal lever is started. Push the multifunction lever forward to switch the headlights to high beam, and pull toward yourself (normal position) to return to low beam. If the light turns on high beam. High Beam Indicator ...This indicator shows that the headlights are on while driving, stop the vehicle and shut off the engine as soon as possible. This light does not show how much oil is...
...cause is first turned ON. Speedometer Indicates vehicle speed. 7. The light should turn signal lever is started. Push the multifunction lever forward to switch the headlights to high beam, and pull toward yourself (normal position) to return to low beam. If the light turns on high beam. High Beam Indicator ...This indicator shows that the headlights are on while driving, stop the vehicle and shut off the engine as soon as possible. This light does not show how much oil is...

Owner's Manual
Page 182
... an engine oil change interval may fluctuate dependent upon your personal driving style. The engine oil change indicator system is equipped with a single chime) • Headlights On • Key In Ignition • Check TPM System Engine Oil Change Indicator System Oil Change Required Your vehicle is duty-cycle based, which means...
... an engine oil change interval may fluctuate dependent upon your personal driving style. The engine oil change indicator system is equipped with a single chime) • Headlights On • Key In Ignition • Check TPM System Engine Oil Change Indicator System Oil Change Required Your vehicle is duty-cycle based, which means...

Owner's Manual
Page 187
...this feature is selected the driver can choose to make your selection. Press and hold the EVIC button when in the AUTO position, the headlights will turn on approximately 10 seconds after the wipers are turned on during the daytime causes the instrument panel lights to make your selection. ... Remote Key Lock When ON is selected, a short horn sound will occur when the RKE transmitter LOCK button is pressed. NOTE: Turning the headlights on . UNDERSTANDING YOUR INSTRUMENT PANEL 185 Sound Horn with Remote Key Lock When ON is selected, the front and rear turn signals will flash ...
...this feature is selected the driver can choose to make your selection. Press and hold the EVIC button when in the AUTO position, the headlights will turn on approximately 10 seconds after the wipers are turned on during the daytime causes the instrument panel lights to make your selection. ... Remote Key Lock When ON is selected, a short horn sound will occur when the RKE transmitter LOCK button is pressed. NOTE: Turning the headlights on . UNDERSTANDING YOUR INSTRUMENT PANEL 185 Sound Horn with Remote Key Lock When ON is selected, the front and rear turn signals will flash ...

Owner's Manual
Page 188
... compass variance should be properly set , the compass will be changed between Magnetic North and Geographic North. Illuminated Approach When this feature is selected the headlights will activate and remain on for up to 60 minutes after the ignition switch has been turned OFF. Display English or Metric The EVIC, odometer...
... compass variance should be properly set , the compass will be changed between Magnetic North and Geographic North. Illuminated Approach When this feature is selected the headlights will activate and remain on for up to 60 minutes after the ignition switch has been turned OFF. Display English or Metric The EVIC, odometer...
Owner's Manual
Page 394
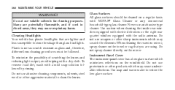
.... Instrument Panel Cover The instrument panel cover has a low glare surface which may cause respiratory harm. Cleaning Headlights Your vehicle has plastic headlights that you are lighter and less susceptible to stone breakage than glass headlights. To remove road dirt, wash with MOPAR Glass Cleaner or any commercial household-type glass cleaner. Many...
.... Instrument Panel Cover The instrument panel cover has a low glare surface which may cause respiratory harm. Cleaning Headlights Your vehicle has plastic headlights that you are lighter and less susceptible to stone breakage than glass headlights. To remove road dirt, wash with MOPAR Glass Cleaner or any commercial household-type glass cleaner. Many...
Owner's Manual
Page 399
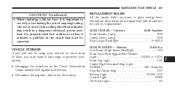
... the mini-fuse in the Power Distribution Center labeled IOD (Ignition Off-Draw). • Disconnect the negative cable from the battery. Low Beam/High Beam Headlight ...H13 Front Park/Turn Signal/Side Marker Light ...3157AK or 3157A Front Fog Light ...9145 Center High Mounted Stop Light (CHMSL) ...LED Assembly Rear Tail...
... the mini-fuse in the Power Distribution Center labeled IOD (Ignition Off-Draw). • Disconnect the negative cable from the battery. Low Beam/High Beam Headlight ...H13 Front Park/Turn Signal/Side Marker Light ...3157AK or 3157A Front Fog Light ...9145 Center High Mounted Stop Light (CHMSL) ...LED Assembly Rear Tail...

Owner's Manual
Page 400
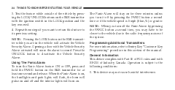
398 MAINTAINING YOUR VEHICLE BULB REPLACEMENT Headlamps 1. Reach into engine compartment and pull red lock out at connector. Raise the hood and locate the connector behind the headlight. 2.
398 MAINTAINING YOUR VEHICLE BULB REPLACEMENT Headlamps 1. Reach into engine compartment and pull red lock out at connector. Raise the hood and locate the connector behind the headlight. 2.

Owner's Manual
Page 441
... Data Recorder, Event ...58 Dealer Service ...369 Defroster, Rear Window ...158 Defroster, Windshield ...70,244 Delay (Intermittent) Wipers ...131 Diagnostic System, Onboard ...366 Dimmer Switch, Headlight ...126 Dipsticks Power Steering ...286 Disposal Antifreeze (Engine Coolant) ...382 Engine Oil ...371 Door Locks ...26 Door Locks, Automatic ...28 Door Opener, Garage ...136 Downshifting...
... Data Recorder, Event ...58 Dealer Service ...369 Defroster, Rear Window ...158 Defroster, Windshield ...70,244 Delay (Intermittent) Wipers ...131 Diagnostic System, Onboard ...366 Dimmer Switch, Headlight ...126 Dipsticks Power Steering ...286 Disposal Antifreeze (Engine Coolant) ...382 Engine Oil ...371 Door Locks ...26 Door Locks, Automatic ...28 Door Opener, Garage ...136 Downshifting...
Owner's Manual
Page 444
... Rating ...335,337 Hands-Free Phone (UConnect ) ...81 Hazard Driving Through Flowing, Rising, or Shallow Standing Water ...267 Hazard Warning Flasher ...350 Head Restraints ...117 Headlights ...398 Cleaning ...392 High Beam ...126 High Beam/Low Beam Select Switch ...126 Passing ...127 Replacing ...398 Switch ...123 Heated Seats ...117 Hill Descent Control...
... Rating ...335,337 Hands-Free Phone (UConnect ) ...81 Hazard Driving Through Flowing, Rising, or Shallow Standing Water ...267 Hazard Warning Flasher ...350 Head Restraints ...117 Headlights ...398 Cleaning ...392 High Beam ...126 High Beam/Low Beam Select Switch ...126 Passing ...127 Replacing ...398 Switch ...123 Heated Seats ...117 Hill Descent Control...

