Owner's Manual
Page 140
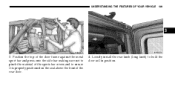
UNDERSTANDING THE FEATURES OF YOUR VEHICLE 139 3 3. Loosely install the rear knob (long knob) to ensure it is properly positioned on the seal above the front of the rear door. 4. Position the top of the door frame against the metal sport bar and press onto the side bar making sure not to pinch the material of the sports bar covers and to hold the door rail in position.
UNDERSTANDING THE FEATURES OF YOUR VEHICLE 139 3 3. Loosely install the rear knob (long knob) to ensure it is properly positioned on the seal above the front of the rear door. 4. Position the top of the door frame against the metal sport bar and press onto the side bar making sure not to pinch the material of the sports bar covers and to hold the door rail in position.
Owner's Manual
Page 141
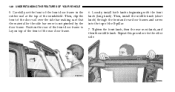
Then, install the middle knob (short knob) through the front and rear door frames and screw into the top of the door rail over the side bar making sure that the material for the other side. Loosely install both knobs beginning with the front knob (long knob). Repeat ...this procedure for the side bar cover is not pinched by the door frame. Then, clip the front of...
Then, install the middle knob (short knob) through the front and rear door frames and screw into the top of the door rail over the side bar making sure that the material for the other side. Loosely install both knobs beginning with the front knob (long knob). Repeat ...this procedure for the side bar cover is not pinched by the door frame. Then, clip the front of...

Owner's Manual
Page 151
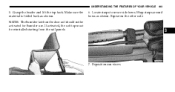
150 UNDERSTANDING THE FEATURES OF YOUR VEHICLE 14. Unlatch the side bows from both door rails (Sunrider Models Only). Make sure the plastic sleeves are slid forward over the Sunrider link (Sunrider Models Only). 15.
150 UNDERSTANDING THE FEATURES OF YOUR VEHICLE 14. Unlatch the side bows from both door rails (Sunrider Models Only). Make sure the plastic sleeves are slid forward over the Sunrider link (Sunrider Models Only). 15.

Owner's Manual
Page 152
Before lowering the top, open the swing gate to prevent possible damage to "Door Frame" in this prevents damage to the front of the vehicle. This will keep any 19. Refer to the rear center high-mounted brake lamp. ... it toward the rear of the vehicle. Move to the soft top material. 3 18. portion of the top from flapping outside of the vehicle. Remove door frames, if desired. Tuck the fabric and the check straps between the bows and as far inward as possible. When the top is completely down...
Before lowering the top, open the swing gate to prevent possible damage to "Door Frame" in this prevents damage to the front of the vehicle. This will keep any 19. Refer to the rear center high-mounted brake lamp. ... it toward the rear of the vehicle. Move to the soft top material. 3 18. portion of the top from flapping outside of the vehicle. Remove door frames, if desired. Tuck the fabric and the check straps between the bows and as far inward as possible. When the top is completely down...

Owner's Manual
Page 156
.... 3 Open the header latches and engage the hook on the interior side of the rail. To be properly located, the bracket must only be clipped to the door rails (Sunrider Models Only). 7. Then, rotate it rearward and over the channel until it snaps onto the exterior part of the body channel. UNDERSTANDING THE...
.... 3 Open the header latches and engage the hook on the interior side of the rail. To be properly located, the bracket must only be clipped to the door rails (Sunrider Models Only). 7. Then, rotate it rearward and over the channel until it snaps onto the exterior part of the body channel. UNDERSTANDING THE...
Owner's Manual
Page 164
Make sure the material is folded back as shown. Locate straps to secure side bows. Repeat on the door rail should not be reinstalled starting from the sail panels. 6. NOTE: The Sunrider latch on the other side. 3 7. If activated, the soft top must be activated for Sunrider use. Reposition sun visors. Grasp the header and lift the top back. Wrap straps around bows as shown. UNDERSTANDING THE FEATURES OF YOUR VEHICLE 163 5.
Make sure the material is folded back as shown. Locate straps to secure side bows. Repeat on the door rail should not be reinstalled starting from the sail panels. 6. NOTE: The Sunrider latch on the other side. 3 7. If activated, the soft top must be activated for Sunrider use. Reposition sun visors. Grasp the header and lift the top back. Wrap straps around bows as shown. UNDERSTANDING THE FEATURES OF YOUR VEHICLE 163 5.

Owner's Manual
Page 165
... other side. Slide plastic sleeve rearward over Sunrider link. 6. Grasp the front header and pull to the operation of the rear door, place finger up into door frame slots. Tuck drip rail retainers into the cutout in the plastic retainer and pull down, rolling both the front and rear retainers out of the... FEATURES OF YOUR VEHICLE To Close 1. Repeat this on the windshield frame, close latches, and return sun visor's to the side. 3. Remove straps from the door rail prior to the front of the vehicle. Unclip and move sun visors to their original position. 5.
... other side. Slide plastic sleeve rearward over Sunrider link. 6. Grasp the front header and pull to the operation of the rear door, place finger up into door frame slots. Tuck drip rail retainers into the cutout in the plastic retainer and pull down, rolling both the front and rear retainers out of the... FEATURES OF YOUR VEHICLE To Close 1. Repeat this on the windshield frame, close latches, and return sun visor's to the side. 3. Remove straps from the door rail prior to the front of the vehicle. Unclip and move sun visors to their original position. 5.


