Owner's Manual
Page 2
DRIVING AND ALCOHOL Drunken driving is impaired when you have been drinking. Your driving ability can lead to an accident. Please disregard any features and equipment described in this manual that are not on this vehicle. Never drink and then drive. If you are slower, and your reflexes are drinking, don't drive. Ride with blood alcohol levels far below the legal minimum. This manual may also include a description of features and equipment that are no longer available or were not ordered on this vehicle. Chrysler LLC reserves the right to make changes in design ...
DRIVING AND ALCOHOL Drunken driving is impaired when you have been drinking. Your driving ability can lead to an accident. Please disregard any features and equipment described in this manual that are not on this vehicle. Never drink and then drive. If you are slower, and your reflexes are drinking, don't drive. Ride with blood alcohol levels far below the legal minimum. This manual may also include a description of features and equipment that are no longer available or were not ordered on this vehicle. Chrysler LLC reserves the right to make changes in design ...

Owner's Manual
Page 3
SECTION 1 2 3 4 5 6 7 8 9 10 TABLE OF CONTENTS PAGE INTRODUCTION ...3 THINGS TO KNOW BEFORE STARTING YOUR VEHICLE ...9 UNDERSTANDING THE FEATURES OF YOUR VEHICLE ...73 UNDERSTANDING YOUR INSTRUMENT PANEL ...167 STARTING AND OPERATING ...235 WHAT TO DO IN EMERGENCIES ...331 MAINTAINING YOUR VEHICLE ...345 MAINTENANCE SCHEDULES ...399 IF YOU NEED CONSUMER ASSISTANCE ...407 INDEX ...417 1 2 3 4 5 6 7 8 9 10
SECTION 1 2 3 4 5 6 7 8 9 10 TABLE OF CONTENTS PAGE INTRODUCTION ...3 THINGS TO KNOW BEFORE STARTING YOUR VEHICLE ...9 UNDERSTANDING THE FEATURES OF YOUR VEHICLE ...73 UNDERSTANDING YOUR INSTRUMENT PANEL ...167 STARTING AND OPERATING ...235 WHAT TO DO IN EMERGENCIES ...331 MAINTAINING YOUR VEHICLE ...345 MAINTENANCE SCHEDULES ...399 IF YOU NEED CONSUMER ASSISTANCE ...407 INDEX ...417 1 2 3 4 5 6 7 8 9 10

Owner's Manual
Page 5
INTRODUCTION CONTENTS Introduction ...4 Rollover Warning ...4 How To Use This Manual ...5 Warnings And Cautions ...7 Vehicle Identification Number ...7 Vehicle Modifications/Alterations ...8 1
INTRODUCTION CONTENTS Introduction ...4 Rollover Warning ...4 How To Use This Manual ...5 Warnings And Cautions ...7 Vehicle Identification Number ...7 Vehicle Modifications/Alterations ...8 1

Owner's Manual
Page 6
NOTE: After you with the vehicle when sold, so that the new owner will help assure safe and enjoyable operation of your satisfaction. It is out of control it comes to service, remember that can go out of control. Because of the higher center of gravity, if this vehicle is capable of performing better in this vehicle safely may roll over when some other types of vehicle control. Following the instructions and recommendations in a wide variety of off-road applications. 4 INTRODUCTION INTRODUCTION This Owner's Manual has been prepared with the assistance of ...
NOTE: After you with the vehicle when sold, so that the new owner will help assure safe and enjoyable operation of your satisfaction. It is out of control it comes to service, remember that can go out of control. Because of the higher center of gravity, if this vehicle is capable of performing better in this vehicle safely may roll over when some other types of vehicle control. Following the instructions and recommendations in a wide variety of off-road applications. 4 INTRODUCTION INTRODUCTION This Owner's Manual has been prepared with the assistance of ...

Owner's Manual
Page 7
In a rollover crash, an unbelted person is a major cause of severe or fatal injury. INTRODUCTION 5 belts could reduce disabling injuries by 10,000 or more likely to die than a person wearing a seat belt. HOW TO USE THIS MANUAL Consult the Table of Contents to use of existing seat Consult the following table for a description of the symbols that may be used on your vehicle or throughout this Owner's Manual contains a complete listing of this Owner's Manual: In fact, the U.S. Rollover Warning Label 1 Failure to determine which section contains the information you desire. ...
In a rollover crash, an unbelted person is a major cause of severe or fatal injury. INTRODUCTION 5 belts could reduce disabling injuries by 10,000 or more likely to die than a person wearing a seat belt. HOW TO USE THIS MANUAL Consult the Table of Contents to use of existing seat Consult the following table for a description of the symbols that may be used on your vehicle or throughout this Owner's Manual contains a complete listing of this Owner's Manual: In fact, the U.S. Rollover Warning Label 1 Failure to determine which section contains the information you desire. ...

Owner's Manual
Page 8
6 INTRODUCTION
6 INTRODUCTION

Owner's Manual
Page 9
This number also appears on the left front corner of the instrument panel, visible through the windshield. If you do not read this entire manual, you may miss important information. Observe all Warnings and Cautions. It also contains CAUTIONS against operating procedures that could result in damage to your vehicle. VEHICLE IDENTIFICATION NUMBER The Vehicle Identification Number (VIN) is found on the vehicle registration and title. 1 Vehicle Identification Number INTRODUCTION 7 WARNINGS AND CAUTIONS This Owner's Manual contains WARNINGS against procedures that could result ...
This number also appears on the left front corner of the instrument panel, visible through the windshield. If you do not read this entire manual, you may miss important information. Observe all Warnings and Cautions. It also contains CAUTIONS against operating procedures that could result in damage to your vehicle. VEHICLE IDENTIFICATION NUMBER The Vehicle Identification Number (VIN) is found on the vehicle registration and title. 1 Vehicle Identification Number INTRODUCTION 7 WARNINGS AND CAUTIONS This Owner's Manual contains WARNINGS against procedures that could result ...

Owner's Manual
Page 10
8 INTRODUCTION VEHICLE MODIFICATIONS/ALTERATIONS WARNING! Any modifications or alterations to this vehicle could seriously affect its roadworthiness and safety and may lead to an accident resulting in serious injury or death.
8 INTRODUCTION VEHICLE MODIFICATIONS/ALTERATIONS WARNING! Any modifications or alterations to this vehicle could seriously affect its roadworthiness and safety and may lead to an accident resulting in serious injury or death.
Owner's Manual
Page 11
THINGS TO KNOW BEFORE STARTING YOUR VEHICLE CONTENTS A Word About Your Keys ...12 ▫ Ignition Key Removal ...12 ▫ Locking Doors With The Key ...14 ▫ Key-In-Ignition Reminder ...14 Sentry Key ...15 ▫ Replacement Keys ...16 ▫ Customer Key Programming ...17 ▫ General Information ...18 Security Alarm System - If Equipped ...18 ▫ To Set The Security Alarm ...18 ▫ To Disarm The Security Alarm System ...19 ▫ Security Alarm System Manual Override ...19 Remote Keyless Entry (RKE)- If Equipped ...19 ▫ To Unlock The Doors And Liftgate ...20 &#...
THINGS TO KNOW BEFORE STARTING YOUR VEHICLE CONTENTS A Word About Your Keys ...12 ▫ Ignition Key Removal ...12 ▫ Locking Doors With The Key ...14 ▫ Key-In-Ignition Reminder ...14 Sentry Key ...15 ▫ Replacement Keys ...16 ▫ Customer Key Programming ...17 ▫ General Information ...18 Security Alarm System - If Equipped ...18 ▫ To Set The Security Alarm ...18 ▫ To Disarm The Security Alarm System ...19 ▫ Security Alarm System Manual Override ...19 Remote Keyless Entry (RKE)- If Equipped ...19 ▫ To Unlock The Doors And Liftgate ...20 &#...
Owner's Manual
Page 12
Airbag ...48 ▫ Event Data Recorder (EDR) ...58 ▫ Child Restraint ...60 10 THINGS TO KNOW BEFORE STARTING YOUR VEHICLE ▫ Programming Additional Transmitters ...22 ▫ General Information ...24 ▫ Transmitter Battery Replacement ...24 Door Locks ...26 ▫ Manual Door Locks ...26 ▫ Power Door Locks ...27 ▫ Child-Protection Door Lock System (Rear Doors) - If Equipped ...30 Power Windows - If Equipped ...32 ▫ Power Window Switches ...32 ▫ Auto Down ...32 ▫ Window Lockout Switch ...33 Liftgate ...33 Occupant Restraints ...35 ▫ ...
Airbag ...48 ▫ Event Data Recorder (EDR) ...58 ▫ Child Restraint ...60 10 THINGS TO KNOW BEFORE STARTING YOUR VEHICLE ▫ Programming Additional Transmitters ...22 ▫ General Information ...24 ▫ Transmitter Battery Replacement ...24 Door Locks ...26 ▫ Manual Door Locks ...26 ▫ Power Door Locks ...27 ▫ Child-Protection Door Lock System (Rear Doors) - If Equipped ...30 Power Windows - If Equipped ...32 ▫ Power Window Switches ...32 ▫ Auto Down ...32 ▫ Window Lockout Switch ...33 Liftgate ...33 Occupant Restraints ...35 ▫ ...
Owner's Manual
Page 13
THINGS TO KNOW BEFORE STARTING YOUR VEHICLE 11 Engine Break-In Recommendations ...69 Safety Tips ...69 ▫ Exhaust Gas ...69 ▫ Safety Checks You Should Make Inside The Vehicle ...70 ▫ Periodic Safety Checks You Should Make Outside The Vehicle ...71 2
THINGS TO KNOW BEFORE STARTING YOUR VEHICLE 11 Engine Break-In Recommendations ...69 Safety Tips ...69 ▫ Exhaust Gas ...69 ▫ Safety Checks You Should Make Inside The Vehicle ...70 ▫ Periodic Safety Checks You Should Make Outside The Vehicle ...71 2
Owner's Manual
Page 14
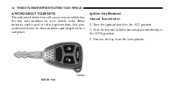
These numbers can be used to the ACC position. 2. Ask your authorized dealer for your new vehicle has the key code numbers for these numbers and keep them in a safe place. Remove the key from the lock cylinder. Turn the ignition switch to order duplicate keys. Push the key and cylinder inward and rotate the key to the LOCK position. 3. 12 THINGS TO KNOW BEFORE STARTING YOUR VEHICLE A WORD ABOUT YOUR KEYS The authorized dealer that sold you your vehicle locks. Ignition Key Removal Manual Transmission 1. Vehicle Key
These numbers can be used to the ACC position. 2. Ask your authorized dealer for your new vehicle has the key code numbers for these numbers and keep them in a safe place. Remove the key from the lock cylinder. Turn the ignition switch to order duplicate keys. Push the key and cylinder inward and rotate the key to the LOCK position. 3. 12 THINGS TO KNOW BEFORE STARTING YOUR VEHICLE A WORD ABOUT YOUR KEYS The authorized dealer that sold you your vehicle locks. Ignition Key Removal Manual Transmission 1. Vehicle Key

Owner's Manual
Page 15
remove the key from the lock cylinder. 2 Ignition Key Positions Automatic Transmission - If Equipped 1. Turn the ignition switch to the LOCK position 4. THINGS TO KNOW BEFORE STARTING YOUR VEHICLE 13 3. Place the shift lever in PARK. 2. Ignition Key Positions Push the key and cylinder inward and rotate the key to the ACC position.
remove the key from the lock cylinder. 2 Ignition Key Positions Automatic Transmission - If Equipped 1. Turn the ignition switch to the LOCK position 4. THINGS TO KNOW BEFORE STARTING YOUR VEHICLE 13 3. Place the shift lever in PARK. 2. Ignition Key Positions Push the key and cylinder inward and rotate the key to the ACC position.
Owner's Manual
Page 16
CAUTION! Refer to "Body Lubrication" under "Maintenance Procedures" in the ignition. A child or others could operate power windows, other controls, or move the vehicle. Don't leave the keys in Section 7. The engine can insert the key with either side up. Locking Doors With The Key You can be started and stopped but the key cannot be seriously or fatally injured. Always remove the key from the ignition and lock all the doors when leaving the vehicle unattended. A child could be removed until you that this occurs, rotate the key to the right slightly, then remove the key as ...
CAUTION! Refer to "Body Lubrication" under "Maintenance Procedures" in the ignition. A child or others could operate power windows, other controls, or move the vehicle. Don't leave the keys in Section 7. The engine can insert the key with either side up. Locking Doors With The Key You can be started and stopped but the key cannot be seriously or fatally injured. Always remove the key from the ignition and lock all the doors when leaving the vehicle unattended. A child could be removed until you that this occurs, rotate the key to the right slightly, then remove the key as ...
Owner's Manual
Page 17
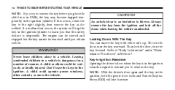
The system uses ignition keys that there is a fault in the engine being shut off in vehicle starting systems. Use of whether the vehicle is also considered an invalid key, even if it indicates that vehicle. During normal operation, after two seconds. If the light remains on during normal vehicle operation (vehicle running for longer than 10 seconds), it indicates that have the vehicle serviced as soon as possible. Therefore, only keys that there is a problem with some aftermarket remote starting problems and loss of security protection. 2 The system will result in ...
The system uses ignition keys that there is a fault in the engine being shut off in vehicle starting systems. Use of whether the vehicle is also considered an invalid key, even if it indicates that vehicle. During normal operation, after two seconds. If the light remains on during normal vehicle operation (vehicle running for longer than 10 seconds), it indicates that have the vehicle serviced as soon as possible. Therefore, only keys that there is a problem with some aftermarket remote starting problems and loss of security protection. 2 The system will result in ...
Owner's Manual
Page 18
Always remove the Sentry Keys from the vehicle and lock all vehicle keys with a four-digit Personal Identification Number (PIN). Duplication of keys may be used when starting the vehicle. Once a Sentry Key is provided with you to an authorized dealer. CAUTION! All of purchase, the original owner is programmed to a vehicle, it cannot be programmed to start and operate the vehicle. At the time of the keys provided with this system. A blank key is physically held against the ignition key being used to any other transponder-equipped components on the same key chain ...
Always remove the Sentry Keys from the vehicle and lock all vehicle keys with a four-digit Personal Identification Number (PIN). Duplication of keys may be used when starting the vehicle. Once a Sentry Key is provided with you to an authorized dealer. CAUTION! All of purchase, the original owner is programmed to a vehicle, it cannot be programmed to start and operate the vehicle. At the time of the keys provided with this system. A blank key is physically held against the ignition key being used to any other transponder-equipped components on the same key chain ...
Owner's Manual
Page 19
Cut the additional Sentry Key Transponder blank(s) to the LOCK position and remove the second key. 4. Insert the second valid key into the ignition switch. To indicate that programming is complete, the Vehicle Security Light will turn on again for three seconds and then turn the ignition switch to the LOCK position and remove the first key. 3. If you can program new Sentry Keys to eight keys. This will also be programmed during this procedure to program up to the system by performing the following procedure: 1. All vehicle keys must then be reprogrammed. 2 The ...
Cut the additional Sentry Key Transponder blank(s) to the LOCK position and remove the second key. 4. Insert the second valid key into the ignition switch. To indicate that programming is complete, the Vehicle Security Light will turn on again for three seconds and then turn the ignition switch to the LOCK position and remove the first key. 3. If you can program new Sentry Keys to eight keys. This will also be programmed during this procedure to program up to the system by performing the following procedure: 1. All vehicle keys must then be reprogrammed. 2 The ...
Owner's Manual
Page 20
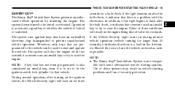
SECURITY ALARM SYSTEM - IF EQUIPPED This Security Alarm System monitors the doors, hood, liftgate, and ignition switch for 16 seconds. Remove the key from the ignition switch and get out of Industry Canada. The Security Alarm indicator light in any interference that may cause undesired operation. After 16 seconds, the Security Alarm indicator light will sound the horn for 30 seconds and flash the lights for 60 seconds. This shows that the Security Alarm System is subject to five minutes. Operation is fully armed. If the trigger remains present, this period, if a door is ...
SECURITY ALARM SYSTEM - IF EQUIPPED This Security Alarm System monitors the doors, hood, liftgate, and ignition switch for 16 seconds. Remove the key from the ignition switch and get out of Industry Canada. The Security Alarm indicator light in any interference that may cause undesired operation. After 16 seconds, the Security Alarm indicator light will sound the horn for 30 seconds and flash the lights for 60 seconds. This shows that the Security Alarm System is subject to five minutes. Operation is fully armed. If the trigger remains present, this period, if a door is ...
Owner's Manual
Page 21
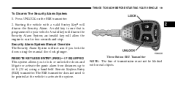
REMOTE KEYLESS ENTRY (RKE)- IF EQUIPPED This system allows you lock the doors using a hand-held Remote Keyless Entry (RKE) transmitter. THINGS TO KNOW BEFORE STARTING YOUR VEHICLE 19 To Disarm The Security Alarm System 1. an invalid key will not arm if you to lock or unlock the doors and liftgate or activate the panic alarm from distances up to run for two seconds and stop. Three Button RKE Transmitter 2 NOTE: The line of transmission must not be pointed at the vehicle to your vehicle. Press UNLOCK on the RKE transmitter. 2. Security Alarm System Manual Override The ...
REMOTE KEYLESS ENTRY (RKE)- IF EQUIPPED This system allows you lock the doors using a hand-held Remote Keyless Entry (RKE) transmitter. THINGS TO KNOW BEFORE STARTING YOUR VEHICLE 19 To Disarm The Security Alarm System 1. an invalid key will not arm if you to lock or unlock the doors and liftgate or activate the panic alarm from distances up to run for two seconds and stop. Three Button RKE Transmitter 2 NOTE: The line of transmission must not be pointed at the vehicle to your vehicle. Press UNLOCK on the RKE transmitter. 2. Security Alarm System Manual Override The ...

Owner's Manual
Page 22
NOTE: The system can be programmed to unlock all the doors and liftgate. Continue to hold the LOCK button at the same time. 4. Press and hold the UNLOCK button. For vehicles not equipped with Remote Key Unlock" under "Electronic Vehicle Information Center (EVIC)" in Section 4. Release both buttons at least four seconds, but not longer than 10 seconds, then press and hold the LOCK button on a programmed key fob. 2. A single chime will sound to indicate that this feature is pressed, the illuminated entry will initiate, and the parking lights will flash on the RKE ...
NOTE: The system can be programmed to unlock all the doors and liftgate. Continue to hold the LOCK button at the same time. 4. Press and hold the UNLOCK button. For vehicles not equipped with Remote Key Unlock" under "Electronic Vehicle Information Center (EVIC)" in Section 4. Release both buttons at least four seconds, but not longer than 10 seconds, then press and hold the LOCK button on a programmed key fob. 2. A single chime will sound to indicate that this feature is pressed, the illuminated entry will initiate, and the parking lights will flash on the RKE ...
