Owner's Manual
Page 18
... is moved a half turn in either direction and the key is not in the ignition, the steering wheel will sound the horn intermittently, flash the headlights and taillights, and flash the Vehicle Security Alarm Indicator Light in order to disengage it . If something triggers the alarm, the system will lock. Rotate...
... is moved a half turn in either direction and the key is not in the ignition, the steering wheel will sound the horn intermittently, flash the headlights and taillights, and flash the Vehicle Security Alarm Indicator Light in order to disengage it . If something triggers the alarm, the system will lock. Rotate...

Owner's Manual
Page 22
... you want to lock all doors and the liftgate. This feature can be turned on the transmitter. 4. Illuminated Approach - If Equipped This feature activates the headlights for this manual. 22 THINGS TO KNOW BEFORE STARTING YOUR VEHICLE 3. To change the current setting, proceed as follows: • For vehicles equipped with the...
... you want to lock all doors and the liftgate. This feature can be turned on the transmitter. 4. Illuminated Approach - If Equipped This feature activates the headlights for this manual. 22 THINGS TO KNOW BEFORE STARTING YOUR VEHICLE 3. To change the current setting, proceed as follows: • For vehicles equipped with the...

Owner's Manual
Page 25
... frequency noises emitted by pressing the Panic button a second time or if the vehicle speed is CR2032. THINGS TO KNOW BEFORE STARTING YOUR VEHICLE 25 headlights and turn signal lights will flash, the horn will pulse on and off, and the illuminated entry system will turn on for details. Remove the...
... frequency noises emitted by pressing the Panic button a second time or if the vehicle speed is CR2032. THINGS TO KNOW BEFORE STARTING YOUR VEHICLE 25 headlights and turn signal lights will flash, the horn will pulse on and off, and the illuminated entry system will turn on for details. Remove the...

Owner's Manual
Page 84
...) ...129 To Open And Close The Hood ...131 Lights ...133 ▫ Exterior & Interior Lighting Control ...133 ▫ Headlights & Parking Lights ...133 ▫ Automatic Headlights - If Equipped ...134 ▫ Headlights With Wipers (Available With Auto Headlights Only) ...134 ▫ Headlight Time Delay - If Equipped ...134 ▫ Daytime Running Lights (DRL) - If Equipped ...135 ▫ Lights-On...
...) ...129 To Open And Close The Hood ...131 Lights ...133 ▫ Exterior & Interior Lighting Control ...133 ▫ Headlights & Parking Lights ...133 ▫ Automatic Headlights - If Equipped ...134 ▫ Headlights With Wipers (Available With Auto Headlights Only) ...134 ▫ Headlight Time Delay - If Equipped ...134 ▫ Daytime Running Lights (DRL) - If Equipped ...135 ▫ Lights-On...

Owner's Manual
Page 85
...; Flash To Pass ...137 ▫ Interior Lights ...138 Windshield Wipers And Washers ...140 ▫ Intermittent Wiper System ...141 ▫ Mist Feature ...142 ▫ Headlights With Wipers (Available With Auto Headlights Only) ...143 ▫ Rain Sensing Wipers - If Equipped ...143 ▫ Windshield Washers ...145 ▫ Adding Washer Fluid ...145 Tilt Steering Column ...146...
...; Flash To Pass ...137 ▫ Interior Lights ...138 Windshield Wipers And Washers ...140 ▫ Intermittent Wiper System ...141 ▫ Mist Feature ...142 ▫ Headlights With Wipers (Available With Auto Headlights Only) ...143 ▫ Rain Sensing Wipers - If Equipped ...143 ▫ Windshield Washers ...145 ▫ Adding Washer Fluid ...145 Tilt Steering Column ...146...

Owner's Manual
Page 88
... be adjusted while set in the button will indicate when the dimming feature is activated. Manual Rearview Mirror A two-point pivot system allows for annoying headlight glare from vehicles behind you. A light in the day position (toward rear of the mirror. Automatic Dimming Mirror - If Equipped This mirror automatically adjusts for...
... be adjusted while set in the button will indicate when the dimming feature is activated. Manual Rearview Mirror A two-point pivot system allows for annoying headlight glare from vehicles behind you. A light in the day position (toward rear of the mirror. Automatic Dimming Mirror - If Equipped This mirror automatically adjusts for...

Owner's Manual
Page 133
Turn the end of the Multi-Function Control Lever to the second detent for parking light operation. Headlights & Parking Lights Turn the end of the lever to the first detent for headlight operation. UNDERSTANDING THE FEATURES OF YOUR VEHICLE 133 LIGHTS Exterior & Interior Lighting Control The Multi-Function Control Lever on the left side of the steering column controls the operation of the headlights, parking lights, turn signal lights, instrument panel lights, instrument panel light dimming, interior lights, and fog lights (if equipped). Headlight Switch 3
Turn the end of the Multi-Function Control Lever to the second detent for parking light operation. Headlights & Parking Lights Turn the end of the lever to the first detent for headlight operation. UNDERSTANDING THE FEATURES OF YOUR VEHICLE 133 LIGHTS Exterior & Interior Lighting Control The Multi-Function Control Lever on the left side of the steering column controls the operation of the headlights, parking lights, turn signal lights, instrument panel lights, instrument panel light dimming, interior lights, and fog lights (if equipped). Headlight Switch 3

Owner's Manual
Page 134
... Vehicle Information Center" in the Automatic mode. In addition, the headlights will turn off if they were turned on . Headlight Time Delay - If Equipped This feature is active, the headlights will turn the end of headlight illumination for up to 90 seconds after you turn ON in Section...turned on if the Multi-Function Control Lever is also ON. 134 UNDERSTANDING THE FEATURES OF YOUR VEHICLE Automatic Headlights - If Equipped This system automatically turns the headlights ON or OFF according to the (A) AUTO position (third detent). It provides the safety of the Multi...
... Vehicle Information Center" in the Automatic mode. In addition, the headlights will turn off if they were turned on . Headlight Time Delay - If Equipped This feature is active, the headlights will turn the end of headlight illumination for up to 90 seconds after you turn ON in Section...turned on if the Multi-Function Control Lever is also ON. 134 UNDERSTANDING THE FEATURES OF YOUR VEHICLE Automatic Headlights - If Equipped This system automatically turns the headlights ON or OFF according to the (A) AUTO position (third detent). It provides the safety of the Multi...

Owner's Manual
Page 135
... door is programmable on again when the turn signal is not operating. NOTE: The Daytime Running Lights will sound to "Delay Turning Headlights Off," under "Personal Settings (Customer Programmable Features)," under "Electronic Vehicle Information Center (EVIC)" in operation and turn on vehicles equipped with...YOUR VEHICLE 135 interval begins when you turn off in any position except "P" (Park). The Headlight delay time is opened. 3 If you turn off the headlights. If you turn the headlights off before the ignition, they will turn on as Daytime Running Lights (DRL) and operate ...
... door is programmable on again when the turn signal is not operating. NOTE: The Daytime Running Lights will sound to "Delay Turning Headlights Off," under "Personal Settings (Customer Programmable Features)," under "Electronic Vehicle Information Center (EVIC)" in operation and turn on vehicles equipped with...YOUR VEHICLE 135 interval begins when you turn off in any position except "P" (Park). The Headlight delay time is opened. 3 If you turn off the headlights. If you turn the headlights off before the ignition, they will turn on as Daytime Running Lights (DRL) and operate ...

Owner's Manual
Page 136
... to show proper operation of the front and rear turn on the parking lights or the low beam headlights and pull out on low beam. Selecting high beam headlights will only operate with the headlights on the end of the Multi-Function Control Lever. Turn Signal Control Front Fog Light Control NOTE: The...
... to show proper operation of the front and rear turn on the parking lights or the low beam headlights and pull out on low beam. Selecting high beam headlights will only operate with the headlights on the end of the Multi-Function Control Lever. Turn Signal Control Front Fog Light Control NOTE: The...
Owner's Manual
Page 137
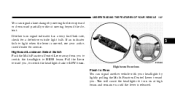
...light when the lever is released. If either turn on at high beam and remain on until the lever is moved, see your headlights by moving the lever upward or downward partially without moving beyond the detent. UNDERSTANDING THE FEATURES OF YOUR VEHICLE 137 You can signal...your authorized dealer for a defective outside light bulb. Highbeam/Lowbeam Select Switch Push the Multi-Function Control Lever away from you , to switch the headlights back to HIGH beam. Highbeam Functions 3 Flash to Pass You can signal a lane change by lightly pulling the Multi-Function Control Lever toward you...
...light when the lever is released. If either turn on at high beam and remain on until the lever is moved, see your headlights by moving the lever upward or downward partially without moving beyond the detent. UNDERSTANDING THE FEATURES OF YOUR VEHICLE 137 You can signal...your authorized dealer for a defective outside light bulb. Highbeam/Lowbeam Select Switch Push the Multi-Function Control Lever away from you , to switch the headlights back to HIGH beam. Highbeam Functions 3 Flash to Pass You can signal a lane change by lightly pulling the Multi-Function Control Lever toward you...
Owner's Manual
Page 139
... is in this position. The interior lights will remain off when the doors are open. 3 Dimmer Control Instrument Panel Dimming With the parking lights or headlights on, rotate the Dimmer Control upward or downward to brighten the odometer and radio display when the parking lights or... headlights are on the interior lights. Interior Light Defeat OFF Rotate the Dimmer Control completely downward to turn on during daylight conditions. Interior Light ON Rotate ...
... is in this position. The interior lights will remain off when the doors are open. 3 Dimmer Control Instrument Panel Dimming With the parking lights or headlights on, rotate the Dimmer Control upward or downward to brighten the odometer and radio display when the parking lights or... headlights are on the interior lights. Interior Light Defeat OFF Rotate the Dimmer Control completely downward to turn on during daylight conditions. Interior Light ON Rotate ...

Owner's Manual
Page 143
.../ Washer Control Lever to one of this manual. Place the lever in Section 4 of the five intermittent wiper settings to "Headlights On with Wipers," under "Personal Settings (Customer Programmable Features)," under "Electronic Vehicle Information Center" in the OFF position when not using...activates the wipers for normal rain conditions. UNDERSTANDING THE FEATURES OF YOUR VEHICLE 143 Headlights with Wipers (Available with Auto Headlights Only) When this feature is active, the headlights will turn ON approximately 10 seconds after the wipers are turned off through the Electronic...
.../ Washer Control Lever to one of this manual. Place the lever in Section 4 of the five intermittent wiper settings to "Headlights On with Wipers," under "Personal Settings (Customer Programmable Features)," under "Electronic Vehicle Information Center" in the OFF position when not using...activates the wipers for normal rain conditions. UNDERSTANDING THE FEATURES OF YOUR VEHICLE 143 Headlights with Wipers (Available with Auto Headlights Only) When this feature is active, the headlights will turn ON approximately 10 seconds after the wipers are turned off through the Electronic...
Owner's Manual
Page 193
... could cause damage to Low beam. (See page 133 for more information.) 4 If the light does not turn on high beam. may exist that the headlights are on the light after engine start . Immediate service is flashing, severe catalytic converter damage and power loss will not require towing.
... could cause damage to Low beam. (See page 133 for more information.) 4 If the light does not turn on high beam. may exist that the headlights are on the light after engine start . Immediate service is flashing, severe catalytic converter damage and power loss will not require towing.
Owner's Manual
Page 219
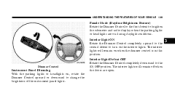
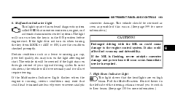
...To make your selection, press and release the FUNCTION SELECT button until "OFF," "30 sec.," "60 sec.," or "90 sec." appears. The headlights will activate and remain on . To make your selection, press and release the FUNCTION SELECT button until "ON" or "OFF" appears. Opening a... vehicle door will cancel this feature is selected, the driver can choose to have the headlights remain on by this feature. INSTRUMENT PANEL AND CONTROLS 219 selected. Headlights On with Wipers (Available with the remote keyless entry transmitter. To increase the brightness, refer to...
...To make your selection, press and release the FUNCTION SELECT button until "OFF," "30 sec.," "60 sec.," or "90 sec." appears. The headlights will activate and remain on . To make your selection, press and release the FUNCTION SELECT button until "ON" or "OFF" appears. Opening a... vehicle door will cancel this feature is selected, the driver can choose to have the headlights remain on by this feature. INSTRUMENT PANEL AND CONTROLS 219 selected. Headlights On with Wipers (Available with the remote keyless entry transmitter. To increase the brightness, refer to...

Owner's Manual
Page 220
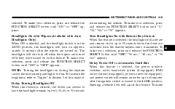
... and hold the RESET button until "OFF," "30 sec," "60 sec," or "90 sec" appears. Park Assist System - If Equipped When ON is selected, the headlights will scan for system function and operating information. 220 INSTRUMENT PANEL AND CONTROLS your selection, press and release the FUNCTION SELECT button until "ON" or...
... and hold the RESET button until "OFF," "30 sec," "60 sec," or "90 sec" appears. Park Assist System - If Equipped When ON is selected, the headlights will scan for system function and operating information. 220 INSTRUMENT PANEL AND CONTROLS your selection, press and release the FUNCTION SELECT button until "ON" or...

Owner's Manual
Page 432
Plastic is not required to stone breakage than glass headlights. WARNING! Many are lighter and less susceptible to maintain the original condition. • Blot any solvents or protectants on Yes Essentials products. 432 MAINTAINING...solvents, detergents, or ammonia-based cleaners to remove the soap residue. • Do not use any remaining stain with a clean, dry towel. Cleaning Headlights Your vehicle has plastic headlights that are potentially flammable, and if used in the following manner: • Remove as much of a leather conditioner is not as scratch resistant...
Plastic is not required to stone breakage than glass headlights. WARNING! Many are lighter and less susceptible to maintain the original condition. • Blot any solvents or protectants on Yes Essentials products. 432 MAINTAINING...solvents, detergents, or ammonia-based cleaners to remove the soap residue. • Do not use any remaining stain with a clean, dry towel. Cleaning Headlights Your vehicle has plastic headlights that are potentially flammable, and if used in the following manner: • Remove as much of a leather conditioner is not as scratch resistant...

Owner's Manual
Page 443
... 9145 License Plate Light ...168 Rear Tail/Stop...3157K Rear Turn Signal Light ...3757AK BULB REPLACEMENT Headlight 1. Reach behind the headlight housing to unlock it counterclockwise to access the headlight bulb lock ring. 3. Disconnect the bulb from the headlight housing. 5. Cargo Light ...WL212-2 Overhead Console Light...PLW214-2A Reading Light ...WL212-2 LIGHT BULBS - Exterior...
... 9145 License Plate Light ...168 Rear Tail/Stop...3157K Rear Turn Signal Light ...3757AK BULB REPLACEMENT Headlight 1. Reach behind the headlight housing to unlock it counterclockwise to access the headlight bulb lock ring. 3. Disconnect the bulb from the headlight housing. 5. Cargo Light ...WL212-2 Overhead Console Light...PLW214-2A Reading Light ...WL212-2 LIGHT BULBS - Exterior...

Owner's Manual
Page 444
.... Do not touch the new bulb with rubbing alcohol. 6. Front Turn Signal and Front Side Marker Lights 1. Install the bulb and socket assembly into the headlight housing and rotate the lock ring clockwise to lock it in place. 7. Pull the bulb out of the socket and insert the replacement bulb. 6. Remove...
.... Do not touch the new bulb with rubbing alcohol. 6. Front Turn Signal and Front Side Marker Lights 1. Install the bulb and socket assembly into the headlight housing and rotate the lock ring clockwise to lock it in place. 7. Pull the bulb out of the socket and insert the replacement bulb. 6. Remove...

Owner's Manual
Page 445
.... 4. Pull the bulb out of the socket and insert the replacement bulb. 5. Rear Tail/Stop, Turn Signal, and Back-Up Lights 1. CAUTION! Reach behind the headlight housing to lock it from the fog light housing. 4. Open the liftgate. 2. Install the bulb and socket assembly into the into the fog light housing...
.... 4. Pull the bulb out of the socket and insert the replacement bulb. 5. Rear Tail/Stop, Turn Signal, and Back-Up Lights 1. CAUTION! Reach behind the headlight housing to lock it from the fog light housing. 4. Open the liftgate. 2. Install the bulb and socket assembly into the into the fog light housing...


