

Owner's Manual
Page 5
Failure to operate this vehicle safely may be equipped with a soft top or optional hard top to give the occupants protection from the weather, these vehicles do not have fully enclosed hard doors. 1 Roll Over Warning Label government notes that the universal use driver and passenger seat belts provided is a major cause of...
Failure to operate this vehicle safely may be equipped with a soft top or optional hard top to give the occupants protection from the weather, these vehicles do not have fully enclosed hard doors. 1 Roll Over Warning Label government notes that the universal use driver and passenger seat belts provided is a major cause of...
Owner's Manual
Page 19
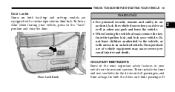
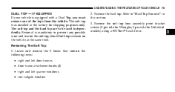
... are equipped with access to the "Lock" position and close the door. THINGS TO KNOW BEFORE STARTING YOUR VEHICLE 19 Door Locks Doors on both hard-top and soft-top models are the restraint systems. These include the front and rear seat belts for the driver and all passengers, and front...
... are equipped with access to the "Lock" position and close the door. THINGS TO KNOW BEFORE STARTING YOUR VEHICLE 19 Door Locks Doors on both hard-top and soft-top models are the restraint systems. These include the front and rear seat belts for the driver and all passengers, and front...

Owner's Manual
Page 51
...™ - If Equipped ...74 Dual Top - If Equipped ...75 ▫ Removing The Soft Top ...75 ▫ Installing The Soft Top ...77 Hard Top ...89 ▫ Hard Top Removal ...90 ▫ Hard Top Installation ...94 Soft Top ...94 ▫ Folding Down The Soft Top ...96 ▫ Putting Up The Soft Top ...103 Soft Top... ...131 Folding Windshield ...132 ▫ Lowering The Windshield And Removing Side Bars ...134 ▫ Raising The Windshield And Replacing Side Bars ...138 Rear Window Features - Hard Top Only ...139 ▫ Rear Window Defogger ...139 ▫ Rear Window Wiper/Washer ...140 3
...™ - If Equipped ...74 Dual Top - If Equipped ...75 ▫ Removing The Soft Top ...75 ▫ Installing The Soft Top ...77 Hard Top ...89 ▫ Hard Top Removal ...90 ▫ Hard Top Installation ...94 Soft Top ...94 ▫ Folding Down The Soft Top ...96 ▫ Putting Up The Soft Top ...103 Soft Top... ...131 Folding Windshield ...132 ▫ Lowering The Windshield And Removing Side Bars ...134 ▫ Raising The Windshield And Replacing Side Bars ...138 Rear Window Features - Hard Top Only ...139 ▫ Rear Window Defogger ...139 ▫ Rear Window Wiper/Washer ...140 3
Owner's Manual
Page 75
... tailgate window 2. Remove the soft top bow assembly pivot bracket screws (2 per side for Wrangler, 1 per side for shipping purposes only. The soft top was installed at the same time. The soft top and the hard top are to "Hard Top Removal" in this section. 3. Removal is equipped with a Dual Top, you must...
... tailgate window 2. Remove the soft top bow assembly pivot bracket screws (2 per side for Wrangler, 1 per side for shipping purposes only. The soft top was installed at the same time. The soft top and the hard top are to "Hard Top Removal" in this section. 3. Removal is equipped with a Dual Top, you must...

Owner's Manual
Page 77
... 2. Refer to "Door Frame" in this section. 3 UNDERSTANDING THE FEATURES OF YOUR VEHICLE 77 Installing the Soft Top NOTE: The following items prior to hard top removal: • right and left door frames • door frame attachment knobs (4) • right and left quarter windows 6. Refer to "Soft... Top" in this section. 1. For future soft top procedures, refer to "Hard Top Removal" in this section. 3. Locate and remove the following procedures are for first time set up only. Install the door frames.
... 2. Refer to "Door Frame" in this section. 3 UNDERSTANDING THE FEATURES OF YOUR VEHICLE 77 Installing the Soft Top NOTE: The following items prior to hard top removal: • right and left door frames • door frame attachment knobs (4) • right and left quarter windows 6. Refer to "Soft... Top" in this section. 1. For future soft top procedures, refer to "Hard Top Removal" in this section. 3. Locate and remove the following procedures are for first time set up only. Install the door frames.

Owner's Manual
Page 89
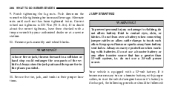
Close the header latches and return the sun visor to carry any additional loads other than environmental (rain, snow, etc.). 3 Also, it 's secure position. UNDERSTANDING THE FEATURES OF YOUR VEHICLE 89 26. HARD TOP CAUTION! • The hard top is not designed to it was not designed as a structural member of the vehicle, and thus cannot properly carry any additional loads such as roof racks, spare tires, building, hunting, or camping supplies, and/or luggage, etc.
Close the header latches and return the sun visor to carry any additional loads other than environmental (rain, snow, etc.). 3 Also, it 's secure position. UNDERSTANDING THE FEATURES OF YOUR VEHICLE 89 26. HARD TOP CAUTION! • The hard top is not designed to it was not designed as a structural member of the vehicle, and thus cannot properly carry any additional loads such as roof racks, spare tires, building, hunting, or camping supplies, and/or luggage, etc.

Owner's Manual
Page 90
Hard Top Removal 1. Unbolt the six Torx head screws which secure the hard top to the windshield frame and bodyside, or fully removed. Do not move them to the side. 2. Fold down the sun visors and move your vehicle until the top has been either fully attached to the vehicle using a #40 Torx head driver. Unlatch the two hard top latches located at the top of the windshield. 3. 90 UNDERSTANDING THE FEATURES OF YOUR VEHICLE CAUTION!
Hard Top Removal 1. Unbolt the six Torx head screws which secure the hard top to the windshield frame and bodyside, or fully removed. Do not move them to the side. 2. Fold down the sun visors and move your vehicle until the top has been either fully attached to the vehicle using a #40 Torx head driver. Unlatch the two hard top latches located at the top of the windshield. 3. 90 UNDERSTANDING THE FEATURES OF YOUR VEHICLE CAUTION!

Owner's Manual
Page 93
... the red latch to disconnect. UNDERSTANDING THE FEATURES OF YOUR VEHICLE 93 8. Disconnect the wire harness from the hard top. 3 9. This will unlock connector tab, allowing the tab to be disconnected from the hard top by pressing the tab at the side of the connector and pulling to the right until you... the latch on one end (right) of the connector. NOTE: If the doors are to be removed, pull the #4 fuse from the vehicle. Remove the hard top from the fuse block to be pressed down and enabling the harness to prevent dome lamp illumination.
... the red latch to disconnect. UNDERSTANDING THE FEATURES OF YOUR VEHICLE 93 8. Disconnect the wire harness from the hard top. 3 9. This will unlock connector tab, allowing the tab to be disconnected from the hard top by pressing the tab at the side of the connector and pulling to the right until you... the latch on one end (right) of the connector. NOTE: If the doors are to be removed, pull the #4 fuse from the vehicle. Remove the hard top from the fuse block to be pressed down and enabling the harness to prevent dome lamp illumination.

Owner's Manual
Page 94
...as roof racks, spare tires, building, hunting, or camping supplies, and/or luggage, etc. Install the hard top using the same steps for damage and replace if necessary. 2. NOTE: The hard top must be positioned properly to carry any additional loads other than environmental (rain, snow, etc.). SOFT... removal in reverse order. Also, it was not designed as a structural member of the hard top. 1. Also, make sure that there is no overhang. 94 UNDERSTANDING THE FEATURES OF YOUR VEHICLE Hard Top Installation NOTE: If the door frames are installed from soft top usage, they must ...
...as roof racks, spare tires, building, hunting, or camping supplies, and/or luggage, etc. Install the hard top using the same steps for damage and replace if necessary. 2. NOTE: The hard top must be positioned properly to carry any additional loads other than environmental (rain, snow, etc.). SOFT... removal in reverse order. Also, it was not designed as a structural member of the hard top. 1. Also, make sure that there is no overhang. 94 UNDERSTANDING THE FEATURES OF YOUR VEHICLE Hard Top Installation NOTE: If the door frames are installed from soft top usage, they must ...

Owner's Manual
Page 100
... bow behind the header and lift top back. 11. NOTE: If your vehicle is equipped with a Dual Top, prevent connector damage by ensuring that the hard top wire harness is folded back and secured to lower the top, wrap the sail panels so that the check straps are clear of the...
... bow behind the header and lift top back. 11. NOTE: If your vehicle is equipped with a Dual Top, prevent connector damage by ensuring that the hard top wire harness is folded back and secured to lower the top, wrap the sail panels so that the check straps are clear of the...

Owner's Manual
Page 134
... your vehicle. 134 UNDERSTANDING THE FEATURES OF YOUR VEHICLE WARNING! Carefully follow these instructions may cause personal injury. Lower the fabric top or remove the hard top following the instructions in some accidents. • If you carefully follow these warnings to help protect against personal injury: • Do not drive your...
... your vehicle. 134 UNDERSTANDING THE FEATURES OF YOUR VEHICLE WARNING! Carefully follow these instructions may cause personal injury. Lower the fabric top or remove the hard top following the instructions in some accidents. • If you carefully follow these warnings to help protect against personal injury: • Do not drive your...

Owner's Manual
Page 139
... battery drain use the defogger only when the engine is on , press the rocker switch. UNDERSTANDING THE FEATURES OF YOUR VEHICLE 139 REAR WINDOW FEATURES - HARD TOP ONLY Rear Window Defogger To turn the rear window defogger on . For five more minutes of operation, depress the top of the rear window...
... battery drain use the defogger only when the engine is on , press the rocker switch. UNDERSTANDING THE FEATURES OF YOUR VEHICLE 139 REAR WINDOW FEATURES - HARD TOP ONLY Rear Window Defogger To turn the rear window defogger on . For five more minutes of operation, depress the top of the rear window...

Owner's Manual
Page 151
... by an authorized dealer. 22. Indicates parking brake is turned on at vehicle start-up. Gallons (7.6L) this manual. 21. If light remains on after hard braking, accelerations, or turns. The system reverts to the shifting of the fuel in the tank. 4 Refer to the ON position. If the parking brake...
... by an authorized dealer. 22. Indicates parking brake is turned on at vehicle start-up. Gallons (7.6L) this manual. 21. If light remains on after hard braking, accelerations, or turns. The system reverts to the shifting of the fuel in the tank. 4 Refer to the ON position. If the parking brake...

Owner's Manual
Page 192
Overdrive Off Switch Begins at a stop in mud, sand, snow, or on steep grades. Will not shift to 3rd. 1 (First) For hard pulling at low speeds. Overdrive can be locked out by reducing excessive shifting and heat buildup. When the indicator light is on, Overdrive is useful ...
Overdrive Off Switch Begins at a stop in mud, sand, snow, or on steep grades. Will not shift to 3rd. 1 (First) For hard pulling at low speeds. Overdrive can be locked out by reducing excessive shifting and heat buildup. When the indicator light is on, Overdrive is useful ...

Owner's Manual
Page 195
... front and rear driveshafts are spinning. Shifting while only the front or rear wheels are intended for normal street and highway conditions such as dry hard surfaced roads. STARTING AND OPERATING 195 Operating Instructions/Precautions The transfer case provides four mode positions - two (rear) wheel drive high range, four ...rear wheels are locked together. NOTE: Do not attempt to these positions. This transfer case is in the 4H and 4L positions on dry hard surfaced roads may cause increased tire wear and damage to overspeed the engine and do not exceed 25 mph (40 km/h). 5
... front and rear driveshafts are spinning. Shifting while only the front or rear wheels are intended for normal street and highway conditions such as dry hard surfaced roads. STARTING AND OPERATING 195 Operating Instructions/Precautions The transfer case provides four mode positions - two (rear) wheel drive high range, four ...rear wheels are locked together. NOTE: Do not attempt to these positions. This transfer case is in the 4H and 4L positions on dry hard surfaced roads may cause increased tire wear and damage to overspeed the engine and do not exceed 25 mph (40 km/h). 5

Owner's Manual
Page 196
WARNING! The parking brake should always be injured if you leave the vehicle unattended with the transfer case in the vehicle. Dry hard surfaced roads. Shift Positions For additional information on each transfer case mode position, see the information below: 2H Position Rear Wheel Drive High Range - Normal ...
WARNING! The parking brake should always be injured if you leave the vehicle unattended with the transfer case in the vehicle. Dry hard surfaced roads. Shift Positions For additional information on each transfer case mode position, see the information below: 2H Position Rear Wheel Drive High Range - Normal ...

Owner's Manual
Page 230
... may be used in your engine. Reformulated Gasoline Many areas of the country require the use of reformulated gasoline. Fuels blended with oxygenates such as hard starting, stalling and hesitations. Reformulated gasoline contains oxygenates, and is not harmful to reduce vehicle emissions and improve air quality. The manufacturer strongly supports the...
... may be used in your engine. Reformulated Gasoline Many areas of the country require the use of reformulated gasoline. Fuels blended with oxygenates such as hard starting, stalling and hesitations. Reformulated gasoline contains oxygenates, and is not harmful to reduce vehicle emissions and improve air quality. The manufacturer strongly supports the...
Owner's Manual
Page 258
... 12-volt system, i.e. Keep open flames or sparks away from battery vent holes. Always stow the jack parts and the spare tire in a collision or hard stop could endanger the occupants of the vehicle. Push down on the wrench while tightening for increased leverage. do not allow cable clamps to contact...
... 12-volt system, i.e. Keep open flames or sparks away from battery vent holes. Always stow the jack parts and the spare tire in a collision or hard stop could endanger the occupants of the vehicle. Push down on the wrench while tightening for increased leverage. do not allow cable clamps to contact...
Owner's Manual
Page 278
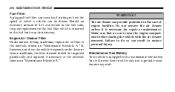
... may be inspected periodically and replaced if necessary at which is periodic maintenance required. 278 MAINTAINING YOUR VEHICLE Fuel Filter A plugged fuel filter can cause hard starting the vehicle with a maintenance-free battery. Engine Air Cleaner Filter Under normal driving conditions, replace the air filter at the intervals shown on "Maintenance...
... may be inspected periodically and replaced if necessary at which is periodic maintenance required. 278 MAINTAINING YOUR VEHICLE Fuel Filter A plugged fuel filter can cause hard starting the vehicle with a maintenance-free battery. Engine Air Cleaner Filter Under normal driving conditions, replace the air filter at the intervals shown on "Maintenance...
Owner's Manual
Page 289
... sure that may result in these areas has not melted or collapsed. Insure nylon tubing in unsatisfactory cooling performance, poor gas mileage, and increased emissions. Hard or soft spots, brittle rubber, cracking, tears, cuts, abrasions, and excessive swelling indicate deterioration of the rubber. Inspect all hose connections such as the exhaust...
... sure that may result in these areas has not melted or collapsed. Insure nylon tubing in unsatisfactory cooling performance, poor gas mileage, and increased emissions. Hard or soft spots, brittle rubber, cracking, tears, cuts, abrasions, and excessive swelling indicate deterioration of the rubber. Inspect all hose connections such as the exhaust...


